I still remember the first time I made a dump cake. It was one of those frantic weeknights where the fridge held nothing but a questionable block of cream cheese, a dusty box of yellow cake mix, and a can of lemon pie filling I bought on a whim. I was skeptical, to say the least. I mean, "dump cake" doesn’t exactly scream culinary sophistication, right? But I was hungry, tired, and in no mood to fuss with layers, sifting, or folding anything with whipped egg whites. I tossed everything into a pan, crossed my fingers, and hoped for the best. What came out of the oven was nothing short of a miracle — a bubbling, golden, tangy-sweet dessert that tasted like sunshine and comfort had a baby. The cream cheese had melted into little pockets of richness, the lemon filling had caramelized at the edges, and the cake mix had formed a buttery, crisp topping that cracked like crème brûlée under my fork. I ate it straight out of the pan, standing at the counter, in complete disbelief that something so easy could taste so ridiculously good.
Since that fateful night, I’ve become a bit of a dump cake evangelist. I’ve made them for potlucks, birthdays, and even a wedding shower (yes, really). And of all the flavor combinations I’ve tried — cherry, peach, blueberry, even pineapple — the lemon cream cheese version remains undefeated. It’s the Beyoncé of dump cakes. The flavor is bright and zingy without being overpowering, the texture is a dreamy contrast of creamy and crunchy, and the whole thing comes together faster than you can say “I forgot to make dessert.” I’ve tweaked this recipe more times than I care to admit, and I can now confidently say: this is the best version you’ll ever make at home. I dare you to taste this and not go back for seconds. Actually, I double dare you.
What makes this version different? For starters, we’re not just dumping and praying. We’re layering with intention. The cream cheese is softened and sweetened with powdered sugar, then dolloped strategically so it melts into creamy puddles instead of rubbery blobs. The lemon pie filling is enhanced with a pinch of salt to amplify its citrusy brightness, and the butter is melted and poured in thin ribbons to ensure every inch of cake mix gets hydrated and crisp. The result is a dessert that looks rustic but tastes refined — like something you’d pay $12 a slice for at a boutique bakery, except you made it in your pajamas with a wooden spoon and a can opener.
And here’s the kicker: it’s foolproof. I’ve made this after two glasses of wine, half-asleep, and even once while on a Zoom call (camera off, obviously). It’s the kind of recipe you can memorize and whip up on a whim, and it never fails to impress. Picture yourself pulling this out of the oven, the whole kitchen smelling like lemon bars and buttery shortbread, your guests already reaching for spoons. Stay with me here — this is worth it.
What Makes This Version Stand Out
This isn’t your grandma’s dump cake — unless your grandma was a flavor genius with a penchant for citrus and a secret stash of cream cheese. Here’s why this version will ruin all other dump cakes for you:
- Balanced Sweetness: Most dump cakes are cloyingly sweet, but the tang of lemon pie filling and the slight salt in the cream cheese layer keep things bright and balanced. It’s like the difference between lemonade and lemon candy — one is refreshing, the other is a sugar assault.
- Creamy Pockets: Instead of just cubing cold cream cheese (which never melts properly), we whip it with powdered sugar and egg. This creates silky, cheesecake-like pockets that stay soft even after baking. It’s like finding treasure in every bite.
- Buttery Crunch: By drizzling melted butter in a zig-zag pattern, we ensure the cake mix turns golden and crisp, not powdery or soggy. The edges get caramelized and crackly — think sugar cookie meets shortbread.
- No Mixer Needed: You don’t even need a whisk. A fork and a little elbow grease are enough to turn cream cheese into a cloud. This is lazy baking at its finest.
- Make-Ahead Magic: You can assemble the whole thing, cover it, and refrigerate for up to 24 hours before baking. Perfect for entertaining or for those nights when you want dessert without the effort.
- Crowd Appeal: Kids love it because it’s sweet. Adults love it because it’s tangy and rich. It’s the rare dessert that works for everyone — even that one friend who claims they “don’t like sweets.”
Alright, let’s break down exactly what goes into this masterpiece — and why each ingredient matters more than you think.
Inside the Ingredient List
The Flavor Base
Let’s start with the star of the show: the lemon pie filling. This is where 90% of your flavor comes from, so don’t skimp. Go for a high-quality brand with real lemon juice and pulp — not the neon-yellow gel that tastes like candy. I’ve tested everything from organic to generic, and trust me, you can taste the difference. The good stuff has a bright, zippy flavor that tastes like sunshine in a can. The cheap stuff? It’s like drinking lemon extract mixed with corn syrup. If you’re feeling fancy, you can even stir in a teaspoon of fresh lemon zest to amplify the citrus punch. Pro tip: use a microplane to zest directly into the can — it catches all the oils and makes the filling smell like a lemon grove in July.
The Texture Crew
Next up: cream cheese. This isn’t just for richness — it’s your texture insurance. When whipped with powdered sugar and an egg, it becomes light and spreadable, almost like a cheesecake batter. The egg helps it set slightly during baking, so you get soft, custardy pockets instead of melted cheese puddles. Make sure it’s at room temperature, or you’ll end up with tiny white flecks that refuse to blend. I’ve tried using mascarpone and even Greek yogurt as swaps, but nothing gives you that tangy richness quite like good old Philadelphia. If you’re dairy-free, you can use a plant-based cream cheese, but pick one that’s high in fat — low-fat versions turn grainy and watery.
The yellow cake mix is your scaffolding. It provides the structure and the sweetness, but it also needs help. Without proper hydration, it stays powdery and dry. That’s where the butter comes in. Melted butter, drizzled slowly, seeps into the mix and creates a crisp, golden crust. I use unsalted butter because the pie filling and cake mix already have plenty of sugar and salt. If all you have is salted, skip the kosher salt in the cream cheese layer. And please — don’t use margarine. It has too much water and not enough fat, which leads to soggy spots.
The Unexpected Star
Here’s the ingredient most people skip: kosher salt. Just a pinch, stirred into the cream cheese mixture, does something magical. It sharpens the lemon, tames the sweetness, and makes the whole dessert taste more sophisticated. It’s like turning the brightness up on a photo — suddenly everything pops. Don’t use table salt; it’s too fine and can make the mixture taste metallic. And don’t skip it unless you want your cake to taste flat and one-dimensional.
The Final Flourish
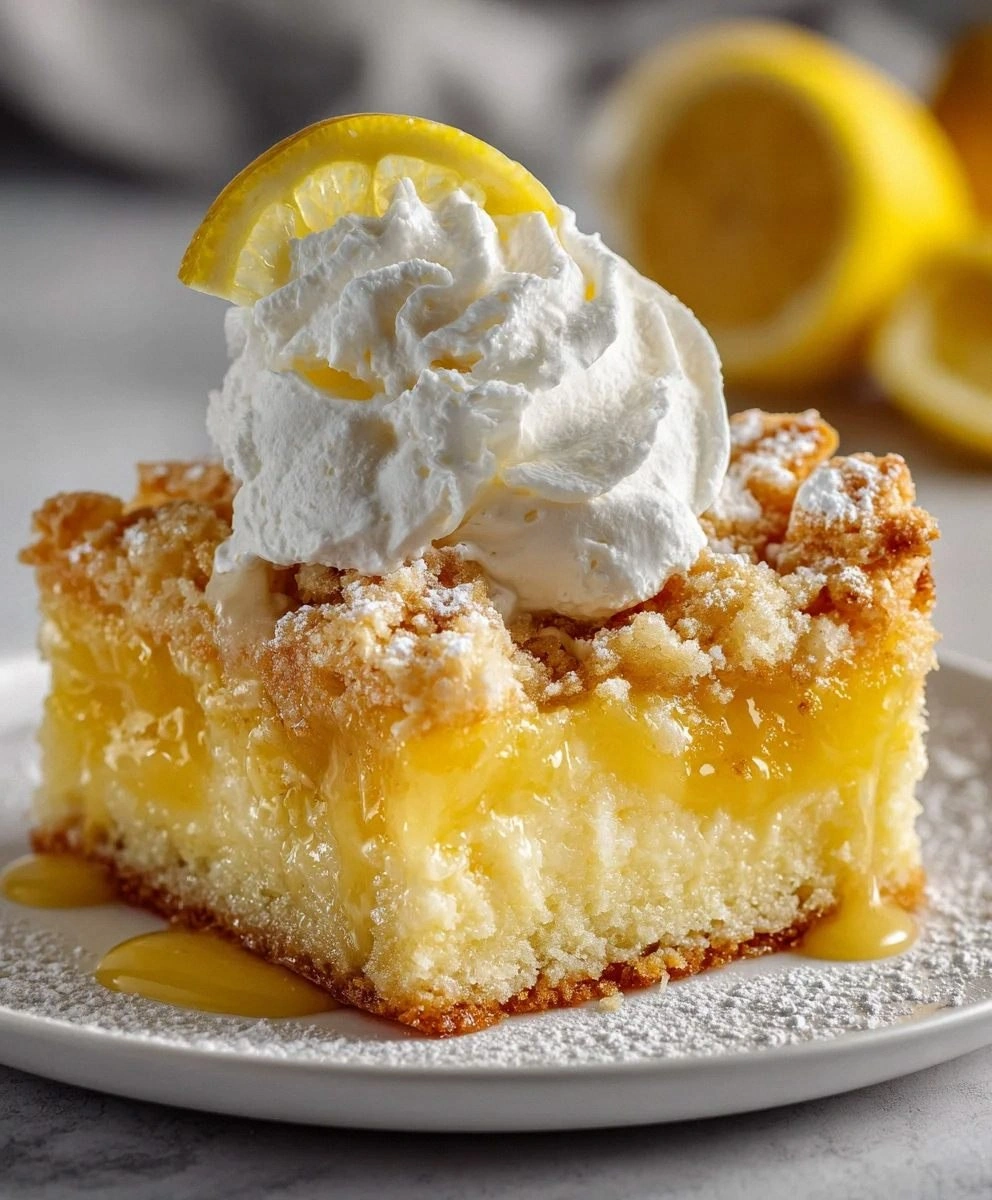
Once baked, this cake is delicious on its own — but add a dollop of whipped cream or a scoop of vanilla ice cream and it becomes transcendent. The cold cream melts into the warm cake, creating a lemon-cream sauce that pools on the plate like a dessert from a Michelin-starred restaurant. I like to use lightly sweetened whipped cream with a splash of vanilla, but if you’re feeling indulgent, go for the ice cream. The contrast of hot and cold, creamy and crunchy, tangy and sweet — it’s what dessert dreams are made of.
Everything’s prepped? Good. Let’s get into the real action...
The Method — Step by Step
- Preheat your oven to 350°F (175°C). Yes, I know every recipe says this, but here’s why it matters: dump cakes rely on even heat to turn powdery cake mix into golden deliciousness. If your oven runs hot, the edges will burn before the center bakes. If it’s too cool, you’ll get a pale, doughy mess. I keep a cheap oven thermometer on the middle rack — best $5 I ever spent. While the oven heats, grease a 9x13-inch baking dish with butter or non-stick spray. Don’t use a smaller dish; the cake needs room to bubble and crisp. And don’t use glass unless you like watching your dessert rise like a volcano — use metal for even browning.
- In a medium bowl, beat the cream cheese with a fork until it looks like fluffy clouds — about 1 minute. Add the powdered sugar, egg, and kosher salt. Keep mixing until it’s smooth and slightly shiny. This is your cheesecake layer, and it should be loose enough to dollop but thick enough to hold its shape. If it looks like icing, you’re there. If it looks like cottage cheese, keep going. This step is crucial: under-mixed cream cheese will bake into rubbery nuggets. Over-mixed will deflate and disappear. You want ribbons, not chunks.
- Open the can of lemon pie filling and give it a gentle stir. Some brands separate, with clear gel on top and fruit on the bottom. You want it homogenous so every bite has that bright, zesty flavor. Pour it into the greased dish and spread it into an even layer. Don’t swirl it up the sides — keep it low and flat. This is your flavor foundation, and it needs to stay put. If you’re feeling fancy, scatter a handful of fresh blueberries or raspberries on top. They’ll burst during baking and add little pops of color and tartness.
- Now for the fun part: dollop the cream cheese mixture over the lemon filling in 12 roughly even blobs. Think of it like dropping cookie dough — you want gaps between so the lemon can peek through. Use two spoons: one to scoop, one to scrape. Don’t spread it flat; the blobs will melt and create pockets of creamy goodness. If you smooth it out, you’ll get a weird lemon-cheese layer that tastes like tangy wallpaper paste. Trust the blobs.
- Rip open the yellow cake mix and sprinkle it evenly over the top. Hold the packet about 6 inches above the dish and shake gently — this prevents clumps. You want a thin, even blanket with no bald spots. If you see a crater, fill it with a pinch of mix. Don’t press it down; leave it loose and fluffy. This is what will turn into your buttery crust. And resist the urge to use butter pecan or spice cake — the lemon needs a neutral backdrop to shine.
- Melt the butter in a small saucepan over low heat until it’s just liquid — no browning. You want it hot enough to pour but not so hot it splatters. Using a spoon, drizzle it in thin ribbons over the cake mix. Start at one corner and zig-zag your way across, then rotate the dish 90° and repeat. The goal is to moisten as much of the surface as possible. Any dry patches will stay powdery and taste like raw flour. If you run out of butter, melt another tablespoon — don’t leave desert islands of mix.
- Slide the dish into the oven and bake for 35 to 40 minutes. Set a timer for 30 minutes and peek through the door. You’re looking for golden edges that pull slightly away from the sides and a center that’s bubbling like hot lava. If the top is still pale, give it another 5 minutes. If it’s browning too fast, tent with foil. The smell should be like lemon bars and buttery shortbread had a party — bright, sweet, and toasty. Don’t walk away; dump cakes can go from perfect to burnt in under 3 minutes.
- Cool for exactly 10 minutes. I know, I know — it smells incredible and you want to dive in. But cooling lets the cream cheese set slightly and the topping crisp up. It’s still warm enough to melt ice cream, but not so hot it scalds your tongue. Serve straight from the dish with a big spoon and zero shame. Add whipped cream or ice cream if you’re feeling fancy, or just eat it standing up in the kitchen like I do. Leftovers (if there are any) keep for 3 days in the fridge — but good luck with that.
That's it — you did it. But hold on, I've got a few more tricks that'll take this to another level...
Insider Tricks for Flawless Results
The Temperature Rule Nobody Follows
Room temperature isn’t just a suggestion — it’s the secret to creamy, not clumpy, cream cheese. I leave the brick on the counter for at least 2 hours before baking. If you’re in a rush, cut it into cubes and spread them on a plate; it softens in 15 minutes. Cold cream cheese will seize when mixed with the egg, giving you tiny white flecks that refuse to melt. And if you microwave it too long, it turns liquid and separates. Aim for soft enough to press with your finger but not melty. Your blobs will thank you.
Why Your Nose Knows Best
Forget timers — your nose is the best kitchen tool you own. When the cake is close to done, your kitchen will smell like buttery shortbread with a hint of lemon zest. If you smell caramel and toasted sugar, you’re 2 minutes away from perfection. If you smell anything sharp or burnt, yank it out immediately. I’ve saved more desserts by sniffing than by staring through the oven door. Trust your senses — they’ve been honed by thousands of years of evolution and countless batches of cookies.
The 5-Minute Rest That Changes Everything
I know it’s tempting to scoop the second it comes out, but waiting 5 minutes lets the cream cheese settle and the topping crisp. It’s the difference between a molten mess and a structured dessert. Plus, the lemon filling thickens slightly, so it doesn’t run all over the plate. If you’re serving guests, use those 5 minutes to whip cream or set out spoons. If you’re alone, use them to pour a glass of cold milk and do a little victory dance.
Creative Twists and Variations
This recipe is a playground. Here are some of my favorite ways to switch things up:
Berry Burst Upgrade
Fold ½ cup fresh raspberries or blueberries into the lemon filling before adding the cream cheese. The berries burst during baking, creating jammy pockets that pair beautifully with the tangy citrus. Use frozen berries if fresh aren’t in season — just don’t thaw them first or they’ll bleed purple streaks.
Coconut Cream Dream
Swap the yellow cake mix for coconut cake mix and sprinkle ½ cup shredded coconut on top before baking. The coconut toasts into golden flakes that taste like tropical vacation. Serve with a scoop of coconut ice cream for extra island vibes.
Peaches & Cream Remix
Use peach pie filling instead of lemon and add ½ teaspoon cinnamon to the cream cheese mixture. It tastes like peach cobbler meets cheesecake. Add a handful of chopped pecans for crunch and serve warm with bourbon whipped cream.
Lemon-Lavender Luxury
Stir ¼ teaspoon culinary lavender into the lemon filling. It sounds fancy, but it’s just dried buds from the baking aisle. The floral note makes the dessert taste like you bought it in a French pâtisserie. A little goes a long way — too much and it tastes like soap.
Chocolate Lemon Swirl
For the brave, drizzle ¼ cup melted dark chocolate over the finished cake. The bitterness of the chocolate plays off the sweet-tart lemon in a way that’s oddly addictive. Use good chocolate — 70% or higher — or it’ll taste like candy.
Individual Mini Trifles
Scoop the warm cake into small glasses and layer with whipped cream and lemon zest. It looks elegant, travels well, and lets everyone feel like they got their own personal dessert. Plus, you can make them ahead and chill — perfect for summer parties.
Storing and Bringing It Back to Life
Fridge Storage
Cover the cooled dish tightly with foil or transfer to an airtight container. It keeps for up to 4 days in the fridge. The topping will soften, but the flavor deepens — almost like lemon cheesecake. I actually like it cold for breakfast with coffee. Don’t judge.
Freezer Friendly
Cut the cooled cake into squares and wrap each in plastic, then foil. Freeze for up to 2 months. Thaw overnight in the fridge, then warm in a 300°F oven for 10 minutes to crisp the topping. It’s not quite fresh-from-the-oven, but it’s close enough to fool your coworkers.
Best Reheating Method
Skip the microwave — it turns the topping gummy. Instead, place a square on a sheet pan and warm in a 300°F oven for 8 minutes. Add a tiny splash of water to the pan before covering with foil; it steams the cake back to life without drying it out. Serve immediately with fresh whipped cream.