Picture this: a cold December evening, the kind where the wind whistles through the trees and your kitchen feels like the coziest refuge in the world. I was halfway through a marathon of holiday movies when a sudden craving hit me like a rogue snowball—intense, unavoidable, and utterly delicious. I grabbed the nearest pan, threw together whatever I could find, and ended up with a batch of cookies that tasted like a hug from a chocolate‑loving hazelnut fairy. That accidental masterpiece sparked a fire, and I’ve been obsessively tweaking the recipe ever since, determined to lock down the perfect balance of crunch, chew, and cocoa‑rich decadence.
The moment those cookies first hit the oven, the whole house was filled with a scent that could convince even the most disciplined dieter to abandon their resolutions. The aroma was a symphony: buttery richness mingling with the earthy whisper of roasted hazelnuts, all underscored by a deep, dark chocolate note that seemed to curl around every breath you took. I could hear the faint sizzle of the butter melting into the sugars, feel the heat radiating from the oven like a warm blanket, and see the dough spreading slowly, forming little golden hills ready to become holiday legends. My taste buds were already doing a happy dance, and I knew I was onto something extraordinary.
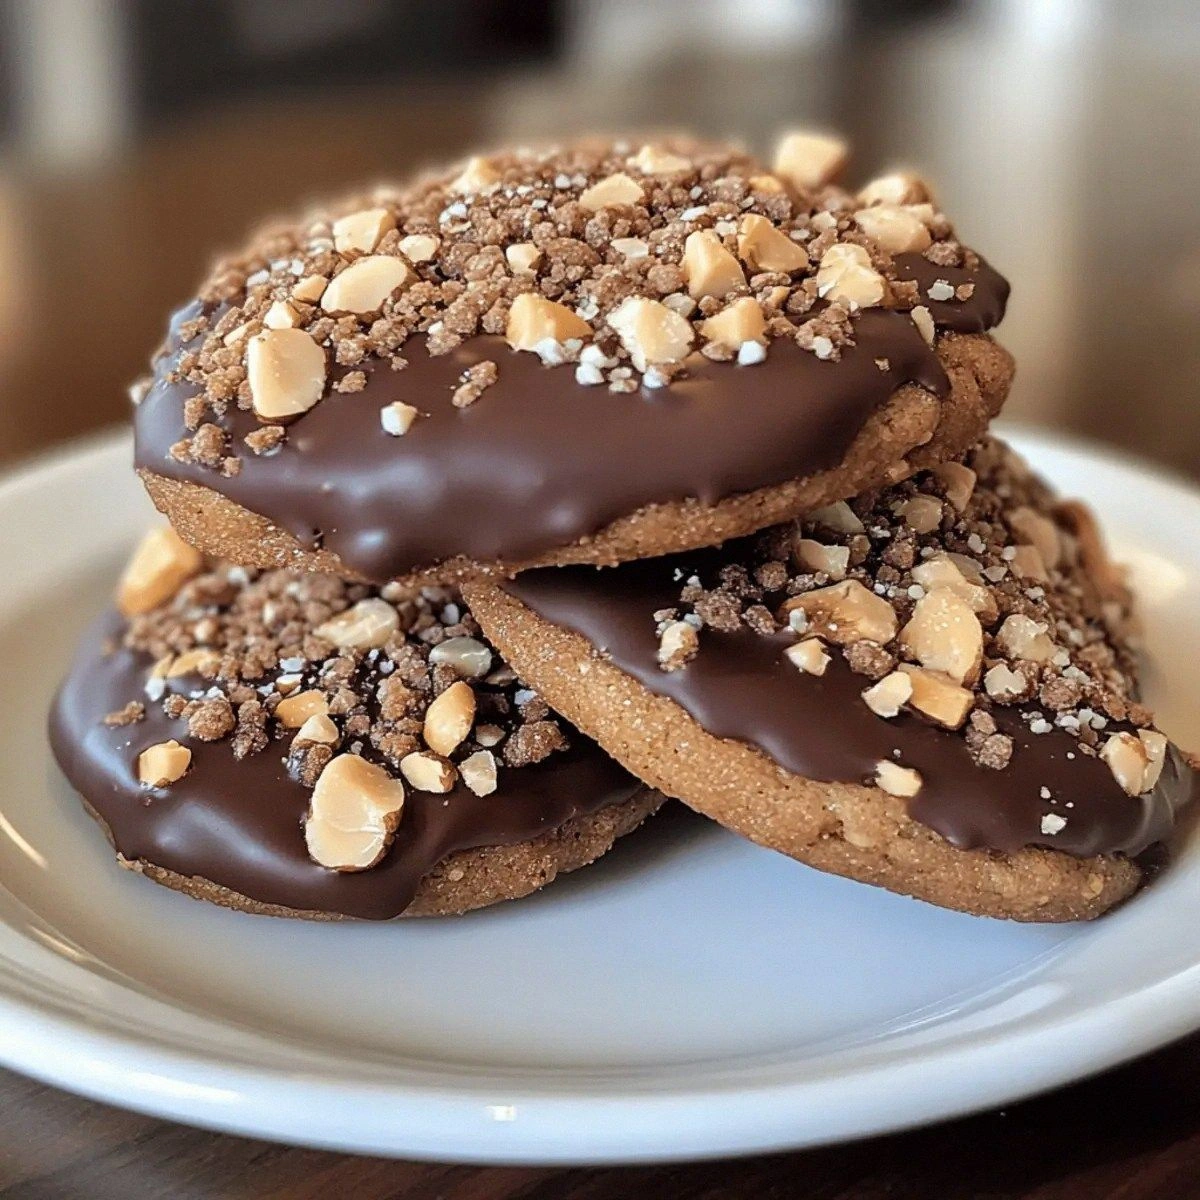
Most cookie recipes out there either give you a bland, one‑note experience or they try to be too fancy and end up confusing the palate. This version, however, is a masterclass in simplicity meeting sophistication. I’ve combined the classic comfort of a chocolate chip cookie with the nutty crunch of toasted hazelnuts, and then I added a secret weapon: a swirl of melted dark chocolate that creates a glossy, almost caramelized finish. The result? A cookie that’s crisp on the edges, chewy in the center, and studded with delightful shards that snap like tiny fireworks when you bite into them.
And here’s the kicker: the technique I’m about to share involves a quick tempering step for the chocolate that most recipes completely skip. It’s the difference between a dull, flat chocolate coating and a glossy, snap‑ready glaze that makes each bite feel like a celebration. I dare you to taste this and not go back for seconds. Let me walk you through every single step — by the end, you’ll wonder how you ever made it any other way.
What Makes This Version Stand Out
- Flavor Fusion: The marriage of dark chocolate and toasted hazelnuts creates a depth that feels both familiar and exciting, like discovering a hidden level in your favorite video game.
- Texture Tango: You get a crisp outer edge that shatters like thin ice, while the interior stays soft and chewy, offering a satisfying contrast in every bite.
- Simplicity Meets Sophistication: Only eleven ingredients, yet each one is treated with respect, resulting in a cookie that feels gourmet without the fuss.
- Ingredient Quality: Using real butter, high‑quality dark chocolate, and fresh hazelnuts elevates the whole experience—no artificial shortcuts here.
- Crowd‑Pleaser Factor: These cookies disappear at parties faster than you can say “holiday joy,” making them the ultimate potluck hero.
- Make‑Ahead Magic: The dough can be refrigerated for up to 48 hours, and the cookies freeze beautifully, so you can prep ahead and still serve fresh‑baked warmth.
- Versatile Baking Method: Whether you use a convection oven or a classic bake, the cookies hold their shape and texture, forgiving minor temperature variations.
- Visual Appeal: The glossy chocolate swirl and speckled hazelnuts give each cookie a festive, Instagram‑ready look that screams holiday cheer.
Inside the Ingredient List
The Flavor Base
Butter (1 cup): This is the foundation of flavor and texture. Real, unsalted butter adds richness and helps create that melt‑in‑your‑mouth crumb. If you substitute margarine, you’ll lose the depth and the cookies may turn greasy. For the best result, use butter that’s been softened to room temperature but not melted.
Granulated Sugar (1 cup) & Brown Sugar (1 cup): The duo creates a perfect balance between crispness and chew. Granulated sugar caramelizes, giving the edges that snap, while brown sugar’s molasses adds moisture and a subtle caramel note. Skipping the brown sugar will make the cookies too dry, and using only brown sugar will result in a softer, cakier texture.
The Texture Crew
Hazelnuts (1 cup): Toasted hazelnuts bring an earthy crunch that contrasts beautifully with the soft interior. If you skip toasting, you’ll miss out on that nutty aroma; if you over‑toast, they become bitter. A quick tip: toss them in a hot pan for 3‑4 minutes, shaking frequently, until fragrant.
Dark Chocolate (8 oz): The dark chocolate provides a deep, slightly bitter counterpoint to the sweet dough. Melt it gently over a double boiler to avoid scorching; a burnt chocolate will give a harsh, acrid flavor. You can substitute semi‑sweet chocolate, but expect a milder taste.
The Unexpected Star
Cocoa Powder (½ cup): Unsweetened cocoa adds that rich chocolate backbone without extra sugar. Choose a Dutch‑process cocoa for a smoother, less acidic flavor. If you only have natural cocoa, add a pinch more baking powder to balance the acidity.
Egg (1 large): The egg binds everything together and adds lift. Using a smaller egg will make the dough too dry; a larger one will make it spread too thin. Beat it lightly before adding to the butter‑sugar mixture to ensure even distribution.
The Final Flourish
All‑Purpose Flour (2 cups): This provides structure. Over‑mixing the flour will develop gluten, leading to tough cookies; under‑mixing will cause them to fall apart. Sift the flour with the cocoa powder, baking powder, and salt for an even blend.
Baking Powder (1 tsp) & Salt (½ tsp): Baking powder gives a subtle rise, keeping the center tender. Salt amplifies all the flavors, preventing the sweetness from becoming cloying. Skipping salt is a rookie mistake—your cookies will taste flat.
Everything's prepped? Good. Let's get into the real action…
The Method — Step by Step
Preheat your oven to 350°F (175°C) and line two baking sheets with parchment paper. While the oven heats, give yourself a moment to savor the anticipation—picture the golden cookies emerging, the whole kitchen smelling like a chocolate‑hazelnut dream. This is the moment of truth: a properly preheated oven ensures even baking and that coveted snap on the edges.
In a large mixing bowl, cream together the softened butter, granulated sugar, and brown sugar until the mixture is light, fluffy, and pale yellow. This should take about 3‑4 minutes on medium speed. Power transition: If the mixture looks grainy, you’ve under‑creamed—keep at it until you can see the texture change under the beaters.
Kitchen Hack: Add a splash of milk (about 1 tbsp) while creaming; it helps the butter emulsify, giving you a smoother base.Beat in the egg and vanilla extract until fully incorporated. The batter should look glossy and slightly thicker. This is where the cookie gets its structure; the egg acts as a binder while the vanilla adds aromatic depth that complements the chocolate.
In a separate bowl, whisk together the sifted flour, cocoa powder, baking powder, and salt. Ensure there are no lumps—any pockets of dry flour will turn into gritty bites later. Watch Out: Over‑sifting can cause the flour to become too aerated, leading to a cookie that spreads too thin.
Watch Out: Adding the dry mix too quickly can cause flour to fly everywhere—add it in three batches, stirring gently each time.Gradually fold the dry ingredients into the wet mixture, stirring just until combined. Over‑mixing at this stage develops gluten, which makes cookies tough. The dough should be thick, slightly sticky, and hold its shape when scooped.
Toast the hazelnuts in a dry skillet over medium heat for 3‑4 minutes, shaking the pan constantly. Once they’re fragrant and lightly browned, let them cool, then roughly chop them. This step releases the nuts’ natural oils, intensifying their flavor and adding that satisfying crunch.
Meanwhile, melt the dark chocolate using a double boiler or a microwave in 20‑second bursts, stirring between each burst. The chocolate should be smooth, glossy, and just barely warm—any hotter and you risk seizing. This next part? Pure magic. Once melted, let it cool just enough to be thick but still pourable.
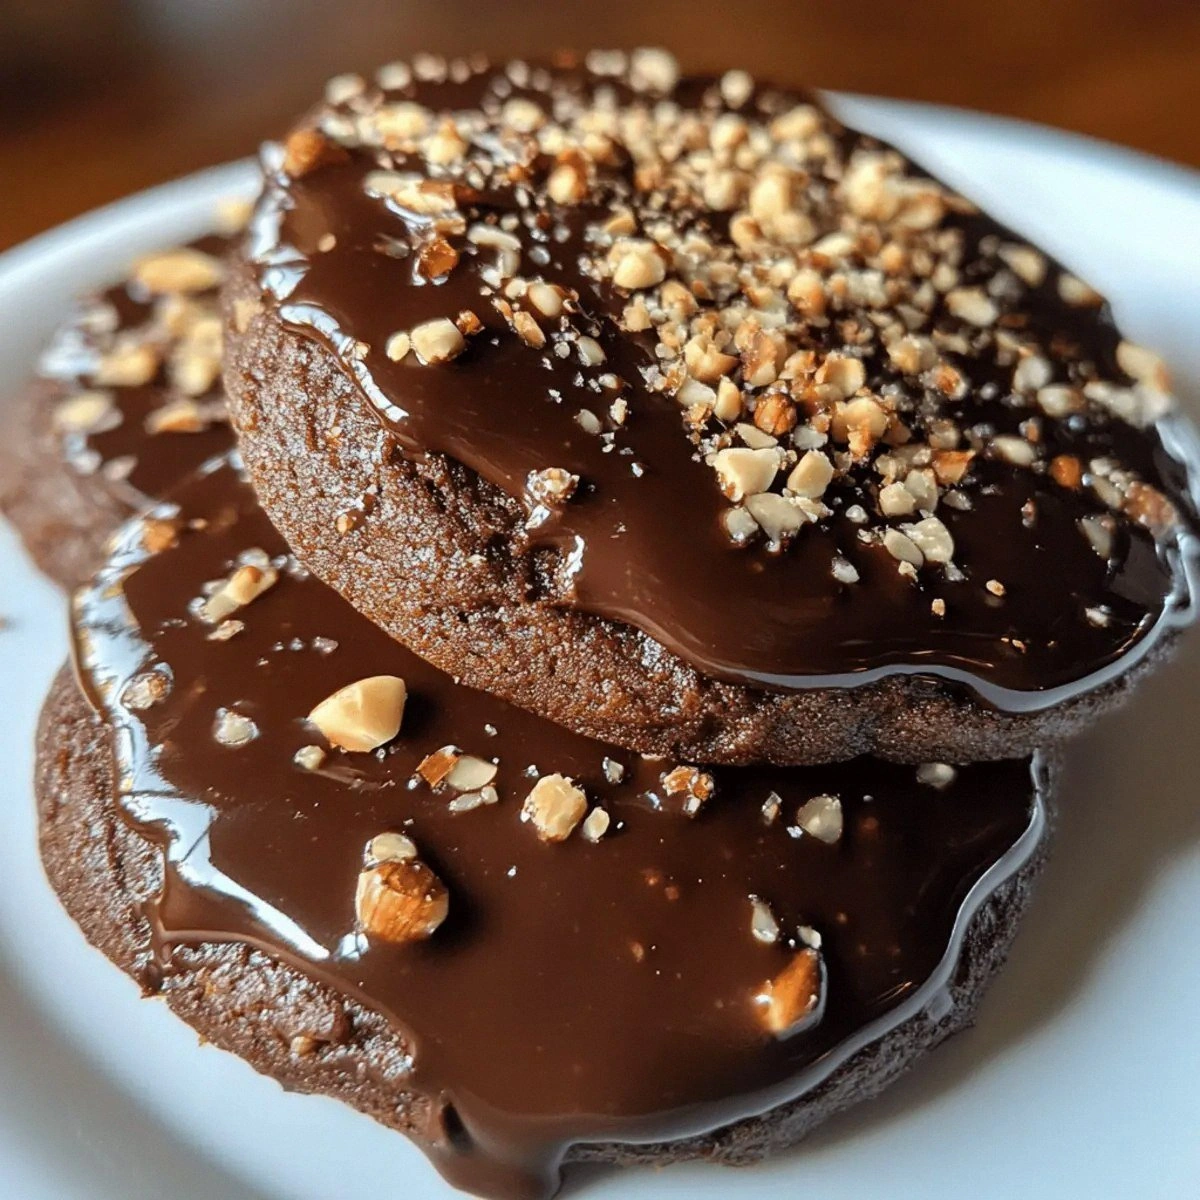
Kitchen Hack: Add a pinch of sea salt to the melted chocolate; it heightens the chocolate’s bitterness and balances the sweetness.Stir half of the toasted hazelnuts into the cookie dough, reserving the rest for topping. Then, using a tablespoon or a small ice‑cream scoop, portion out dough onto the prepared baking sheets, spacing them about 2 inches apart. Press a small well into the top of each cookie with the back of a spoon and drizzle a teaspoon of melted chocolate into the well, then sprinkle the remaining hazelnuts on top. The chocolate will set into a glossy crown as the cookies bake.
Slide the trays into the preheated oven and bake for 12‑14 minutes, or until the edges are firm and lightly browned while the centers still look slightly soft. The cookies will continue to set as they cool—this is the sweet spot. Picture yourself pulling this out of the oven, the whole kitchen smelling incredible...
Allow the cookies to cool on the baking sheet for 5 minutes before transferring them to a wire rack. This short rest lets the chocolate glaze firm up, creating that satisfying snap. Once cooled, store them in an airtight container, and brace yourself for the inevitable second (or third) round of devouring.
That's it — you did it. But hold on, I've got a few more tricks that'll take this to another level...
Insider Tricks for Flawless Results
The Temperature Rule Nobody Follows
Always start with butter that’s just soft enough to leave an imprint when you press it with your finger. If the butter is too warm, the dough will spread excessively, resulting in thin, crispy edges instead of the desired chewy center. I once tried using melted butter—let's just say the cookies turned into a flat, sad pancake. Keep that butter cool, and you’ll get that perfect balance.
Why Your Nose Knows Best
When the butter‑sugar mixture turns a light golden hue and you can smell a faint caramel note, you’ve reached the ideal creaming stage. Trust that scent; it’s a reliable indicator that the sugar has begun to dissolve into the butter, creating a smoother texture. If you’re unsure, give it a quick taste—if it’s still gritty, keep mixing.
The 5‑Minute Rest That Changes Everything
After mixing the dough, cover it and let it rest in the refrigerator for at least 30 minutes, or up to 48 hours for deeper flavor development. This rest allows the flour to hydrate fully, which prevents excessive spreading and enhances chewiness. One of my friends tried skipping this step and ended up with cookies that crumbled at the first bite.
Chocolate Swirl Mastery
When adding the melted chocolate, don’t pour it straight onto the cookie dough. Instead, create a shallow well in the center of each cookie and drizzle the chocolate in a circular motion. This technique ensures the chocolate stays on top, forming a glossy crown rather than mixing into the dough, which would dilute the flavor.
Cookie Cooling Hack
Transfer the cookies to a wire rack as soon as they’re firm enough to move. If you leave them on the hot baking sheet, the residual heat continues to cook them, leading to a drier texture. A quick 5‑minute rest on the sheet, followed by a move to the rack, preserves that perfect interior softness.
Creative Twists and Variations
This recipe is a playground. Here are some of my favorite ways to switch things up:
Spiced Holiday Edition
Swap half of the cocoa powder for espresso powder and add a pinch of cinnamon and ground nutmeg. The espresso deepens the chocolate flavor, while the spices give it that festive warmth. Perfect for those who love a little spice in their sweet.
White Chocolate & Pistachio
Replace the dark chocolate with white chocolate chips and the hazelnuts with chopped pistachios. The buttery white chocolate pairs beautifully with the bright green pistachios, creating a cookie that looks as elegant as it tastes.
Vegan Adaptation
Use coconut oil in place of butter, a flax egg (1 tbsp ground flaxseed + 3 tbsp water) for the egg, and dairy‑free dark chocolate. The texture will be slightly softer, but the flavor profile remains indulgent.
Gluten‑Free Version
Swap the all‑purpose flour for a 1‑to‑1 gluten‑free flour blend, and add a tablespoon of almond flour for extra nuttiness. The cookies will be just as crisp on the edges, with a tender interior.
Double‑Crunch Delight
Toast the hazelnuts twice—once plain, then again after chopping, mixing in a handful of toasted almond slivers. The extra crunch layers create a texture that’s almost addictive.
Mini Bite‑Size Treats
Form the dough into walnut‑sized balls and bake for 8‑10 minutes. These mini cookies are perfect for holiday gift boxes or for serving at a cocktail party where guests appreciate a dainty, elegant bite.
Storing and Bringing It Back to Life
Fridge Storage
Place the cooled cookies in an airtight container with a slice of bread on top. The bread will keep the cookies moist for up to a week, preventing them from drying out. If you notice any sogginess, simply remove the bread and let the cookies air out for a few minutes.
Freezer Friendly
Arrange the cookies on a parchment‑lined tray and freeze them individually for 2‑3 hours. Once solid, transfer them to a zip‑top freezer bag. They’ll keep for up to three months. To enjoy, let them thaw at room temperature for 15 minutes, then pop them in the oven at 300°F for 5 minutes to refresh the crunch.
Best Reheating Method
When you’re ready to serve, preheat your oven to 325°F, place the cookies on a baking sheet, and add a tiny splash (about 1 tsp) of water to the sheet before covering loosely with foil. The steam revitalizes the interior, while the gentle heat restores the glossy chocolate crown.