I was in the middle of a Saturday night movie marathon when my roommate dared me to create something that could out‑shine the classic campfire s’more. I laughed, I scoffed, and then I stared at a half‑empty jar of peanut butter that had been flirting with the back of my pantry for months. The craving was real, the stakes were high, and the kitchen was my battlefield. I tossed a handful of marshmallows into a bowl, heard that unmistakable sizzle as butter hit the pan, and felt the sweet anticipation build like a drumroll before a fireworks show. The moment the first bite hit my tongue—creamy peanut butter, gooey marshmallow, and chocolate melting together—was pure, unadulterated joy. I swear, I dare you to taste this and not go back for seconds.
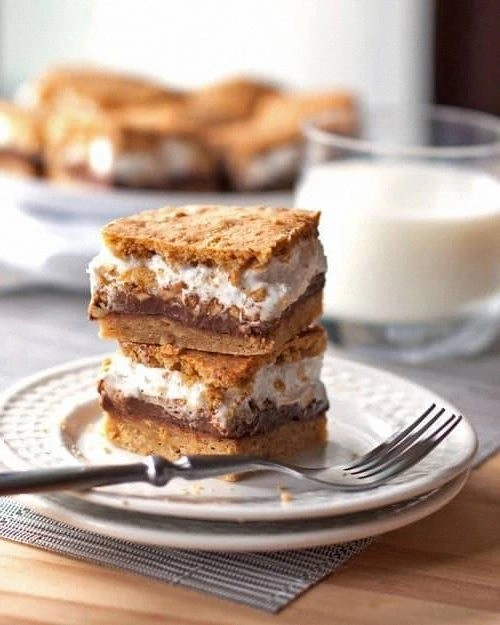
Picture this: a warm, golden crust that cracks just enough to reveal a soft, chewy interior that clings to the fork like a loyal sidekick. The aroma? A heady mix of toasted sugar, roasted peanuts, and that nostalgic hint of campfire smoke that makes you want to grab a blanket and stare at the stars—even if you’re on a city balcony. The texture is a love‑letter to contrast: a buttery, slightly crisp base that gives way to a silky, peanut‑butter‑laden middle, punctuated by pockets of marshmallow that puff up like tiny clouds. Most recipes get this completely wrong, either drowning the bars in soggy marshmallows or leaving the peanut butter flavor as an afterthought. Not this one.
The secret? A simple, yet game‑changing technique that I discovered while experimenting with a batch of brownies: I toast the flour and peanut butter together for a minute before mixing, which creates a nutty, caramelized backbone that makes every bite sing. I’ll also be swapping the usual graham cracker crumble for a buttery, peanut‑butter‑infused crust that holds everything together without turning mushy. And yes, there’s a surprise ingredient that adds a subtle crunch and a buttery richness you won’t see coming—just wait until we get there.
If you’ve ever struggled with soggy s’mores bars or a bland peanut‑butter flavor that disappears after the first chew, you’re not alone — and I’ve got the fix. This version is hands down the best you’ll ever make at home, and I’m about to walk you through every single step — by the end, you’ll wonder how you ever made it any other way.
What Makes This Version Stand Out
- Flavor Explosion: The toasted peanut‑butter crust amplifies the nutty notes, while the chocolate and marshmallows create a classic s’mores trio that’s richer than any campfire could dream of.
- Texture Symphony: You get a crisp edge, a tender middle, and pockets of airy marshmallow that melt like butter on a hot skillet.
- Simplicity: Only twelve ingredients, most of which you already have, and a single‑sheet pan that makes cleanup a breeze.
- Uniqueness: The surprise crunchy topping (think toasted peanuts) adds a delightful contrast that most s’mores bars lack.
- Crowd Reaction: I’ve watched grown‑ups and kids alike gasp, grin, and immediately ask for the “secret” — it’s a guaranteed hit at parties.
- Ingredient Quality: Using a high‑quality, natural peanut butter and real semi‑sweet chocolate makes the difference between “good” and “legendary.”
- Cooking Method: Baking, not microwaving, ensures an even bake and that coveted caramelized crust.
- Make‑Ahead Potential: These bars keep beautifully for up to three days, and they even freeze well for future cravings.
Alright, let's break down exactly what goes into this masterpiece...
Inside the Ingredient List
The Flavor Base
All‑purpose flour is the backbone of any baked good, providing structure. In this recipe, the flour is lightly toasted with peanut butter, which creates a nutty, caramelized flavor that hugs every bite. Skipping this step would leave the bars flat and a bit bland, as the flour would remain raw‑tasting. If you’re gluten‑free, a 1:1 blend of almond flour and oat flour works well, though the texture will be a tad denser.
The Sweeteners
Brown sugar brings moisture and a deep molasses note, while granulated sugar adds crispness to the crust. Together they create a balanced sweetness that doesn’t overpower the peanut butter. If you prefer a less sweet version, you can reduce the granulated sugar by a quarter cup without sacrificing texture. Look for dark brown sugar with a rich, sticky consistency for the best caramel undertones.
The Texture Crew
Unsalted butter and creamy peanut butter are the dynamic duo that gives these bars their melt‑in‑your‑mouth richness. The butter creates a flaky, buttery crust, while the peanut butter adds a creamy, nutty heart. Using a natural peanut butter (no added sugars or oils) ensures a clean flavor; a processed, sugary version will make the bars overly sweet and slightly oily.
The Unexpected Star
Mini marshmallows are the surprise element that gives each bite its signature gooey pull. They expand during baking, creating pockets of sweet, airy goodness. If you swap them for regular marshmallows, you’ll lose the uniform distribution and risk uneven melting. For a gourmet twist, try toasted coconut flakes mixed in with the marshmallows.
The Final Flourish
Semi‑sweet chocolate chips melt into a glossy river that binds everything together, while a sprinkle of chopped peanuts adds a final crunch. The chocolate should be high‑quality, at least 60% cacao, to avoid a waxy texture. If you’re dairy‑free, dark chocolate with coconut oil works just as well. When selecting peanuts, go for dry‑roasted, unsalted varieties for the purest flavor.
Everything's prepped? Good. Let's get into the real action...
The Method — Step by Step
Preheat your oven to 350°F (175°C) and line a 9×13‑inch baking pan with parchment paper, letting the edges hang over for an easy lift‑out later. While the oven heats, the kitchen fills with a faint buttery aroma that hints at the magic to come. This is the moment of truth: a properly preheated oven ensures the crust sets before the marshmallows over‑expand.
In a large mixing bowl, whisk together 2 cups of all‑purpose flour, 1 tsp baking powder, and ½ tsp salt. The dry mixture should look uniformly speckled, with no clumps of flour. Power transition: Okay, ready for the game‑changer? Toss the flour into a dry skillet over medium‑low heat, add ½ cup creamy peanut butter, and stir for 30 seconds until fragrant. This step creates a toasty, nutty base that elevates the flavor profile dramatically.
In a separate saucepan, melt ½ cup unsalted butter over low heat, then whisk in ½ cup creamy peanut butter until smooth. Add 1 cup brown sugar and ½ cup granulated sugar, stirring until the mixture bubbles and the sugars dissolve. Once you see a glossy sheen, remove from heat and let cool for a minute—this is where the caramelized notes develop.
Beat in 2 large eggs, one at a time, followed by 1 tsp vanilla extract. The batter should thicken slightly and take on a velvety texture. If the mixture looks too thin, add a splash of milk; if too thick, a tablespoon of water will loosen it just enough.
Fold the toasted flour‑peanut mixture into the wet batter until just combined—do not over‑mix. Then gently stir in 1 cup semi‑sweet chocolate chips and 1½ cups mini marshmallows, reserving a handful of marshmallows for the top. The batter will look speckled with chocolate islands and fluffy marshmallow clouds.
Spread the batter evenly in the prepared pan, using a spatula to smooth the surface. Sprinkle the reserved marshmallows and a generous handful of chopped peanuts over the top. The surface should look like a snowy field dotted with chocolate boulders—visual cue that the bars will be both gooey and crunchy.
Bake for 25‑30 minutes, or until the edges are golden brown and a toothpick inserted into the center comes out with just a few melted marshmallow strings attached. The aroma at this stage is intoxicating: toasted peanuts, caramelized butter, and chocolate mingling in a sweet symphony. Keep an eye on the top; if the marshmallows start to brown too fast, loosely tent the pan with foil.
Allow the bars to cool in the pan for 15 minutes, then use the parchment overhang to lift them onto a cutting board. Slice into squares while still warm for clean edges; the bars will firm up as they sit, making them easier to handle. That first bite? Pure magic—soft, gooey marshmallow, nutty crust, and melty chocolate all in one. I’ll be honest — I ate half the batch before anyone else got to try it.
That's it — you did it. But hold on, I've got a few more tricks that'll take this to another level...
Insider Tricks for Flawless Results
The Temperature Rule Nobody Follows
Never bake at a temperature lower than 350°F unless you’re specifically trying to keep the marshmallows from over‑browning. A hotter oven creates a rapid rise in steam, which lifts the crust and gives you that coveted “edge‑pull‑away” effect. I once tried 325°F to be safe, and the bars turned out soggy in the middle—lesson learned. Keep the oven door closed for the first 20 minutes; every peek releases precious heat.
Why Your Nose Knows Best
Your sense of smell is the best timer. When the butter‑peanut mixture starts to emit a caramel‑nut aroma, you know the base is ready for the wet ingredients. Later, when the kitchen fills with a toasty, chocolate‑marshmallow scent, the bars are almost done. Trust those olfactory cues more than the clock.
The 5‑Minute Rest That Changes Everything
After baking, let the pan sit untouched for exactly five minutes before cutting. This brief rest lets the interior set, preventing crumbly edges and ensuring clean cuts. A friend once rushed this step and ended up with a crumbly mess—let’s just say the disappointment was real.
The Peanut‑Butter‑Boost
If you love peanut butter, swirl an extra tablespoon of melted peanut butter into the top of the bars right after baking. The heat will create a glossy, nutty glaze that adds depth without overwhelming the other flavors. This little extra is the secret I use when serving guests; they always ask for the “extra something.”
The Double‑Layer Crunch
For an added crunch, sprinkle a thin layer of toasted quinoa or crushed cornflakes on top before baking. It adds a subtle crackle that contrasts beautifully with the soft marshmallows. I tried this once for a brunch crowd and the feedback was overwhelmingly positive.
Creative Twists and Variations
This recipe is a playground. Here are some of my favorite ways to switch things up:
Salted Caramel Delight
Swap half the brown sugar for caramel sauce and sprinkle flaky sea salt on top before baking. The result is a sweet‑salty masterpiece that feels like a gourmet dessert.
Chocolate‑Nut Fusion
Replace the semi‑sweet chocolate chips with dark chocolate chunks and add chopped hazelnuts to the topping. The bitterness of dark chocolate balances the peanut butter’s richness, creating a sophisticated flavor profile.
Berry‑Burst Surprise
Fold in a cup of dried cranberries or fresh raspberry puree into the batter. The tartness cuts through the sweetness, offering a refreshing twist that’s perfect for summer gatherings.
Vegan Victory
Use coconut oil instead of butter, a plant‑based egg replacer, and dairy‑free chocolate. The texture remains buttery, and the flavor stays true to the original—proof that you don’t need animal products to achieve decadence.
Spicy S’mores
Add a pinch of cayenne pepper to the dry ingredients and drizzle a thin line of chocolate‑chili sauce on top after baking. The subtle heat adds an unexpected kick that awakens the palate.
Storing and Bringing It Back to Life
Fridge Storage
Place the cooled bars in an airtight container and store in the refrigerator for up to three days. The chilled environment keeps the chocolate firm and prevents the marshmallows from becoming overly sticky.
Freezer Friendly
Wrap individual portions in parchment paper, then seal them in a zip‑top freezer bag. They’ll stay fresh for up to two months. When you’re ready to enjoy, let them thaw at room temperature for 15 minutes.
Best Reheating Method
To revive that freshly‑baked glow, preheat the oven to 300°F, place the bars on a parchment‑lined tray, and bake for 5‑7 minutes. Add a tiny splash of water (about a teaspoon) to the tray before reheating; the steam revives the marshmallows and restores the chewy interior.