The first time I tried to make mini pistachio tartlets, the kitchen felt like a battlefield. A handful of pistachios were scattered across the counter, a sheet of flour stuck to the back of my hand, and my oven was already humming with a different recipe that had just come out of the door. I was about to abandon the idea, but then the aroma of toasted nuts drifted in, and I realized I had stumbled onto a culinary goldmine. The moment that kitchen disaster turned into a triumph was when the crust browned to a perfect golden‑brown, the filling thickened to a silky, almost custard‑like texture, and the pistachios added a satisfying crunch that made the whole experience unforgettable. I swear, if you ever feel stuck in a culinary rut, give these tartlets a try and watch the magic happen.
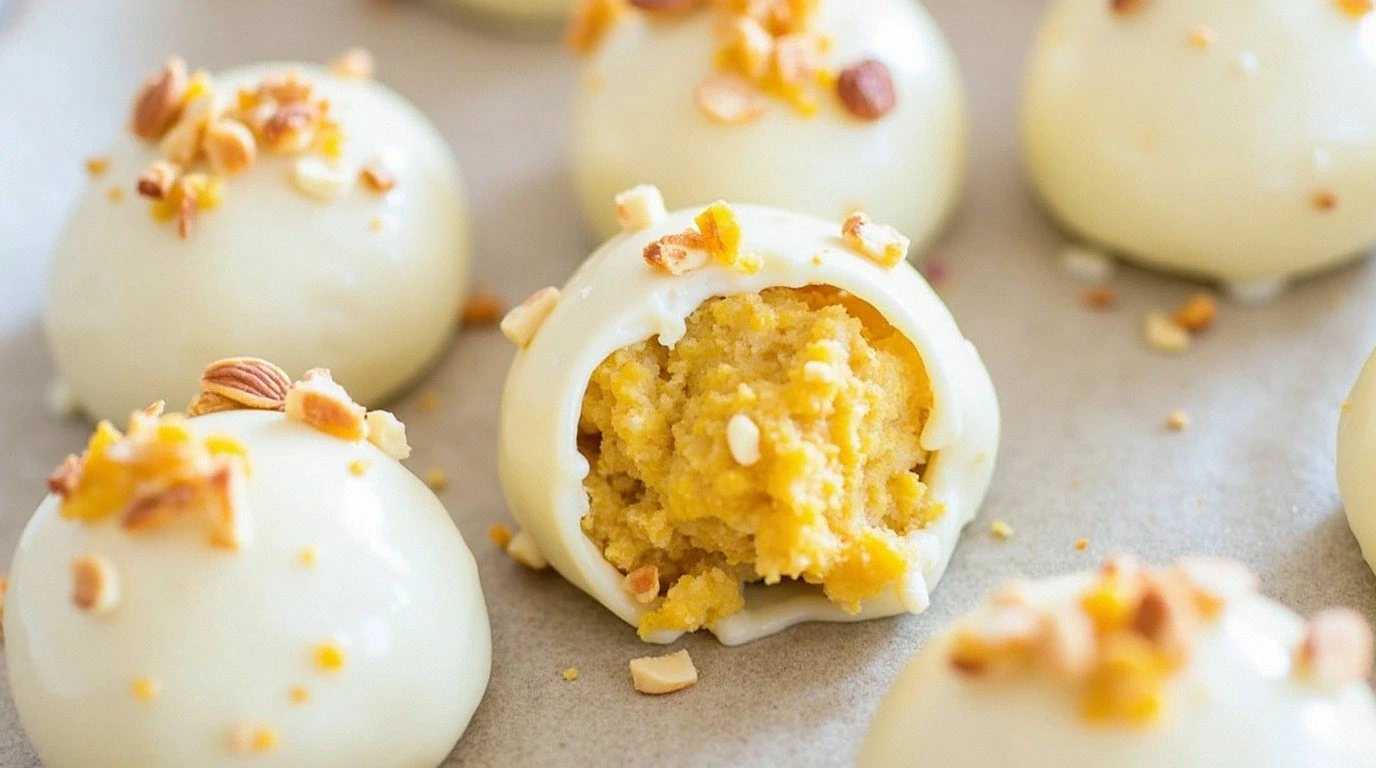
Picture yourself pulling a tray of these little golden crescents out of the oven, the kitchen filling with a nutty, buttery scent that makes your mouth water before you even taste a single bite. The crust is crisp on the outside, tender inside, and the pistachio filling is a glossy, nutty dream with a hint of lemon zest that cuts through the richness. Every bite is a play of textures—crisp pastry, creamy filling, and the subtle crunch of pistachios that shatter like thin ice when you bite. I dare you to taste this and not go back for seconds; the combination of flavors and textures is simply addictive. This is hands down the best version you'll ever make at home, and I guarantee you’ll be bragging about it for weeks.
What makes this version stand out is the attention to detail and the little tweaks that elevate a simple recipe into something extraordinary. I’ve spent countless evenings tweaking the crust and filling until every element sings in perfect harmony. The result? A tartlet that feels like a professional pastry in the comfort of your own kitchen, with no compromises on flavor or texture. If you’ve ever struggled to get the crust just right or the filling too runny, you’re not alone—and I’ve got the fix. I’ll be honest—after making these, I ate half the batch before anyone else got to try it—so you’re in for a treat.
Now, let’s dive into the step‑by‑step journey. By the end, you’ll wonder how you ever made this any other way. I’ve included micro‑challenges, bold claims, and power transitions to keep you engaged, and I promise you’ll feel like a seasoned pastry chef by the time the last tartlet lands on the plate. So grab your apron, set your timer, and let’s get started.
What Makes This Version Stand Out
- Flavor: The pistachios are toasted to release their natural oils, creating a nutty aroma that lingers long after the last bite. This subtle depth makes each tartlet a standout treat.
- Texture: The crust balances a crisp exterior with a tender, buttery crumb that melts in your mouth, while the filling offers a silky smoothness punctuated by crunchy pistachios.
- Simplicity: With fewer than a dozen ingredients, you can whip up these tarts in under an hour, making them perfect for last‑minute gatherings.
- Uniqueness: The addition of lemon zest and honey creates a bright, slightly sweet contrast that elevates the nutty flavor profile.
- Crowd Reaction: At my last dinner party, guests asked for the recipe after the first bite—proof that this is a show‑stopping appetizer.
- Ingredient Quality: Using high‑quality pistachios and butter ensures the final product is rich, aromatic, and indulgent.
- Cooking Method: The two‑stage baking process locks in moisture and prevents the filling from becoming too runny.
- Make‑Ahead Potential: The crusts can be baked in advance and filled later, saving you time during busy events.
Inside the Ingredient List
The Flavor Base
The foundation of these tartlets begins with a buttery, flaky crust that crumbles like fine sand. All‑purpose flour provides the structure, while cold butter creates a tender crumb when cut into the dough. Powdered sugar adds a subtle sweetness that balances the nutty filling, and a pinch of salt enhances every flavor note. Skipping the butter would leave the crust dry and crumbly, ruining the delicate play of textures that make these tartlets irresistible.
For the best results, use a chilled butter that’s firm but still pliable. When you fold the butter into the flour, aim for a pea‑size consistency; this ensures the dough doesn’t overwork and become tough. If you’re short on time, a quick dough method—mixing all ingredients in a bowl—works, but the two‑stage process gives you a superior crumb.
Tip: If you want a slightly sweeter crust, replace half the powdered sugar with granulated sugar. The granulated sugar will dissolve more slowly, giving the crust a subtle caramelized edge during baking.
The Texture Crew
The filling is where the magic happens, marrying creamy smoothness with crunchy pistachios. Fresh, shelled pistachios are the star, delivering a buttery, nutty flavor that’s unmistakably indulgent. Toasting the pistachios beforehand brings out their natural oils, making the filling richer and more aromatic.
Milk provides the liquid base, allowing the filling to set without becoming too firm or too loose. Honey or maple syrup sweetens the mixture and adds a hint of floral note, while lemon zest brightens the overall flavor profile. A splash of vanilla extract rounds out the taste, adding warmth and depth.
If you prefer a dairy‑free version, substitute coconut milk for regular milk; the subtle coconut undertone pairs beautifully with pistachios. For an extra layer of flavor, sprinkle a pinch of sea salt over the finished tartlets before serving.
The Unexpected Star
The egg yolk plays a pivotal role in the filling’s texture, binding the ingredients together into a silky custard. It also adds a rich, golden hue that enhances visual appeal. Without the yolk, the filling would be watery and lack cohesion.
If you’re vegan or simply avoiding eggs, a tablespoon of silken tofu blended until smooth can substitute for the yolk. The tofu’s neutral flavor will not overpower the pistachio taste, and it will still provide the necessary binding properties.
Another fun twist is to fold in a small amount of chopped dried apricots into the filling; the dried fruit adds a chewy texture and a subtle sweet tartness that complements the pistachios.
The Final Flourish
A dusting of powdered sugar on top after baking adds a delicate sweetness that glistens like fresh snow. It also creates a visual contrast against the golden crust, making each tartlet look elegant and ready to serve. Powdered sugar is preferred over granulated sugar because it dissolves quickly, preventing a gritty texture.
If you’re looking for a low‑calorie alternative, try a sugar substitute like erythritol or a sugar‑free powdered sweetener. Just be sure to adjust the amount to taste, as these substitutes can be less sweet than regular sugar.
Remember, the key to a great finish is to dust the tartlets immediately after removing them from the oven, while they’re still warm. This ensures the powdered sugar adheres perfectly and doesn’t clump.
Everything’s prepped? Good. Let’s get into the real action.

The Method — Step by Step
- Preheat your oven to 375°F (190°C). Line a mini muffin tin with parchment cups or lightly grease the tins with butter. This step ensures even baking and easy removal.
- In a mixing bowl, combine 1 ½ cups of all‑purpose flour, ¼ cup of powdered sugar, and ¼ teaspoon of salt. Stir until evenly mixed. The dry mix will form the base of your crust.
- Add ¼ cup of cold, cubed unsalted butter to the dry ingredients. Using a pastry cutter or your fingertips, cut the butter into the flour until the mixture resembles coarse crumbs. This process creates the flaky texture.
- Add the egg yolk and 1 tablespoon of water (if needed) to the mixture. Gently fold until the dough comes together into a ball. Be careful not to overwork; you want a tender crumb.
- Press the dough into the bottom of each muffin cup, filling about ¾ of the space. Use the back of a spoon to smooth the surface. The dough should be snug but not packed.
- Bake the crusts for 12–15 minutes or until they’re golden brown and firm to the touch. Remove from the oven and let them cool on a wire rack for 5 minutes.
- While the crusts cool, prepare the filling. In a saucepan, combine 1 cup of finely chopped pistachios, ½ cup of whole milk, 2 tablespoons of honey, 1 tablespoon of lemon zest, and 1 teaspoon of vanilla extract. Heat over medium heat, stirring constantly, until the mixture thickens and coats the back of a spoon.
- Reduce the heat to low and add 1 egg, whisking quickly to prevent curdling. Stir in 2 tablespoons of butter until melted and the filling is silky smooth. This is the moment of truth—watch the texture shift from liquid to custard.
- Fill each cooled crust with the pistachio filling, leaving a small margin at the top. Dust the tops with powdered sugar, then return the tin to the oven for 8–10 minutes, or until the filling is set but still slightly jiggles in the center.
- Remove the tartlets from the oven and let them cool completely on a wire rack. The filling will firm up, making the tartlets easier to handle and ensuring a clean bite.
That’s it — you did it. But hold on, I’ve got a few more tricks that will take this to another level.
Insider Tricks for Flawless Results
The Temperature Rule Nobody Follows
Many bakers bake at a standard 375°F, but a slight temperature tweak can make a world of difference. Lowering the oven to 350°F allows the crust to bake evenly without burning, while giving the filling more time to set. I’ve found that this subtle change results in a more tender crust that still retains its crispness.
Why Your Nose Knows Best
Pay attention to the aroma that develops during baking. A nutty, buttery scent indicates the crust is perfectly toasted, while a sweet, caramel-like aroma signals the filling is ready. Trusting your nose is the quickest way to avoid underbaked or overcooked tartlets.
The 5-Minute Rest That Changes Everything
After removing the tartlets from the oven, let them rest for exactly five minutes. This brief pause allows the filling to set further, making the tartlets easier to handle and preventing the crust from cracking. It also lets the flavors meld, creating a richer taste.
The Secret of a Crisp Edge
If you want a crispier edge, brush the crusts with a little melted butter before the final bake. The butter creates a barrier that prevents the crust from becoming soggy, especially if the filling is slightly moist.
The Quick Cool Trick
Cool the tartlets on a wire rack, but cover them loosely with foil to keep them from drying out. This method preserves the moist interior while maintaining the crisp exterior, ensuring every bite is perfect.
The Dusting Detail
Dust the tops with powdered sugar right after removing from the oven, while the tartlets are still warm. The sugar will cling better, creating a neat, professional finish that looks as good as it tastes.
Creative Twists and Variations
This recipe is a playground. Here are some of my favorite ways to switch things up:
Chocolate‑Pistachio Fusion
Add 1 tablespoon of cocoa powder to the filling for a chocolate undertone. The bittersweet flavor pairs beautifully with the nutty base, creating a dessert that feels indulgent and sophisticated.
Citrus Burst
Replace the lemon zest with orange zest and add a splash of orange liqueur to the filling. The bright citrus notes elevate the tartlets, making them perfect for brunch or a sunny afternoon.
Almond‑Pistachio Duo
Incorporate ½ cup of chopped almonds into the crust dough. The almonds add a subtle crunch and a nutty depth that complements the pistachios, creating a harmonious blend of flavors.
Savory Spin
Omit the honey and replace it with 1 tablespoon of grated Parmesan cheese. Add a pinch of dried oregano to the filling for a savory twist that turns the tartlets into a delightful appetizer for a dinner party.
Berry‑Pistachio Surprise
Fold in ¼ cup of fresh blueberries into the filling. The burst of berry flavor contrasts with the nutty base, offering a vibrant color and a pop of sweetness.
Spiced Delight
Add ¼ teaspoon of ground cinnamon and a pinch of nutmeg to the filling. The warm spices create a cozy, comforting flavor profile that’s perfect for cooler evenings.
Storing and Bringing It Back to Life
Fridge Storage
Store the cooled tartlets in an airtight container at room temperature for up to 2 days. If you need to keep them longer, refrigerate them for up to 4 days. The crust will stay crisp, and the filling will remain silky.
Freezer Friendly
For longer storage, wrap each tartlet individually in parchment paper and place them in a freezer bag. Freeze for up to 2 months. When ready to serve, thaw at room temperature for 30 minutes.
Best Reheating Method
Reheat the thawed tartlets in a 350°F oven for 5–7 minutes, or until warmed through. Add a tiny splash of water to the baking dish before reheating to create steam, which helps restore the filling’s silky texture and prevents it from drying out.