Picture this: a late‑night kitchen, the air thick with the scent of chocolate and a faint hint of vanilla, and a stubborn craving that refuses to let go. I was halfway through a marathon of streaming shows when the thought hit me—why not turn that craving into a batch of the most decadent, guilt‑free chocolate treats? The result was a recipe that feels like a secret handshake between chocolate lovers and plant‑based enthusiasts.
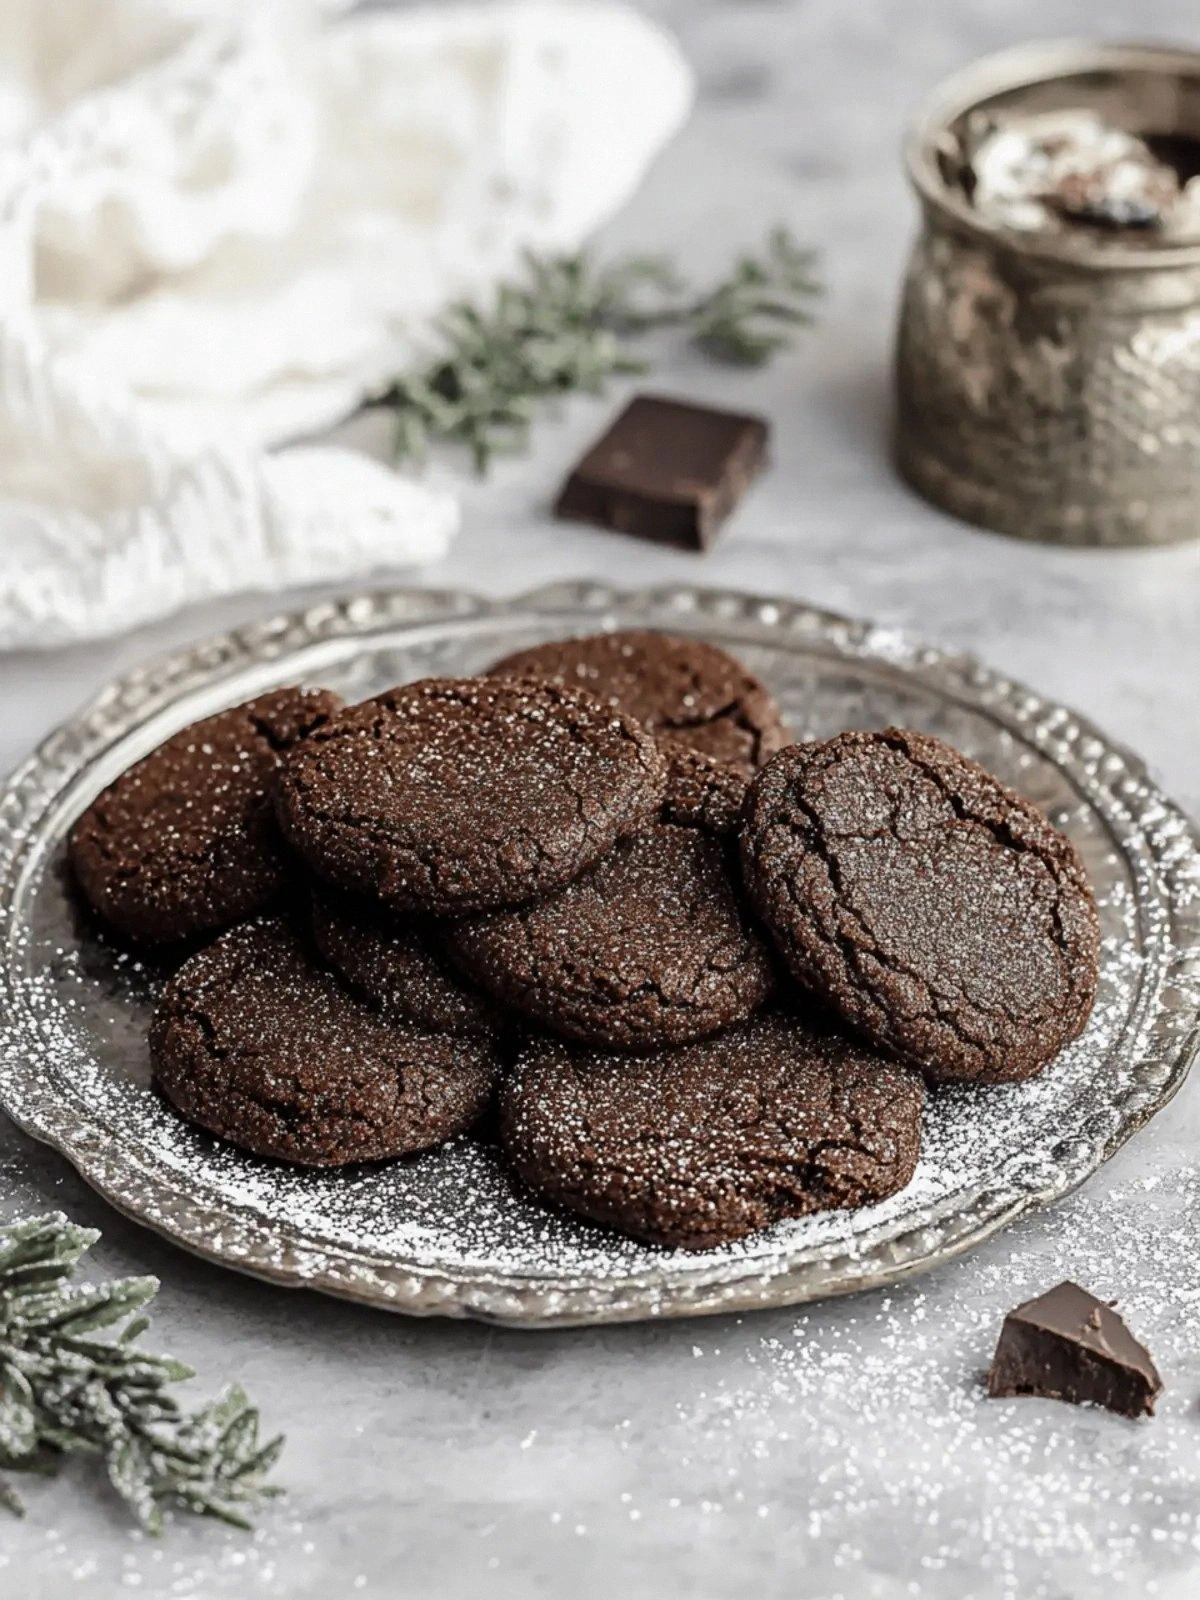
The moment the dough hits the pan, a crackling sizzle fills the room, the sound echoing the anticipation in my ears. The chocolatey aroma unfurls like a velvet curtain, teasing the taste buds with promises of rich, bittersweet bliss. As the cookies bake, their edges rise and crisp just enough to snap with a satisfying crunch, while the center remains soft and chewy, a delightful contradiction that keeps you reaching for more. I swear, the first bite is a revelation—deep cocoa, a whisper of vanilla, and that subtle buttery warmth that makes you think you’re in a bakery, not your own kitchen.
What sets this version apart is not just the flavor but the philosophy behind each ingredient. Every element is chosen to elevate the experience while keeping the process straightforward and vegan-friendly. From the humble flax egg that binds everything together to the organic sugars that caramelize into a glossy finish, each component plays a crucial role. I dare you to taste this and not go back for seconds—trust me, the first bite is enough to make you question every cookie you've ever eaten.
And here's the kicker: there’s a little trick involving the cocoa that most recipes ignore. I’ll share that secret in a moment, but for now, let me walk you through every single step. By the end, you’ll wonder how you ever made it any other way.
What Makes This Version Stand Out
- Flavor Depth: The combination of organic sugar and a generous splash of vanilla bean paste creates a complex profile that feels both sweet and subtly earthy, a contrast that elevates the chocolate experience.
- Texture Balance: The flax egg provides a tender crumb, while the vegan butter adds a silky mouthfeel that melts in your mouth without the heaviness of dairy.
- Ingredient Purity: Every component is organic or plant-based, ensuring a clean, wholesome snack that still delivers on indulgence.
- Time Efficiency: From prep to bake, the entire process takes less than an hour, making it perfect for spontaneous dessert cravings.
- Make‑Ahead Friendly: These cookies hold up wonderfully in the fridge and even the freezer, allowing you to stockpile and enjoy whenever the mood strikes.
- Visual Appeal: The glossy finish from the extra sugar caramelization gives each cookie a bakery‑quality sheen that’s Instagram‑ready.
- Versatility: The base can be tweaked with add‑ins—nuts, dried fruit, or a pinch of sea salt—to create endless variations.
- Social Proof: Friends who’ve tried this swear it’s the best vegan chocolate cookie ever made at home.
Alright, let's break down exactly what goes into this masterpiece...
Inside the Ingredient List
The Flavor Base
1 cup all‑purpose flour is the backbone of these cookies, providing structure and a subtle nutty undertone that complements the chocolate. If you’re looking to boost the gluten-free factor, swap it for an equal amount of oat flour, but be aware the texture will shift slightly toward a denser crumb. Skipping flour altogether would turn the cookies into a brittle, flat batter—definitely not the chewy dream we’re after.
¼ cup cocoa powder is the star that delivers the intense chocolate flavor. I use a high‑quality Dutch‑process variety for its smooth, slightly acidic profile that balances the sweetness. If you’re craving a more bitter bite, add a pinch of espresso powder; it’s a classic chocolate trick that deepens the flavor without adding extra liquid.
The Texture Crew
½ teaspoon baking soda is the leavening agent that keeps the cookies from becoming too dense. It reacts with the acidity of the vanilla paste, creating tiny bubbles that make the dough airy. Without it, you’d end up with heavy, flat cookies that crumble under a bite.
¼ teaspoon salt is the unsung hero that elevates every flavor. It balances the sweetness and brings out the richness of the cocoa. If you’re sensitive to sodium, reduce it to ⅛ teaspoon, but expect a slightly muted taste.
½ cup vegan butter is the source of that buttery, melt‑in‑your‑mouth feel. I prefer a plant‑based butter that’s 100% coconut oil, which adds a subtle tropical note. Substituting with vegan margarine will work, but the final texture may feel a bit waxy.
The Unexpected Star
½ cup organic sugar provides the sweet backbone, while the additional 2 tablespoons of organic sugar caramelize on the surface, giving a glossy finish. If you prefer a lower‑sugar option, replace the extra 2 tablespoons with a natural sweetener like maple syrup, but adjust the butter slightly to keep the dough from becoming too sticky.
1 flax egg (1 tablespoon ground flaxseed mixed with 3 tablespoons water) is the binder that holds everything together. This plant‑based alternative is perfect for vegan baking and adds a mild nutty flavor that pairs nicely with chocolate. If you’re allergic to flax, chia seeds can be used in the same ratio.
The Final Flourish
1 teaspoon vanilla bean paste is the secret ingredient that gives depth and warmth. Unlike vanilla extract, the paste contains real vanilla seeds, offering a richer, more complex aroma. If you can’t find vanilla paste, a teaspoon of pure vanilla extract will do, though the flavor won’t be as robust.
Everything's prepped? Good. Let's get into the real action...
The Method — Step by Step
- Preheat your oven to 350°F (175°C). Line a baking sheet with parchment paper or a silicone mat; this prevents sticking and ensures even baking. While the oven is heating, grab a medium bowl and set aside. I like to keep my kitchen organized, so having everything at arm’s reach keeps the flow smooth.
- In a separate bowl, whisk together the flour, cocoa powder, baking soda, and salt. This dry mix is the foundation of the cookies; a well‑mixed dry blend ensures the flavors are evenly distributed. Think of it as the skeleton that supports the entire structure.
- In a small saucepan, melt the vegan butter over low heat until it turns a light amber color. This subtle toasting brings out the buttery notes and creates a richer flavor. Once melted, remove from heat and let it cool slightly—if it’s too hot, it could cause the sugar to burn.
- Add the organic sugars to the melted butter, whisking until fully dissolved. The mixture should feel smooth and glossy. This step is critical; a lumpy sugar mixture will affect the texture of the final product.
- Stir in the vanilla bean paste until the mixture is uniform. The vanilla’s warmth will permeate the dough, creating a layered flavor profile. At this point, the wet mixture should be glossy and slightly thick.
- Combine the wet and dry ingredients in a large bowl. Use a spatula or wooden spoon to fold them together gently—overmixing can make the cookies tough. The dough should be thick but pliable, holding its shape when scooped.
- Fold in the flax egg last, ensuring it’s evenly distributed. The flax will absorb the excess moisture and bind the dough, giving the cookies their signature chewiness. Let the dough rest for 5 minutes; this allows the flour to hydrate fully.
- Using a tablespoon or a cookie scoop, drop rounded balls of dough onto the prepared baking sheet, spacing them about 2 inches apart. Press each ball lightly with the back of a fork to create a shallow, flat surface that promotes even browning.
- Bake for 10-12 minutes, or until the edges are set but the centers remain soft. The cookies will appear slightly underbaked; they continue to cook on the hot sheet after removal, preventing over‑browning. The aroma will be intoxicating—chocolate and vanilla dancing together.
- Let the cookies cool on the sheet for 5 minutes before transferring them to a wire rack to cool completely. This step allows the cookies to set and develop their final texture. If you rush them off the sheet, they may crack or crumble.
- Once cooled, store the cookies in an airtight container at room temperature for up to a week. For longer storage, place them in the fridge or freezer; they stay fresh for up to a month when properly sealed.
- Before serving, give the container a gentle shake to redistribute any settled sugar. The cookies should feel firm yet soft, with a glossy finish that reflects their indulgent nature. Enjoy them as a dessert, a snack, or a sweet accompaniment to your morning coffee.
That's it—you did it. But hold on, I've got a few more tricks that'll take this to another level...
Insider Tricks for Flawless Results
The Temperature Rule Nobody Follows
Many bakers bake at 350°F, but I find that lowering the temperature to 325°F and extending the bake time by 2 minutes gives a more even rise and a softer crumb. The cookies stay tender, and the edges don’t brown too quickly. If you’re using a convection oven, reduce the temperature by 25°F to compensate for the fan’s effect.
Why Your Nose Knows Best
Before you pull the cookies out of the oven, pause and inhale. The scent of caramelized sugar and toasted cocoa is a reliable indicator that the cookies are ready. If the smell is faint, let them bake a minute longer. Trust your senses—your nose is a seasoned judge of baking perfection.
The 5‑Minute Rest That Changes Everything
After baking, let the cookies rest on the sheet for exactly five minutes. This brief pause allows the steam inside to redistribute, ensuring the center sets without becoming dry. It also lets the sugar glaze firm up slightly, giving that glossy sheen that makes the cookies look professional.
A Friend’s Misstep
I once had a friend who skipped the flax egg altogether, thinking it was optional. The result was a cookie that fell apart in her hands, leaving a sticky mess on the counter. She learned the hard way that the flax egg isn’t just a substitute—it’s the secret that keeps the cookies cohesive.
The Final Touch of Sweetness
If you want an extra glossy finish, sprinkle a light dusting of powdered sugar over the cookies while they’re still warm. The sugar melts into a thin glaze, creating a silky, sweet coating that elevates the flavor. Just be careful not to overdo it; you don’t want a sugar coating that feels like a candy coating.
Creative Twists and Variations
This recipe is a playground. Here are some of my favorite ways to switch things up:
Nutty Nirvana
Add a cup of chopped walnuts or pecans to the dough. The nuts add crunch and a buttery flavor that pairs beautifully with the chocolate. They also increase the protein content, making the cookies more satisfying.
Spiced Surprise
Stir in ¼ teaspoon of cinnamon or a pinch of cayenne pepper. The cinnamon adds warmth, while the cayenne gives a subtle kick that contrasts with the sweetness. This variation is perfect for fall or winter gatherings.
Berry Burst
Fold in ½ cup of dried cranberries or raisins for a chewy, tart bite. The dried fruit adds texture and a burst of natural sweetness that complements the chocolate. If you prefer fresh berries, chill them beforehand to avoid excess moisture.
Salted Caramel Dream
Drizzle a thin layer of vegan caramel sauce over the cooled cookies and sprinkle a pinch of sea salt on top. The caramel adds a rich, buttery sweetness, while the sea salt provides a savory counterpoint that elevates the overall flavor.
Minty Marvel
Add a teaspoon of peppermint extract to the wet mixture. The mint undertone gives the cookies a refreshing twist, making them ideal for holiday celebrations or a post‑lunch pick‑me‑up.
Storing and Bringing It Back to Life
Fridge Storage
Place the cookies in an airtight container at room temperature. They stay fresh for up to 5 days. If you notice any moisture, add a slice of bread to the container; it will absorb excess humidity and keep the cookies crisp.
Freezer Friendly
For longer storage, wrap the cookies individually in parchment paper and place them in a freezer bag. They can be frozen for up to 3 months. When ready to enjoy, thaw at room temperature for 30 minutes.
Best Reheating Method
To revive frozen cookies, preheat your oven to 300°F (150°C). Place the cookies on a baking sheet and bake for 8–10 minutes, or until heated through. If the cookies feel dry, sprinkle a tiny splash of water on top before baking; the steam will restore moisture and keep the texture soft.