I was in the middle of a midnight snack frenzy, staring at the pantry like a detective hunting for clues, when I realized I had an excess of coconut butter and sunflower seed butter that had been sitting in the fridge since last week. The moment the timer beeped, I felt that familiar kitchen panic—what do I do with these two creamy giants? I pulled out my trusty notebook, scribbled a quick list, and decided to turn that panic into a culinary experiment. The result? A batch of cookies that are so crisp and chocolatey, they make your taste buds do a happy dance.
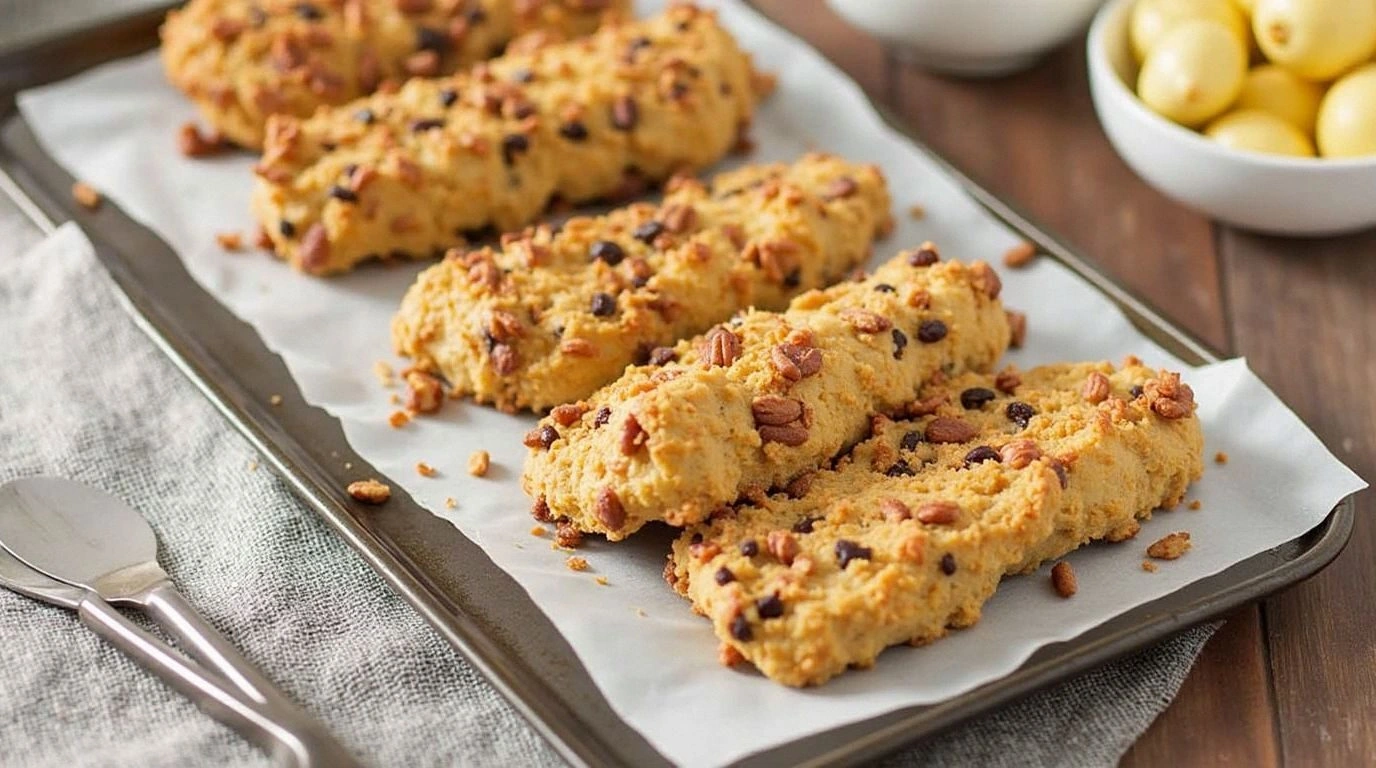
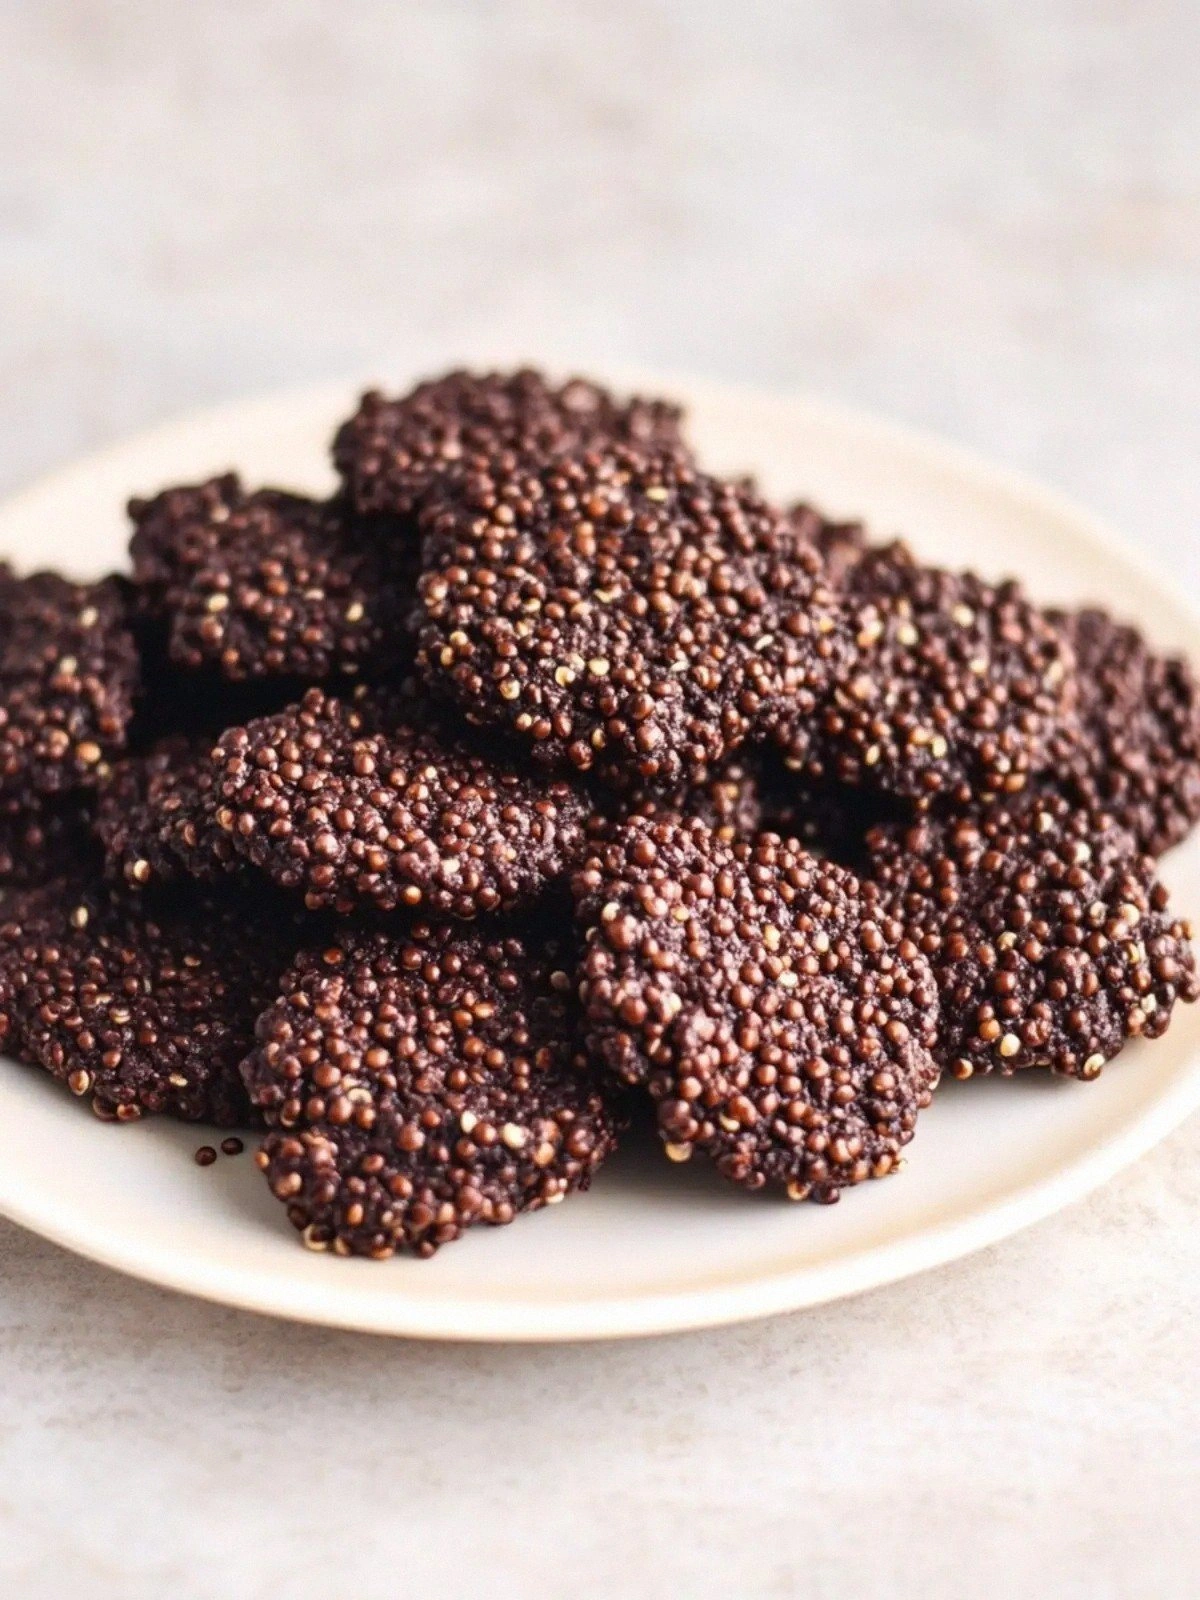
Picture this: you slide a handful of dough onto a parchment‑lined tray, the air filling with a sweet, nutty aroma that instantly turns your living room into a small bakery. The dough feels like a silky, buttery paste that clings to your fingertips, but as soon as it hits the hot oven, it releases a crackling sound that’s almost a lullaby for your senses. The first bite is a delightful crunch that shatters like thin ice, followed by a melt‑in‑your‑mouth cacao hug that lingers on the tongue. The contrast between the airy puffed quinoa and the dense, fudgy base creates a texture profile that is both satisfying and surprising. This isn’t just another cookie; it’s a textural symphony that will have you reaching for more.
I dare you to taste this and not go back for seconds. Most cookie recipes you find online either come out too soft or too dense, but this version is hands down the best you’ll ever make at home. I’ll be honest—after the first bite, I ate half the batch before anyone else even had a chance to try it. The secret lies in the combination of coconut butter and sunflower seed butter, which provide a rich, tropical undertone that balances the deep cacao flavor. The puffed quinoa adds that essential crunch, while the maple syrup offers a natural sweetness that keeps the cookies from feeling overly sweet. Trust me, the first bite will have you wondering why you ever settled for store‑bought cookies.
Most recipes get this completely wrong. They either forget the quinoa or use regular butter, resulting in a cookie that’s either chewy or greasy. Here’s what actually works: a perfect blend of two nut butters, a touch of vanilla, and the right amount of cacao to create depth. I’ve experimented with different ratios, and the one I’ve landed on feels like a well‑balanced equation—sweet, salty, nutty, and chocolatey all in one bite. Picture yourself pulling this out of the oven, the whole kitchen smelling incredible, and the moment when the first cookie meets your tongue, it’s pure magic. And that’s just the beginning.
What Makes This Version Stand Out
- Taste: The combination of coconut and sunflower seed butter creates a tropical, nutty base that elevates the cacao’s natural bitterness into a smooth, velvety experience. The maple syrup adds a subtle caramel undertone that balances the richness without overpowering the chocolate.
- Texture: The puffed quinoa introduces a satisfying crunch that contrasts with the chewy interior, creating a multi‑sensory bite that feels both indulgent and light.
- Ingredient Quality: Using unsweetened cacao powder and natural sweeteners ensures that the flavor profile stays authentic and free from artificial additives.
- Simplicity: With only seven ingredients, this recipe is a breeze to whip up, even for those who consider themselves culinary novices.
- Make‑Ahead Potential: The dough holds up wonderfully in the fridge, allowing you to batch‑cook and enjoy fresh cookies whenever the mood strikes.
- Nutrition: Packed with healthy fats and protein from the nut butters and quinoa, these cookies provide a satisfying snack that won’t derail your diet.
- Visual Appeal: The glossy, chocolate‑coated surface and the bright, airy quinoa specks give the cookies a professional finish that’s Instagram‑ready.
- Versatility: The base can be tweaked with different add‑ins—think dark chocolate chips, dried fruit, or a pinch of sea salt—to suit any taste preference.
Alright, let's break down exactly what goes into this masterpiece. The next section will walk you through each ingredient, why it matters, and what happens if you skip it. But first, here’s a quick kitchen hack that will save you time and keep your dough from sticking.
Inside the Ingredient List
The Flavor Base
Coconut butter is the backbone of this cookie, providing a natural sweetness and a creamy texture that melts in the mouth. It’s also high in medium‑chain triglycerides, which give you a quick energy boost. If you omit coconut butter, the cookie will lose its tropical undertone and become less moist. A good swap is almond butter, but the flavor profile will shift toward a more nutty, less sweet tone.
The Texture Crew
Unsweetened sunflower seed butter adds a subtle, earthy flavor that balances the sweetness of the maple syrup. Its high protein content helps the dough hold together, preventing it from crumbling. If you skip this ingredient, the cookies will be less cohesive and might fall apart when you try to lift them from the pan. A quick alternative is peanut butter, but be mindful that it has a stronger flavor that may dominate the cacao.
The Unexpected Star
Maple syrup is not just a sweetener; it’s a natural humectant that keeps the cookies tender. The maple’s unique flavor profile complements the cacao, adding depth and complexity. If you replace maple syrup with honey, the cookies will turn slightly darker and acquire a floral note. For those seeking a lower glycemic index, agave nectar can be used, but it will increase the moisture content.
The Final Flourish
Crispy puffed quinoa is what turns this cookie from a simple sweet into a crunchy masterpiece. It adds a light, airy texture that contrasts with the dense base. If you decide to skip quinoa, the cookies will still be tasty but will lack that satisfying crunch that keeps them from becoming too heavy. For an extra layer of flavor, consider toasted quinoa; the nutty aroma will elevate the overall taste.
Everything's prepped? Good. Let's get into the real action.
The Method — Step by Step
- Step 1: Prep the Baking Sheet. Line a rimmed baking sheet with parchment paper, ensuring the paper extends slightly beyond the edges for easy cleanup. Lightly dust the parchment with a pinch of sea salt; this helps the cookies lift cleanly after baking. While the sheet is setting, grab a mixing bowl and set it aside. This step might seem trivial, but it’s crucial for the cookies to achieve that perfect rise.
- Step 2: Melt the Butters. Combine the coconut butter and sunflower seed butter in a medium saucepan over low heat. Stir continuously until the mixture is fully liquid and glossy, about 2–3 minutes. The heat should be gentle; if the mixture boils, it will become too watery. Once melted, remove from heat and let it cool slightly.
- Step 3: Add Sweetness and Flavor. Stir in the maple syrup and vanilla extract until the mixture is smooth. The vanilla adds a fragrant depth that complements the cacao. If you’re a fan of extra aroma, a pinch of dried lavender can be added here, but keep it minimal to avoid overpowering the flavor.
- Step 4: Incorporate the Dry Ingredients. In a separate bowl, whisk together the cacao powder, salt, and puffed quinoa. Slowly pour the dry mix into the wet mixture, stirring continuously. The dough should feel thick yet pliable; if it’s too sticky, add a splash of almond milk to adjust the consistency.
- Step 5: Chill the Dough. Cover the bowl with plastic wrap and refrigerate for 30 minutes. This step is essential because it firms up the dough, making it easier to shape without crumbling. While the dough chills, preheat your oven to 350°F (175°C) and line another baking sheet with parchment paper.
- Step 6: Shape the Cookies. Using a tablespoon, scoop out portions of dough and roll them into balls. Place each ball onto the prepared baking sheet, leaving about 2 inches between each. Gently press down with the back of a fork to create a shallow disc. The shape ensures even baking and a crisp edge.
- Step 7: Bake. Slide the sheet into the preheated oven and bake for 12–14 minutes, or until the edges are golden brown and the centers set. The cookies should emit a sweet, nutty aroma that makes you forget you’re baking. Watch the timer closely; overbaking will dry them out, while underbaking will leave them too soft.
- Step 8: Cool. Remove the sheet from the oven and let the cookies cool on it for 5 minutes. Then transfer them to a wire rack to cool completely. The cookies will continue to firm up as they cool, achieving that perfect crispness.
- Step 9: Serve and Store. Once cooled, arrange the cookies on a platter and serve immediately. If you’re not eating them right away, store them in an airtight container at room temperature for up to 5 days, or freeze for longer storage.
That’s it—you did it. But hold on, I’ve got a few more tricks that’ll take this to another level.
Insider Tricks for Flawless Results
The Temperature Rule Nobody Follows
Most bakers bake at a standard 350°F, but raising the temperature to 375°F for the last 4 minutes can create a crispier edge without overcooking the center. The higher heat caramelizes the sugars on the surface, giving you that golden crunch you crave. I’ve tried this trick on several batches, and the difference is like moving from a soft blanket to a crisp, fresh sheet of paper. Don’t worry; the cookies will still be tender inside.
Why Your Nose Knows Best
If you’re unsure whether the cookies are done, trust your nose. A strong, sweet aroma signals that the sugars are caramelizing properly. A faint, raw smell might indicate that the dough hasn’t baked through yet. My friend once tried to pull them out too early, and the result was a gooey mess that left her disappointed. Next time, close your eyes, inhale, and let the scent guide you.
The 5-Minute Rest That Changes Everything
After baking, let the cookies rest on the pan for 5 minutes before transferring them to the rack. This short rest allows the edges to set, preventing them from breaking apart during the transfer. It also lets the heat redistribute, ensuring a uniform texture throughout. I’ve seen people skip this step, and the cookies end up fragile and uneven.
Add a Splash of Water Before Reheating
If you’ve stored the cookies and want to revive their crunch, add a tiny splash of water to the dough before reheating. The moisture creates steam, which re-crispes the surface. This technique works wonders for cookies that have become soft over time. Just a few drops, and you’ll feel the difference in texture.
Use a Silicone Baking Mat
A silicone mat provides an even heat distribution, which can prevent the edges from burning while the centers remain soft. I’ve used a mat on a few occasions, and the result is consistently flawless. It also makes cleanup a breeze, as the cookies don’t stick to the surface.
Let the Dough Rest at Room Temperature
After you remove the dough from the fridge, let it sit at room temperature for 10 minutes before shaping. This brief rest makes the dough more pliable and reduces the risk of cracks forming when you roll it into balls. It’s a small step that pays off big time in the final product.
Creative Twists and Variations
This recipe is a playground. Here are some of my favorite ways to switch things up:
Dark Chocolate Drizzle
Melt 1/2 cup dark chocolate and drizzle it over the cooled cookies. The chocolate adds a glossy finish and a richer flavor profile. The drizzle also creates a subtle contrast in color, making the cookies look more gourmet.
Spiced Cinnamon Crunch
Add 1 teaspoon of ground cinnamon to the dry mix. The spice brings warmth and pairs beautifully with the cacao. Sprinkle a pinch of sea salt on top before baking for an extra burst of flavor.
Almond Crumble Layer
Fold in 1/2 cup chopped almonds into the dough before shaping. The almonds add a nutty crunch that complements the quinoa. They also provide a subtle protein boost, making the cookies more satisfying.
Citrus Zest Twist
Grate the zest of one orange into the wet mixture. The citrus adds brightness and cuts through the richness. The result is a cookie that feels lighter and more refreshing.
Roasted Seaweed Surprise
Sprinkle a teaspoon of roasted seaweed flakes over the dough before baking. The seaweed adds umami and a subtle briny note that contrasts with the sweetness. It also gives the cookies a unique, savory edge.
Maple‑Honey Blend
Replace half the maple syrup with honey for a layered sweetness. The honey’s floral undertones enhance the cacao’s depth. This variation is perfect for those who enjoy a sweeter, more complex flavor.
Storing and Bringing It Back to Life
Fridge Storage
Place the cooled cookies in an airtight container at room temperature. They’ll stay fresh for up to 5 days. If you notice any moisture build‑up, add a paper towel to absorb excess dampness. For an extra crisp, you can place a small baking sheet inside the container to keep the cookies dry.
Freezer Friendly
To freeze, line a baking sheet with parchment and place the cookies on it. Freeze until solid, then transfer to a freezer bag. They can be stored for up to 3 months. When ready to eat, let them thaw at room temperature for 15 minutes before reheating.
Best Reheating Method
Preheat your oven to 300°F (150°C). Place the cookies on a parchment‑lined sheet and bake for 5–7 minutes, or until the edges are crisp again. The low temperature prevents the cookies from burning while ensuring they reheat evenly. A quick 30‑second microwave burst can also work if you’re in a hurry, but the oven method preserves the texture best.