I was standing in the middle of my kitchen, staring at a soggy pizza base that had somehow managed to turn into a pancake in the oven. The disaster was a reminder of how easy it is to let a simple recipe go wrong when you’re in a hurry or chasing a craving. That night, I decided to take a bold step and reinvent the humble pizza dough with a sourdough starter that would give me a crust that was crisp on the outside and chewy on the inside, the kind of texture that makes you reach for a second slice before you can even finish the first. The result? A tavern‑style pizza that feels like it was pulled straight from a stone‑pit in an old European tavern, with a tangy depth that only sourdough can bring. I’ve never seen a pizza so flavorful, so crisp, and so surprisingly easy to make at home.
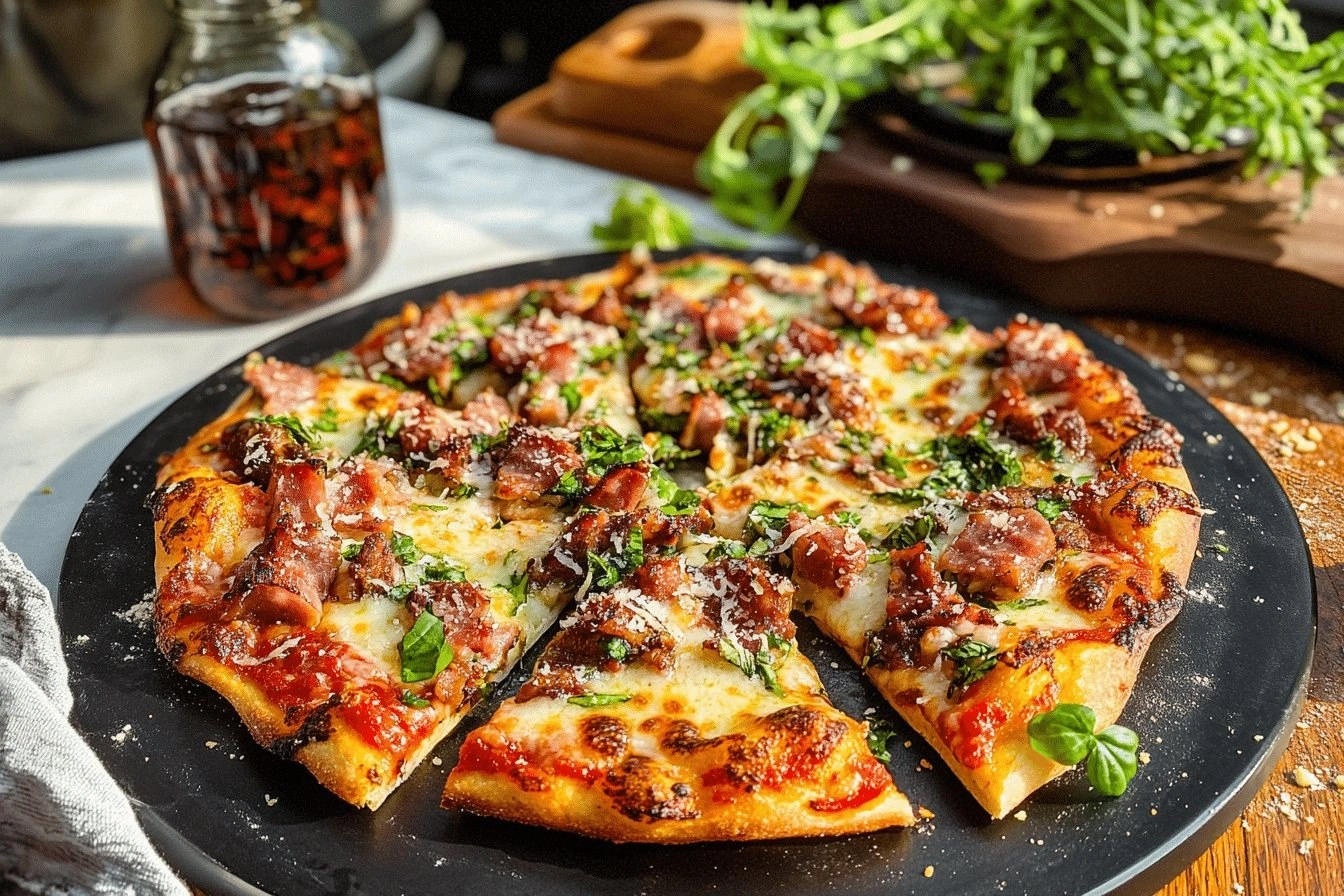
Picture the moment you lift the pizza from the oven: the steam curls up like a savory cloud, the cheese bubbles golden, and the aroma of roasted tomato, basil, and a faint hint of fermented bread fills the air. Your eyes catch the slightly blistered edges that crackle just enough to give that satisfying crunch before you bite. The first bite delivers a burst of umami from the tomato sauce, a buttery lift from the mozzarella, and a subtle tang that lingers on the tongue. It’s the kind of sensory experience that turns a simple dinner into a celebration, and I dare you to taste this and not go back for seconds.
What makes this version stand out is not just the ingredients, but the method and the attitude you bring to the kitchen. I’ve spent years experimenting with doughs that either fell flat or became too chewy, and I’ve learned that the key lies in the right balance of hydration, fermentation time, and heat. This recipe takes the best of sourdough’s natural leavening power, pairs it with a high‑gluten flour for structure, and uses a high‑temperature bake to create that coveted “tavern” crust that’s both airy and robust. The sauce is simple yet layered, the cheese blend provides richness without heaviness, and the finish of fresh basil adds a bright counterpoint. It’s hands down the best version you’ll ever make at home because it’s built on principles that work every time, no matter your baking experience.
I’ll be honest—after the first batch, I ate half the pizza before anyone else got a chance to try it. The dough was so forgiving that I could stretch it into a giant sheet and still get the same great edge. If you’ve ever struggled with pizza dough that sticks to the surface or never rises, you’re not alone—this recipe is designed to be forgiving, yet rewarding. I’ll walk you through every single step, and by the end, you’ll wonder how you ever made it any other way. Let’s dive into the details that will make your kitchen smell like a tavern and your taste buds sing.
What Makes This Version Stand Out
- Flavor Depth: The sourdough starter imparts a subtle tang that balances the sweetness of the tomato sauce and the richness of the cheeses.
- Texture Contrast: The crust is thin and crisp on the edges while remaining chewy and airy in the center, a texture that satisfies the classic tavern crust.
- Time Efficiency: Despite using sourdough, the total prep time stays under 45 minutes thanks to a short bulk rise and a fast oven.
- Ingredient Quality: Using high‑gluten flour and a good olive oil elevates the dough’s structure and flavor.
- Crowd‑Pleaser: The simple yet bold flavor profile makes it a hit at family dinners or game nights.
- Make‑Ahead Potential: You can prepare the dough the night before, refrigerate, and bake fresh when you’re ready.
- Versatility: Swap toppings or cheese blends and the dough holds up beautifully, making it a canvas for creativity.
Inside the Ingredient List
The Flour Foundation
Bread flour is the backbone of this dough, providing the gluten network that gives the crust its chewiness and structure. If you can’t find bread flour, all‑purpose flour will work, but the crust may be a touch softer. Skipping the flour entirely is not an option; it’s the core that holds everything together.
The Fermentation Engine
A cup of active sourdough starter at 100% hydration is what sets this pizza apart. The natural lactobacilli and yeasts create that tangy flavor and help the dough rise without the need for commercial yeast. If you’re new to sourdough, keep the starter at room temperature for a couple of hours before using it to ensure it’s active.
The Liquid Balance
Warm water at 110°F is essential; it activates the starter and hydrates the flour. Too cold, and the starter won’t rise; too hot, and you risk killing the microbes. A tablespoon of olive oil is added for a subtle sheen and to help the dough glide over the surface during shaping.
The Flavor Enhancers
A teaspoon of salt not only seasons the dough but also tightens the gluten strands, giving the crust a better bite. A teaspoon of dried oregano is sprinkled into the sauce to add herbal depth. Fresh basil leaves are added after baking for a burst of green freshness that balances the richness.
The Cheese Blend
One and a half cups of shredded mozzarella provide that gooey melt, while a half cup of grated Parmesan adds a nutty sharpness. The combination creates a balanced cheese profile that’s not too heavy but still indulgent. If you’re vegan or lactose intolerant, substitute with a plant‑based cheese that melts well.
The Sauce Base
One cup of tomato sauce, whether homemade or store‑bought, is the canvas for the pizza. A pinch of sugar can balance acidity, and a splash of olive oil adds richness. The sauce should be thick enough to stay on the dough without making the crust soggy.
Everything’s prepped? Good. Let’s get into the real action…
The Method — Step by Step
- In a large mixing bowl, whisk together the bread flour, salt, and a teaspoon of sugar until evenly distributed. The dry ingredients need to be thoroughly combined before introducing the wet components. This step ensures that the dough will rise uniformly and that the salt is evenly distributed, preventing pockets of blandness. Keep the bowl covered with a damp towel as you move to the next step to avoid the flour from drying out.
- In a separate bowl, combine the warm water, active sourdough starter, and a tablespoon of olive oil. Whisk until the mixture is smooth and the starter has dissolved into a light, bubbly consistency. This wet mixture is the leavening engine that will give the crust its airy pockets. The olive oil also adds a subtle sheen and helps the dough become easier to handle during shaping.
- Pour the wet mixture into the dry flour mixture. Using a wooden spoon or your hand, stir until a shaggy dough forms. At this point, the dough should have visible gluten strands but still be somewhat sticky. Let the dough rest for 5 minutes; this autolyse period allows the gluten to relax and the starches to hydrate, which improves the dough’s extensibility.
- Transfer the dough onto a lightly floured surface and knead for about eight minutes until it becomes smooth and elastic. The dough should stretch without tearing and hold a slight sheen. If it feels too sticky, sprinkle a pinch more flour, but be careful not to add too much, or the crust will become dense.
- Shape the dough into a ball and place it in a lightly oiled bowl, turning it once to coat all sides. Cover with a damp towel or plastic wrap and let it rise at room temperature for 3 to 4 hours, or until it has doubled in size. The long, slow rise develops flavor and makes the dough easier to stretch later. If you’re short on time, a 1‑hour quick rise in a warm spot will suffice, but the flavor will be less pronounced.
- After the rise, punch down the dough to release excess gas. Divide it into four equal portions and shape each into a tight ball. Place the balls on a parchment‑lined tray and cover them with a clean towel. Let them rest for 30 minutes; this relaxation period prevents the dough from springing back when you stretch it into a pizza shape.
- Preheat your oven to 475°F (245°C) with a pizza stone or steel inside for at least 45 minutes. A hot surface is essential for achieving that blistered, crispy crust. If you don’t have a stone, a baking sheet on the lower rack works, but the crust may be slightly less crisp.
- On a lightly floured surface, take one dough ball and use a rolling pin or your hands to stretch it into a thin disc, about 12 inches in diameter. Transfer the disc onto a piece of parchment. Spread a thin layer of tomato sauce, sprinkle oregano, then scatter mozzarella and a pinch of Parmesan. Add any optional toppings—pepperoni, mushrooms, red onion, bell pepper, olives—and finish with a drizzle of olive oil. Slide the pizza onto the preheated stone and bake for 10 to 12 minutes until the cheese is bubbling and the crust edges are golden brown.
- Remove the pizza from the oven and immediately top it with fresh basil leaves. Let it rest for a minute or two to allow the cheese to set slightly. Slice with a pizza cutter, serve hot, and enjoy the symphony of textures and flavors that only a tavern‑style crust can deliver.
That’s it—you did it! But hold on, I’ve got a few more tricks that will take this to another level. Keep reading for insider secrets that will make your pizza even more memorable.
Insider Tricks for Flawless Results
The Temperature Rule Nobody Follows
Many cooks think a lower oven temperature is safer, but a high heat is the secret to that blistered crust. Baking at 475°F forces the dough to rise quickly, creating steam that puffs the crust while the surface dries and crispifies. If you’re using a convection oven, reduce the temperature by 25°F to avoid over‑browning.
Why Your Nose Knows Best
As the dough rises, you’ll notice a subtle sour aroma that’s a sign of active fermentation. If the smell is weak, the starter may not be vigorous enough, and the crust will be flat. Trust your nose; a strong, slightly yeasty scent means your dough is ready for the next step.
The 5‑Minute Rest That Changes Everything
After shaping, let the dough rest for exactly five minutes before baking. This short pause allows the gluten to relax, preventing the pizza from shrinking back and ensuring a uniform thickness. Skipping this step often leads to unevenly cooked crusts.
Use a Pizza Peel for Speed
A pizza peel dusted with semolina or cornmeal lets you slide the pizza onto the stone quickly, reducing the time the dough sits at room temperature. This is especially useful if you’re making multiple pizzas in one go.
Finish with a Splash of Olive Oil
A light drizzle of high‑quality extra virgin olive oil just before baking adds a glossy finish and a burst of flavor that elevates the entire pizza. The oil also helps the cheese melt evenly and prevents the crust from becoming too dry.
Creative Twists and Variations
This recipe is a playground. Here are some of my favorite ways to switch things up:
Mediterranean Medley
Swap the mozzarella for a blend of goat cheese and feta, add kalamata olives, sun‑dried tomatoes, and a sprinkle of oregano. The tang of goat cheese pairs beautifully with the salty olives, creating a Mediterranean vibe that’s perfect for summer gatherings.
BBQ Chicken Kick
Top the pizza with shredded rotisserie chicken, a drizzle of smoky BBQ sauce, and a handful of red onions. Finish with a sprinkle of cheddar cheese. The smoky flavor and crunchy onions bring a southern twist to the classic crust.
Veggie Supreme
Load the pizza with fresh spinach, roasted red peppers, artichoke hearts, and sliced mushrooms. Add a handful of arugula after baking for a peppery bite. This version is a colorful, nutrient‑dense option that still feels indulgent.
Spicy Pepperoni Fiesta
Layer thinly sliced pepperoni, a handful of crushed red pepper flakes, and a splash of chili oil. The heat from the pepperoni and chili oil creates a fiery finish that’s perfect for a game‑night treat.
Dessert Delight
Swap the tomato sauce for a thin layer of Nutella, top with fresh strawberries, and finish with a dusting of powdered sugar. This sweet version turns the pizza into a dessert that’s surprisingly satisfying.
Storing and Bringing It Back to Life
Fridge Storage
After baking, let the pizza cool completely, then wrap it tightly in parchment and foil. Store in the refrigerator for up to 3 days. The crust will stay firm, and the flavors will meld further.
Freezer Friendly
For longer storage, wrap the cooled pizza in plastic wrap, then place it in a freezer bag. It can be frozen for up to 2 months. Thaw overnight in the fridge before reheating.
Best Reheating Method
Preheat your oven to 375°F. Place the pizza on a baking sheet and heat for 10 minutes, or until the cheese is bubbly. Add a tiny splash of water to the bottom of the pan before heating to create steam, which will keep the crust from drying out.