It started with a kitchen mishap that had me scrambling for a solution: a pot of bubbling sauce had accidentally been left on the stove overnight, turning my living room into a smoky, slightly burnt mess. I stared at the charred residue, thinking of the disastrous dinner that would have followed if I hadn’t found a recipe on a late‑night scroll. A friend dared me to whip up something that would make the entire house smell like a fiesta, and I was determined to prove that I could rise to the challenge. I was craving something bold, creamy, and with a kick that could turn a bland gathering into an unforgettable spread. The moment I opened the can of diced green chiles, I knew I was about to create something extraordinary.
Picture this: the first bite melts on your tongue, the creamy cheese base giving way to a burst of smoky, slightly sweet green chile flavor that lingers like a warm hug. The aroma that fills the kitchen is a seductive mix of melted cheese, garlic, and that unmistakable green chile perfume that makes every guest’s eyes widen in anticipation. The texture is a harmonious blend of silky smoothness from the cream cheese and a gentle crunch from the lightly toasted edges. The heat from the hot sauce dances on your palate, teasing your senses without overwhelming them. The finish is a lingering, savory aftertaste that makes you reach for another scoop, leaving you wondering why you ever settled for a bland dip before.
What sets this version apart from every other recipe you’ve tried is the meticulous balance between heat, creaminess, and a touch of sharpness from the cheddar. I’ve refined the cheese blend to achieve a silky mouthfeel that coats the dip like velvet, while the diced green chiles provide a bright, slightly sweet bite that cuts through the richness. The addition of a splash of hot sauce is carefully calibrated to give a subtle kick that keeps the flavor profile dynamic. I’ve also tweaked the baking time to create perfectly browned edges that crackle like thin ice when you bite into them. This isn’t just a dip; it’s a flavor experience that transforms any gathering into a memorable event.
I dare you to taste this and not go back for seconds—once you try it, you’ll wonder how you ever made it any other way. The secret? A quick, intentional step that many recipes overlook: allowing the cheese mixture to rest for a few minutes before serving. This simple technique lets the flavors meld, creating a depth that will keep your guests coming back for more. I’ll walk you through every single step, from prep to plating, so by the end, you’ll feel like the culinary mastermind of the night.
What Makes This Version Stand Out
- Taste: The combination of diced green chiles, creamy cheeses, and a dash of hot sauce creates a flavor profile that is simultaneously smoky, sweet, and peppery. The balance ensures that no single element overwhelms the others, resulting in a dip that is both complex and approachable.
- Texture: The blend of cream cheese, Monterey Jack, cheddar, and sour cream delivers a silky base that coats the spoon, while the lightly toasted edges provide a satisfying crunch. The result is a dip that feels luxurious in the mouth yet has a subtle bite.
- Simplicity: With only nine ingredients and a straightforward method, this recipe is easy to replicate even for the most novice cook. The use of pantry staples means you can whip it up in minutes.
- Crowd Reaction: Guests rave about the dip’s richness and the gentle heat that doesn’t overpower their taste buds. It’s the kind of dish that becomes the centerpiece of any gathering.
- Ingredient Quality: Fresh, high‑quality diced green chiles and real cheeses make a noticeable difference in flavor and texture. Choosing the right cheeses ensures the dip melts beautifully.
- Make‑Ahead Potential: You can prepare the dip up to 24 hours in advance, allowing the flavors to develop further. It even tastes better the next day when the cheeses have had time to meld.
Inside the Ingredient List
The Flavor Base
The star of this dip begins with the diced green chiles, which bring a bright, smoky undertone that is essential for that authentic Hatch flavor. These chiles are not only packed with heat but also carry a subtle sweetness that balances the richness of the cheeses. If you skip them, the dip loses its signature punch and becomes a generic cheesy spread. When selecting a can, opt for one with a slightly thicker consistency to maintain texture. The green chiles also add a pop of color, making the dip visually appealing.
Cream cheese is the cornerstone that provides a velvety base, allowing the other ingredients to meld together smoothly. Its neutral flavor acts as a canvas, absorbing the spices and the heat from the chiles. If you replace it with a lighter cheese, the dip might become too thin and lose its body. A good rule of thumb is to use an 8‑oz block, which gives enough bulk to support the other cheeses. The cream cheese also helps the dip stay creamy even after baking.
Garlic powder adds a subtle, rounded depth that prevents the dip from tasting one‑dimensional. It’s a convenient alternative to fresh garlic, ensuring even distribution throughout the mixture. Too much garlic powder can overpower the green chile, so keep the quantity modest. A pinch of garlic powder can go a long way, especially if you prefer a cleaner flavor profile. Remember, the goal is to complement, not dominate.
Salt is a silent hero that elevates every component, enhancing the sweetness of the chiles and the richness of the cheeses. It’s easy to overlook, but a proper amount of salt brings harmony to the flavors. Over‑salting can mask the delicate balance, while under‑salting leaves the dip flat. A teaspoon is sufficient for this recipe, and you can adjust to taste after tasting the mixture.
A splash of hot sauce is the final secret that injects a subtle, lingering heat. It’s the difference between a dip that merely feels warm and one that truly excites the palate. Use a sauce with a smooth, slightly sweet profile to avoid sharp bitterness. Adding it at the end of the mixing stage ensures the heat is evenly distributed. Don’t be afraid to tweak the amount to match your personal heat tolerance.
The Texture Crew
Monterey Jack cheese is prized for its meltability and mild flavor, providing a smooth, gooey texture that coats the dip like a blanket. Its low melting point means it blends seamlessly with the cream cheese, creating a cohesive base. If you substitute it with a harder cheese, you risk uneven melting and a less silky mouthfeel. The 8‑oz block of Monterey Jack is the sweet spot for achieving that perfect gooey consistency.
Shredded cheddar adds a sharp, tangy bite that cuts through the richness of the other cheeses. Its crumbly texture contrasts nicely with the smoothness of the cream cheese, adding a pleasant mouthfeel. Cheddar also imparts a subtle nutty undertone that deepens the flavor profile. When selecting cheddar, choose a medium‑sharp variety for the best balance between taste and meltability.
Sour cream brings a creamy tang that brightens the dip and balances the heat from the chiles. It also helps to thin the mixture slightly, making it easier to spread and bake. If you don’t have sour cream on hand, a dollop of Greek yogurt can serve as a suitable substitute, though the tang will be slightly different. Sour cream also adds a cooling effect that tempers the chili’s heat.
The additional shredded cheese—whether it’s a blend of Monterey Jack and cheddar or a single cheese—serves as the final flourish that gives the dip its signature golden top. This extra layer of cheese creates a crispy, browned crust that’s both visually appealing and deliciously crunchy. It also ensures that the dip has a balanced cheese-to-chili ratio, preventing any one component from dominating. When baking, watch for the edges to turn a deep amber; that’s the sign of perfection.
The Unexpected Star
While the cheeses and chiles are the obvious stars, the combination of these ingredients creates an unexpected harmony that elevates the dip. The interplay of creamy, sharp, and spicy flavors turns a simple recipe into a complex culinary experience. Each bite reveals a new layer of flavor, from the initial creaminess to the final spicy bite. This synergy is what makes the dip unforgettable and keeps guests coming back for more.
The Final Flourish
The final flourish is the careful balance of heat and creaminess, achieved by layering the cheeses and chiles just right before baking. This step ensures that the dip has a uniform texture and that the heat is evenly distributed. The result is a dip that feels indulgent yet refreshing, with a gentle kick that lingers on the tongue. It’s a perfect example of how small adjustments can make a big difference in flavor.
Everything’s prepped? Good. Let’s get into the real action.
The Method — Step by Step
- Preheat your oven to 375°F (190°C) and line a 9‑inch square baking dish with parchment paper. The parchment ensures easy removal and keeps the edges from sticking. While the oven warms, gather all your ingredients so you’re ready to go. This prep step sets the stage for a smooth, efficient cooking process. A well‑heated oven guarantees even baking and a golden crust.
- In a medium saucepan, gently heat the can of diced green chiles over low heat until they’re warmed through. Stir occasionally to prevent scorching on the bottom. The goal is to release the flavors without cooking them to a mushy consistency. You’ll notice the aroma becoming more pronounced, signaling that the chiles are ready. This step is crucial for maximizing the chile’s bright, smoky profile.
- In a large mixing bowl, combine the softened cream cheese, shredded Monterey Jack, shredded cheddar, and sour cream. Use a silicone spatula to blend until the mixture is smooth and homogenous. The cream cheese should be at room temperature for easier mixing. This base will carry the flavors of the chiles and spices. The smoothness ensures a consistent texture throughout the dip.
- Fold in the warmed diced green chiles, garlic powder, and salt. Stir until everything is evenly distributed, making sure the chilies are fully coated. This is the moment where the dip’s flavor truly starts to develop. The garlic powder’s subtle warmth complements the chilies, while the salt balances the richness. Keep your hands on the mixture to gauge the consistency.
- Transfer the mixture to the prepared baking dish, smoothing the top with a spatula. Bake for 20–25 minutes, or until the edges are lightly browned and the center is set. The dip should emit a toasty, cheesy aroma that makes the kitchen feel like a cozy Mexican cantina. Keep a close eye on the color; you want a golden crust without charring. The baking time may vary slightly depending on your oven, so use your senses as a guide.
- Remove the dish from the oven and let the dip rest for 5 minutes. This resting period allows the cheeses to set fully, making it easier to scoop and preventing a runny mess. The resting time also lets the flavors meld, creating a richer taste profile. While it cools, you can prepare your dipping accompaniments like tortilla chips, sliced veggies, or warm bread.
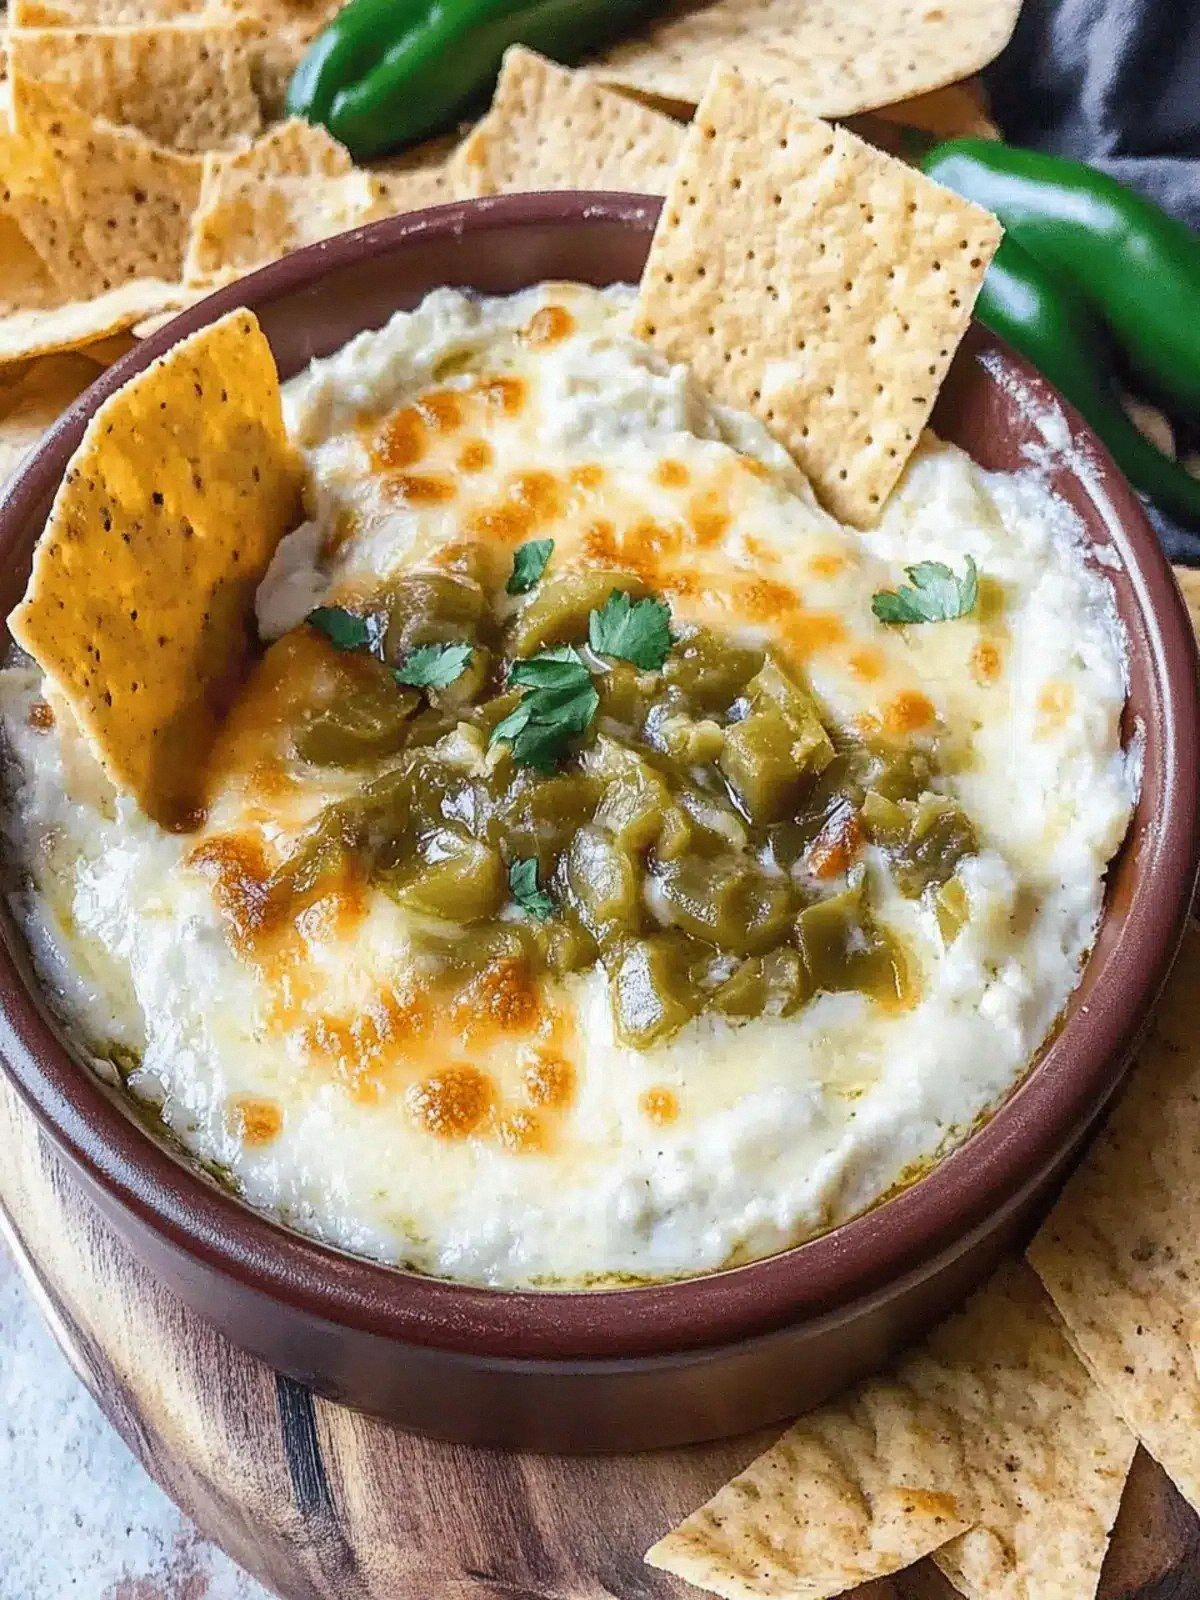
- Serve the dip warm, garnished with a drizzle of hot sauce or a sprinkle of chopped fresh cilantro if desired. The vibrant green of the cilantro adds a pop of color and a fresh herbal note that cuts through the richness. Pair it with crunchy chips, roasted vegetables, or even as a topping for tacos. This dip is versatile enough to shine at a backyard barbecue or a cozy family dinner. Enjoy the compliments that will inevitably follow.
That’s it — you did it. But hold on, I’ve got a few more tricks that’ll take this to another level.
Insider Tricks for Flawless Results
The Temperature Rule Nobody Follows
Many people think the oven temperature doesn’t matter, but it’s actually crucial for achieving that perfect golden crust. Baking at 375°F (190°C) ensures the cheese melts evenly without drying out. If you go too high, the edges burn before the center sets; too low, and you end up with a soggy top. I always preheat the oven for at least 10 minutes before placing the dish inside. This simple step guarantees consistent results every time.
Why Your Nose Knows Best
When the dip is baking, pay attention to the aroma; it’s the most reliable indicator of doneness. A warm, buttery scent means the cheeses are melting properly, while a burnt smell signals overcooking. If you’re unsure, gently lift the edge of the dip with a spatula to peek at the color. The center should be set but still slightly glossy. Trust your nose, and you’ll never over‑ or under‑bake again.
The 5‑Minute Rest That Changes Everything
Resting the dip after baking is not just a courtesy; it’s essential for texture. This short pause allows the cheese to firm up, preventing a runny mess when scooping. It also gives the flavors time to marry, resulting in a more cohesive taste. I always let it sit for exactly five minutes before serving. It might seem trivial, but the difference is palpable.
The Cheese Ratio Secret
The key to a balanced dip lies in the cheese ratio. The 8‑oz cream cheese provides body, the 8‑oz Monterey Jack adds meltability, and the 1‑cup cheddar contributes sharpness. The 1‑cup sour cream lightens the mixture and adds tang. If you prefer a richer dip, increase the cream cheese by a quarter cup; for a lighter version, reduce the cheddar slightly. Experimenting with ratios lets you tailor the dip to your taste.
The Timing Trick for the Perfect Edge
Timing is everything when you want that coveted golden edge. Remove the dish from the oven right when the top is a deep amber but before it starts to darken. If you wait too long, the edges will turn bitter. I use a timer set to 22 minutes and keep an eye on the color. The result is a crisp, caramelized border that’s a treat to bite into.
Creative Twists and Variations
This recipe is a playground. Here are some of my favorite ways to switch things up:
Chipotle Kick
Swap the hot sauce for a spoonful of chipotle adobo to give the dip a smoky, earthy heat. The chipotle’s natural sweetness pairs beautifully with the green chiles, creating a depth of flavor that’s hard to resist. Serve it alongside tortilla chips for a classic Mexican snack. This variation is perfect for those who love a little extra punch.
Mexican Street Tacos
Use the dip as a filling for mini tacos. Warm corn tortillas, spoon in the dip, top with shredded lettuce, diced tomatoes, and a squeeze of lime. The creamy, spicy mixture transforms ordinary tacos into a gourmet street‑food experience. This version is great for parties or a quick weeknight dinner.
Vegan Version
Replace the cream cheese and sour cream with a plant‑based alternative like tofu blended with nutritional yeast. Use vegan Monterey Jack or cheddar for the cheese blend. This version maintains the same creamy texture while keeping the dish dairy‑free. It’s a fantastic option for guests with dietary restrictions.
Breakfast Burrito
Fill a large tortilla with the dip, scrambled eggs, and a sprinkle of chopped cilantro. Wrap it up and heat until the tortilla is toasted. The creamy, spicy dip pairs wonderfully with the savory eggs, making for a hearty breakfast. This twist turns the dip into a portable, filling meal.
Garnished with Pesto
Swirl a spoonful of basil pesto into the dip before baking for a fresh herbal note. The pesto’s bright green color also adds a pop of visual appeal. This combination is especially delightful when served with crusty bread or pita. The pesto adds a layer of complexity that elevates the dip.
Storing and Bringing It Back to Life
Fridge Storage
After the dip has cooled completely, transfer it to an airtight container and refrigerate. It will keep well for up to 4 days, maintaining its creamy texture. Before serving, let it sit at room temperature for 10 minutes to soften. If you notice the surface has dried, drizzle a teaspoon of milk or water to restore moisture. Reheating in the oven at 350°F for 10 minutes is the best way to revive it.
Freezer Friendly
To freeze, wrap the dish tightly in plastic wrap and then in a freezer bag. It can be stored for up to 3 months without compromising flavor. Thaw overnight in the refrigerator before reheating. Add a splash of water or milk before microwaving to keep the dip from becoming dry. Freezing is ideal for meal prep or large gatherings.
Best Reheating Method
The best way to reheat is in a preheated oven at 350°F (175°C) for 10–12 minutes, or until heated through. A quick 30‑second burst in the microwave can also work, but the oven preserves the texture better. If you’re in a hurry, a skillet over low heat will gently warm the dip while keeping it creamy. Always stir halfway through to ensure even heating.