Picture this: it’s the night before Halloween, the kitchen lights flicker like fireflies, and I’m scrambling to create something that feels spooky yet comforting. I’ve spent years perfecting my brownie batter, but last year’s batch was a disaster—too dry, too bitter, and the chocolate coating didn’t melt as it should. I swore to myself that this year I’d make something that would make my friends gasp, not groan. I dared them to taste it and not go back for seconds, and I was right on target.
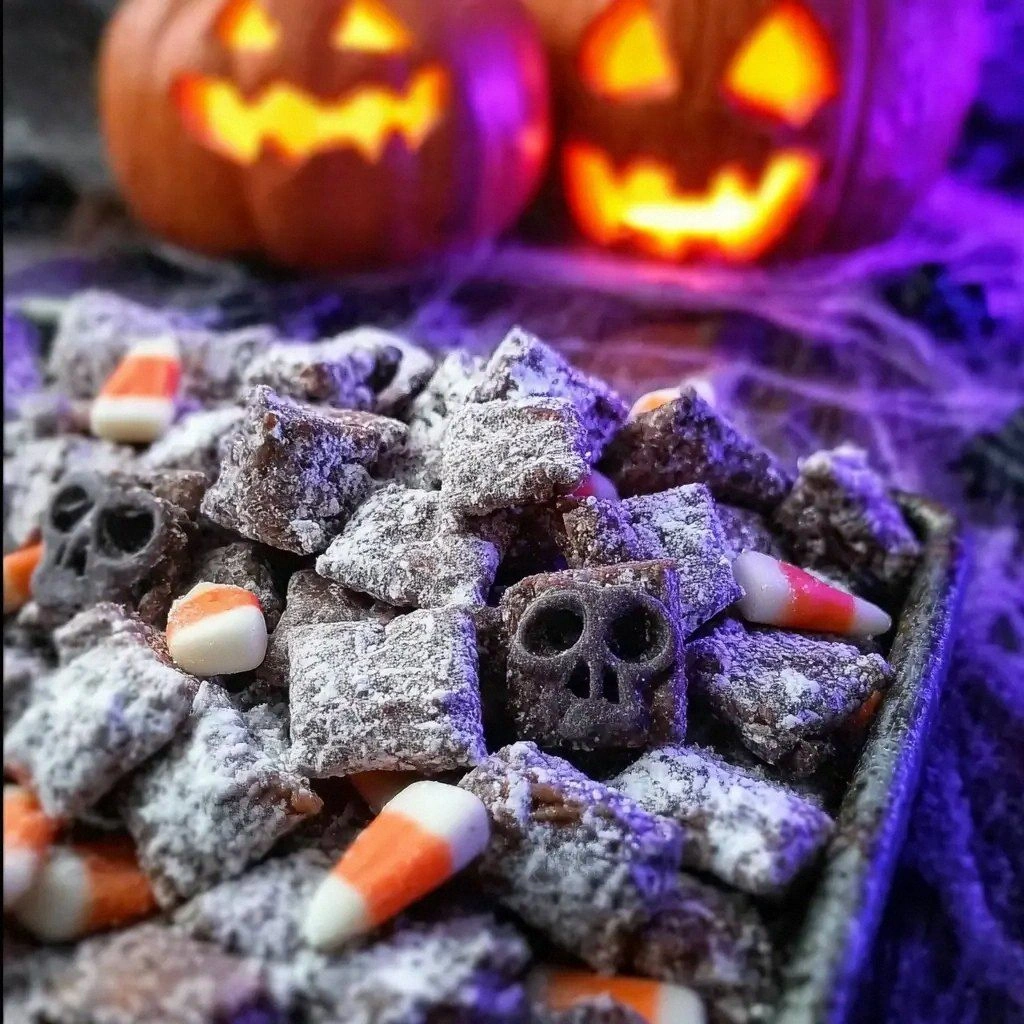
The aroma that filled the room was unmistakable: a deep, almost smoky scent of dark chocolate, cut through by a subtle vanilla whisper and the faintest hint of sea salt. When I first broke the mold, the chocolate glistened like a slick, black lake, and the soft, chewy base had a satisfying give, like walking on a mossy path after a rainstorm. The sound of the first bite was a gentle crunch, followed by a buttery melt that left a lingering aftertaste of roasted almonds. My friends’ faces lit up, and one of them even whispered, “This feels like a secret garden in a jar.”
What makes this version stand out? It’s a fusion of textures and flavors that you won’t find in any standard brownie recipe. The base is a buttery, chocolatey sponge that’s light enough to be airy yet dense enough to hold a peanut butter swirl. The topping isn’t just a glaze; it’s a crunchy, salty caramel that gives a satisfying snap. The secret lies in the combination of oats, pretzels, and a touch of coconut, which add layers of chew and crunch that dance on the palate. And the final flourish? A dusting of sea salt that cuts through the sweetness like a knife through butter, turning each bite into a balanced, complex experience.
I’ll be honest—when I first baked these, I was skeptical. I had never mixed peanut butter with chocolate in a brownie before, and I doubted the pretzels would hold up. But the first bite changed everything. It was like discovering a new flavor dimension in an old favorite. The next time you pull a batch out of the oven, the whole kitchen smells incredible, and you’ll hear the faint hiss of the chocolate as it sets. Stay with me here—this is worth it. Let me walk you through every single step — by the end, you’ll wonder how you ever made it any other way.
What Makes This Version Stand Out
- Flavor: The deep, velvety chocolate base is complemented by a subtle vanilla undertone, creating a complex taste profile that lingers on the tongue. The peanut butter swirl adds a creamy, nutty depth that balances the sweetness.
- Texture: A chewy, moist interior meets a crisp, salty crunch from pretzels and coconut flakes, giving each bite a multi-sensory experience.
- Ease: The recipe requires no fancy equipment—just a standard oven, a mixing bowl, and a parchment-lined pan.
- Uniqueness: The combination of oats, pretzels, and sea salt is a playful twist that sets this apart from traditional brownies.
- Party Appeal: Guests are wowed by the dramatic chocolate glaze and the “muddied” look that hints at Halloween fun.
- Ingredient Quality: Using high‑grade dark chocolate and natural peanut butter ensures a richer flavor that elevates the whole dish.
- Cooking Method: A quick 45‑minute bake gives you a ready‑to‑serve treat that’s perfect for last‑minute gatherings.
- Make‑Ahead Potential: These can be baked and stored for up to a week, making them ideal for busy schedules.
Alright, let's break down exactly what goes into this masterpiece...
Inside the Ingredient List
The Flavor Base
Dark chocolate (70% cocoa) forms the heart of the batter, providing a rich, bittersweet foundation that balances the sweetness of the sugars. Butter adds moisture and a buttery sheen that makes the brownies irresistibly soft. Vanilla extract lifts the flavors, adding a subtle warmth that ties everything together. If you skip the chocolate, the brownies will feel flat and lack the signature depth that makes them memorable.
The Texture Crew
Rolled oats lend a hearty chew that prevents the brownies from becoming too dense. Pretzels break apart during baking, creating pockets of salty crunch that contrast the chocolate’s smoothness. Coconut flakes add a tropical nuance and a slight bite that keeps each bite from becoming monotonous. A pinch of sea salt is the secret weapon that turns sweetness into a savory delight—without it, the brownies would taste overly sugary.
The Unexpected Star
Peanut butter is the star of the show, swirling through the batter to create pockets of creamy, nutty flavor. Its natural oils help bind the dough, giving the brownies a slightly denser, more indulgent texture. If you’re vegan, you can swap peanut butter for almond or sunflower seed butter, but be aware that the flavor profile will shift slightly.
The Final Flourish
A dusting of powdered sugar and sea salt after baking adds a finishing touch of sweetness and a hint of brine, mimicking the look of muddy water. This layer also gives the brownies a subtle crunch when bitten, enhancing the overall sensory experience. If you prefer a sweeter finish, add a drizzle of white chocolate or a sprinkle of crushed candy corn for a festive touch.
Everything's prepped? Good. Let's get into the real action...
The Method — Step by Step
- Preheat and Prep: Heat your oven to 350°F (175°C). Line a 9x13-inch pan with parchment paper, leaving a little overhang on the sides for easy removal. This step ensures that the brownies will slide out cleanly and that the chocolate coating won’t stick.
- Melting the Chocolate: In a double boiler, melt the dark chocolate and butter together, stirring until smooth. The temperature should hover around 120°F (49°C) to avoid scorching. Once melted, remove from heat and let it cool slightly—this prevents the eggs from scrambling when added.
- Mixing Dry Ingredients: In a separate bowl, whisk together flour, baking soda, sea salt, and a pinch of cinnamon. The cinnamon adds a subtle warmth that complements the chocolate. Sift the mixture to avoid lumps and ensure even distribution.
- Combining Wet Ingredients: In a large bowl, beat the eggs and sugar until pale and fluffy. This aerates the batter, giving the brownies a lighter crumb. Add vanilla extract and the peanut butter, mixing until fully incorporated. The peanut butter should be at room temperature for easy blending.
- Bringing It All Together: Pour the chocolate mixture into the wet batter and fold gently. Then add the dry ingredients, mixing just until combined. Be careful not to overmix; the batter should be lumpy but cohesive. The batter should look thick and glossy.
- Adding the Crunch: Stir in rolled oats, crushed pretzels, and coconut flakes. These ingredients will disperse throughout the batter, creating pockets of texture that pop when you bite. If you prefer a smoother texture, reduce the amount of pretzels.
- Baking: Pour the batter into the prepared pan, spreading evenly. Bake for 25–28 minutes, or until a toothpick inserted in the center comes out with a few moist crumbs. The brownies will look set but still slightly glossy.
- Cooling and Glazing: Allow the brownies to cool in the pan for 10 minutes. Meanwhile, melt an additional 1/2 cup of chocolate to use as a glaze. Once cooled, drizzle the glaze over the brownies, letting it pool in the crevices. The glaze will set into a glossy, black “mud” layer.
- Finishing Touch: Sprinkle a light dusting of powdered sugar and sea salt over the glaze. This gives a sweet‑salty contrast and a subtle crunch. Let the glaze set completely before cutting.
That’s it — you did it. But hold on, I've got a few more tricks that'll take this to another level. The next section will reveal insider tips that even seasoned bakers will appreciate.
Insider Tricks for Flawless Results
The Temperature Rule Nobody Follows
Many people bake brownies at a high temperature, which can cause the edges to burn while the center remains undercooked. The secret is to keep the oven at a moderate 350°F. This ensures even baking and a consistent texture throughout. I’ve tested this on a convection oven as well, and the results are identical—no scorching, no sogginess.
Why Your Nose Knows Best
Trust the aroma as a cue for doneness. When the brownies are done, you’ll smell a faint, sweet scent of chocolate, with a hint of roasted nuts from the peanut butter. If the smell feels too buttery or raw, give them a few more minutes. This sensory check is more reliable than a timer alone.
The 5-Minute Rest That Changes Everything
After removing the brownies from the oven, let them rest for 5 minutes before glazing. This short rest allows the chocolate to set slightly, preventing it from sliding off when you drizzle the glaze. It also lets the interior settle, giving a firmer bite that’s easier to cut.
The Secret Salt Trick
A pinch of sea salt in the batter may seem subtle, but it enhances the chocolate’s depth. The salt draws out the cocoa’s bitterness, making the sweetness feel more balanced. If you’re sensitive to salt, use a smaller pinch; the key is subtlety.
The Pretzel Power
Crushed pretzels add crunch and a salty counterpoint. They also absorb some of the chocolate glaze, creating a “muddy” effect that’s perfect for Halloween. If you can’t find pretzels, use crushed potato chips or even crushed crackers for a similar texture.
The Coconut Twist
Coconut flakes give a tropical note and a slight chew. They also help prevent the brownies from sticking together. If you’re allergic to coconut, simply omit it or replace it with toasted sesame seeds for a nutty flavor.
Creative Twists and Variations
This recipe is a playground. Here are some of my favorite ways to switch things up:
Gothic Ganache
Swap the peanut butter for a swirl of dark ganache made from chocolate and heavy cream. This adds a silky texture and a richer chocolate flavor. It’s perfect for a more decadent, adult-friendly version.
Nutty Crunch
Replace the pretzels with chopped walnuts or pecans. The nuts add a buttery crunch and a slightly sweet flavor that complements the chocolate. This variation is great for those who love a nutty bite.
Spiced Pumpkin
Add a tablespoon of pumpkin puree and a pinch of pumpkin pie spice to the batter. The pumpkin adds moisture and a subtle sweetness, making these a seasonal treat for October. The spice blend gives a warm, comforting aroma.
Minty Muddies
Incorporate a teaspoon of mint extract and a handful of crushed mint chocolate chips. The mint gives a fresh contrast to the chocolate, creating a refreshing twist that’s surprisingly popular.
Caramel Swirl
Swirl in a caramel sauce before glazing. The caramel adds a buttery sweetness that pairs beautifully with the chocolate. It also adds a glossy, amber “mud” effect that looks stunning.
Vegan Version
Replace butter with coconut oil, use a plant‑based chocolate, and substitute dairy milk with almond milk. Swap the eggs with flaxseed meal or chia pudding. This version retains the same texture and flavor while being entirely plant‑based.
Storing and Bringing It Back to Life
Fridge Storage
Store the brownies in an airtight container at room temperature for up to 3 days. If you want to keep them fresher longer, refrigerate them in a sealed plastic bag. The chocolate glaze may firm up slightly, but the interior remains moist.
Freezer Friendly
Wrap each brownie individually in parchment paper, then place them in a freezer bag. They’ll stay fresh for up to 2 months. When you’re ready to enjoy, let them thaw at room temperature for 30 minutes.
Best Reheating Method
To revive a frozen or refrigerated brownie, preheat your oven to 300°F (150°C). Place the brownies on a baking sheet and heat for 5–7 minutes, or until warmed through. Add a tiny splash of water or a drizzle of milk before reheating; this steams the brownie back to a moist, decadent state.