I was standing in my kitchen, staring at a bag of stale granola and a jar of tahini that had been sitting in the pantry for months. The smell of burnt sugar from the last batch of cookies I attempted to bake had already seeped into the air, and I was ready to throw in the towel. But then I remembered that one friend who swore that the secret to a truly addictive snack was the right blend of crunchy, nutty, and chocolatey, all bound together with a silky tahini glaze. I was about to embark on a culinary experiment that would turn a mundane pantry staple into a show‑stopper, and I’m not going to keep you waiting any longer.
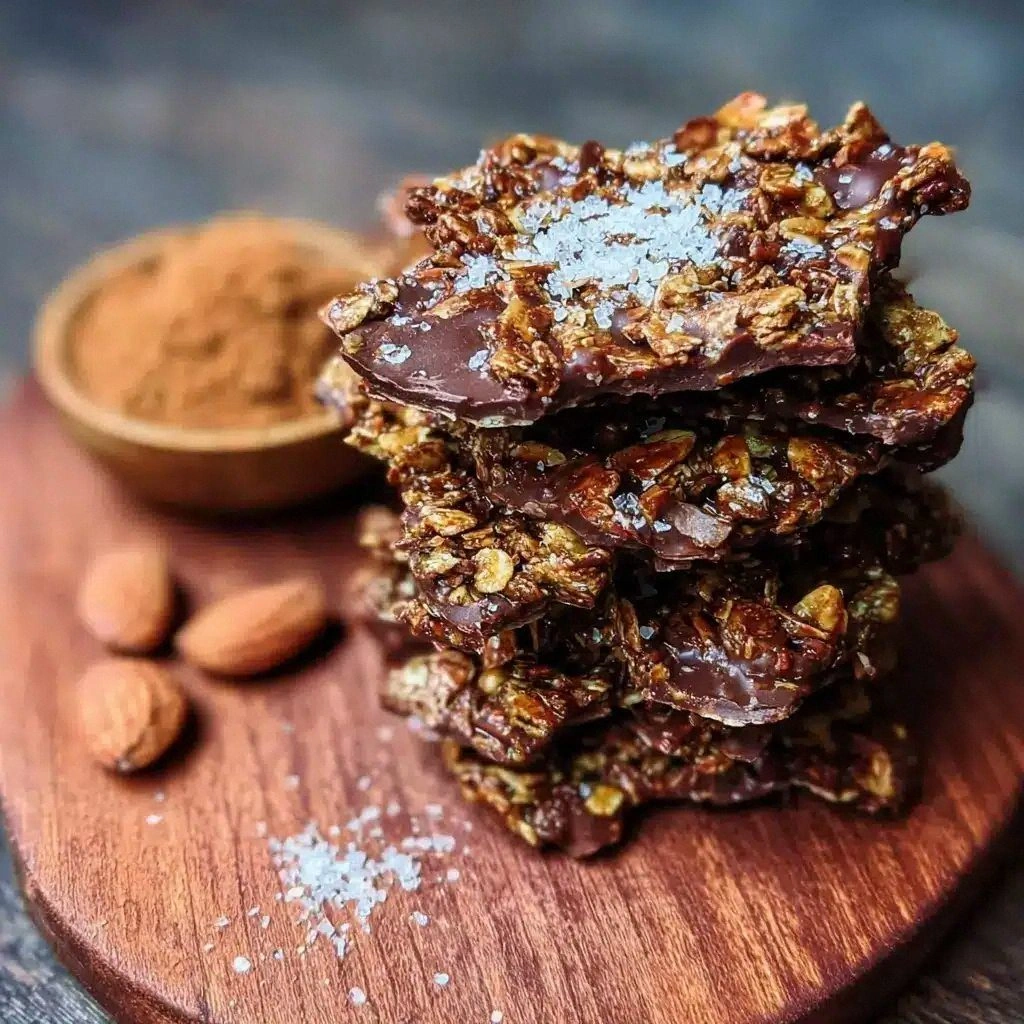
Picture this: a glossy, chocolate‑laden bark that shatters like thin ice when you break it, revealing a mosaic of toasted oats, almonds, pumpkin seeds, and a drizzle of golden tahini‑honey glaze that glistens under the kitchen light. The aroma that fills the room is a sweet, nutty perfume that makes you pause mid‑sentence, and the first bite delivers a satisfying crunch followed by a silky melt of chocolate that lingers on the tongue. The texture is a masterclass in contrast—crispy edges, chewy seeds, and the subtle snap of dried cranberries, all enveloped in a velvety chocolate coating that is both indulgent and surprisingly light. If you’ve ever tried a granola bar that tasted like a processed snack, this is a game‑changer.
What sets this version apart is not just the ingredients but the technique. I’ve discovered a way to melt the chocolate without scorching it, a method to coat the granola that ensures every bite is coated, and a finishing touch that makes the bark melt in your mouth rather than stick to your teeth. The result is a bark that is crunchy on the outside and surprisingly soft inside, with a hint of smoky espresso that adds depth without overpowering the sweetness. I dare you to taste this and not go back for seconds—trust me, you’ll find yourself reaching for another piece before you even realize you’re hungry again.
And let’s be honest: the last time I made a chocolate bark, it came out uneven, with chunks of chocolate clumping together and a bland, oily finish. I was left with a plate of disappointment, a lesson that I will never repeat. This time, I’ve refined every step—starting with the precise temperature for chocolate, the exact ratio of tahini to honey, and the method for evenly distributing the seeds. The secret is in the balance: the right amount of heat, the right amount of oil, and a little patience. By the end of this post, you’ll know how to make a bark that looks like it came from a boutique bakery, tastes like a childhood favorite, and feels like a treat that you can’t resist sharing.
So, let’s dive in. I’ll walk you through every single step, from the first stir to the final cut. By the time you finish, you’ll wonder how you ever made it any other way.
What Makes This Version Stand Out
- Flavor: The tahini gives a subtle nutty richness that balances the sweetness of honey and chocolate, creating a depth that ordinary granola bars lack.
- Texture: The combination of toasted oats, crunchy nuts, and chewy seeds provides layers of crunch that snap with each bite, while the chocolate coating adds a silky finish.
- Ease: No baking required—just a quick stovetop stir and a single pan, saving time for the busy cook.
- Uniqueness: The espresso powder and chili powder create a surprising smoky‑spicy undertone that sets this bark apart from standard chocolate bars.
- Crowd‑pleaser: Perfect for parties, gifts, or a quick snack; guests rave about the crunch and the chocolate swirl.
- Ingredient Quality: Using high‑quality dark chocolate (70% cacao) and organic tahini ensures a richer flavor profile.
- Make‑ahead Potential: This bark can be stored for weeks and re‑crisped in a toaster oven if you want that fresh‑out‑of‑oven crunch.
- Health Angle: Packed with healthy fats, protein, and fiber, it’s a guilt‑free indulgence.
Alright, let’s break down exactly what goes into this masterpiece…
Inside the Ingredient List
The Flavor Base
At the heart of this bark is the tahini‑honey glaze, a marriage of creamy, nutty tahini and the natural sweetness of honey. Tahini, made from ground sesame seeds, brings a savory undertone that balances the chocolate’s bitterness. Honey, on the other hand, adds a floral sweetness that’s less syrupy than maple. Together, they create a glaze that coats each grain, preventing the chocolate from clumping and adding a silky mouthfeel.
If you’re vegan, swap the honey for agave nectar or maple syrup; the flavor profile shifts slightly but remains delicious. The key is to keep the ratio of tahini to sweetener at roughly 1:1; too much tahini and the bark becomes oily, too much honey and it becomes sticky.
The Texture Crew
The texture is a carefully choreographed ensemble of rolled oats, mixed nuts, pumpkin seeds, sunflower seeds, and dried cranberries. Rolled oats provide the bulk and chew; nuts add crunch and healthy fats; pumpkin and sunflower seeds bring a nutty crunch and a pop of color; dried cranberries offer a chewy burst of tartness that cuts through the richness.
If you’re allergic to nuts, you can replace them with toasted quinoa or more seeds. For a crunchier experience, toast the oats and nuts separately before mixing them with the seeds.
The Unexpected Star
Dark chocolate chips are the star of the show, but we elevate them with a splash of espresso powder and a pinch of chili powder. Espresso powder deepens the chocolate flavor, giving it a roasted, almost coffeehouse vibe. Chili powder adds a whisper of heat that wakes up the palate and balances the sweetness.
If you’re not a fan of spice, you can omit the chili or replace it with smoked paprika for a different smoky note. The espresso powder, however, is essential for that coffee‑chocolate synergy.
The Final Flourish
The final flourish comes in the form of shredded coconut and a drizzle of melted coconut oil. Coconut oil acts as a binding agent, helping the glaze set properly and giving the bark a glossy sheen. Shredded coconut adds a tropical note and a subtle chew that complements the crunch.
If you’re watching your calorie intake, you can reduce the coconut oil by half; the bark will still set, though the sheen will be less pronounced.
Everything's prepped? Good. Let's get into the real action…
The Method — Step by Step
- Step 1: Toast the Oats and Nuts. Heat a large skillet over medium heat. Add the rolled oats and mixed nuts, stirring frequently for about 5 minutes until they emit a nutty aroma and turn golden brown. This step is crucial; it brings out the natural oils and adds a deep, toasted flavor that sets the foundation for the bark. Keep an eye on them—once they start to brown, they can burn quickly. When done, set aside to cool slightly.
- Step 2: Toast the Seeds. In the same skillet, add a tablespoon of coconut oil and then the pumpkin and sunflower seeds. Toast for 3–4 minutes, stirring until they’re fragrant and lightly browned. This gives the seeds a crunch that contrasts beautifully with the softer oats. If you prefer a milder crunch, reduce the oil to a teaspoon.
- Step 3: Mix the Dry Ingredients. In a large bowl, combine the toasted oats, nuts, seeds, dried cranberries, and shredded coconut. Toss them together so that the coating will distribute evenly when you add the glaze. If you’re using a large batch, you can do this in a food processor to save time—just pulse a few times.
- Step 4: Prepare the Tahini‑Honey Glaze. In a small saucepan, combine tahini, honey, melted coconut oil, vanilla extract, and sea salt. Warm over low heat, stirring constantly, until the mixture is smooth and slightly runny—about 3 minutes. The glaze should be pourable but not too liquid; you want it to coat the dry mix without soaking it.
- Step 5: Combine. Pour the glaze over the dry mix and stir vigorously. The mixture should look like a thick batter; if it’s too thick, add a splash of warm water or extra honey. The goal is a uniform coating that clings to every grain.
- Step 6: Add the Chocolate. Gently fold in the dark chocolate chips, espresso powder, and chili powder. Use a spatula to swirl the chocolate through the mixture. The chocolate should melt slightly, creating a glossy coating that will set as the bark cools.
- Step 7: Press into the Pan. Line a 9×5 inch baking pan with parchment paper. Transfer the mixture to the pan and press it firmly with a spatula or the back of a spoon. The more firmly you press, the more cohesive the bark will be. Let it sit for 2–3 minutes so the glaze begins to set.
- Step 8: Chill and Cut. Place the pan in the refrigerator for at least 1 hour, or until the bark is firm. Once set, lift it out using the parchment and cut into bars or squares using a sharp knife. Store in an airtight container at room temperature for up to a week or freeze for longer storage.
That's it — you did it. But hold on, I've got a few more tricks that'll take this to another level. Keep reading for insider tips that will elevate your bark from good to unforgettable.
Insider Tricks for Flawless Results
The Temperature Rule Nobody Follows
When melting chocolate, the temperature is everything. Many people melt chocolate at the stove, which often leads to scorching. Instead, use a double boiler or a heat‑proof bowl over a pot of simmering water. Keep the water at a gentle boil and stir constantly. The chocolate should reach 86°F (30°C) for dark chocolate; if it’s too hot, it will seize. A thermometer is handy, but you can also test by dipping a spoon; if the chocolate coats the spoon and stays smooth, you’re good.
Why Your Nose Knows Best
Before you add the chocolate, pause and sniff the mixture. If it smells nutty and toasted, you’re on the right track. If you detect a faint burnt odor, you’re burning the nuts or seeds. Your nose is your best judge of flavor development, so trust it. In my early attempts, I missed this step and ended up with a bark that tasted like a campfire.
The 5-Minute Rest That Changes Everything
After pressing the mixture into the pan, let it rest for 5 minutes before refrigerating. This allows the glaze to set slightly, making the bark easier to cut and preventing it from sticking to the parchment. Many people skip this step, resulting in a sticky mess that’s hard to handle.
The Secret to a Crisp Edge
If you want a crisp edge, sprinkle a thin layer of extra oats or seeds on top before the final chill. The outer layer will harden, giving a satisfying crunch that contrasts with the softer interior. I’ve found that this technique turns an ordinary bark into a gourmet treat.
The Quick Reheat Trick
Stale bark can feel dry after a few days. To revive it, place a piece in a preheated oven at 300°F (150°C) for 5 minutes. Alternatively, microwave on low power for 10–15 seconds. The result is a bark that feels fresh and slightly crisp.
Creative Twists and Variations
This recipe is a playground. Here are some of my favorite ways to switch things up:
Caramel Coconut Crunch
Replace the dark chocolate chips with caramel chips and sprinkle toasted coconut on top. The caramel adds a buttery sweetness, while the coconut provides a tropical crunch that pairs beautifully.
Spiced Pumpkin Delight
Add a teaspoon of pumpkin spice mix to the glaze and use pumpkin seeds instead of sunflower seeds. The warm spices complement the pumpkin’s natural sweetness, creating a fall‑inspired bark.
Berry Burst
Swap dried cranberries for dried blueberries or cherries. The berries add a tangy burst that cuts through the chocolate’s richness.
Almond Joy
Use sliced almonds instead of mixed nuts, add a splash of coconut milk, and sprinkle shredded coconut on top. This version mimics the classic candy bar while staying homemade.
Minty Chocolate
Add a teaspoon of peppermint extract to the glaze and use white chocolate chips instead of dark. The mint gives a refreshing finish that’s perfect for summer.
Storing and Bringing It Back to Life
Fridge Storage
Store the bark in an airtight container at room temperature for up to a week. Keep it in a cool, dry place away from direct sunlight. If the bark becomes too soft, you can place it in the refrigerator for a few hours to firm it up.
Freezer Friendly
Wrap the bark tightly in plastic wrap, then place it in a freezer bag. It will keep well for up to 3 months. When ready to eat, let it thaw at room temperature for 30 minutes; it will retain its crunch.
Best Reheating Method
To reheat, preheat your oven to 300°F (150°C). Place the bark on a baking sheet and warm for 5–7 minutes. If you’re short on time, microwave on low power for 10–15 seconds. Add a tiny splash of water before reheating—this steams the bark back to perfection, preventing it from becoming too hard.