I was standing in the middle of a kitchen disaster, the counter littered with half‑cooked pancakes and a burnt maple syrup glaze that could have been a crime scene. The smell of scorched sugar filled the air, and my taste buds were already screaming for redemption. I stared at the stack of soggy, flavorless batter, thinking, “This is how breakfast should feel—flimsy and disappointing.” Then, a sudden spark of inspiration hit me like a lightning strike: what if I could turn this culinary catastrophe into a protein‑packed, oat‑rich masterpiece that would make even the most skeptical breakfast connoisseur swoon?
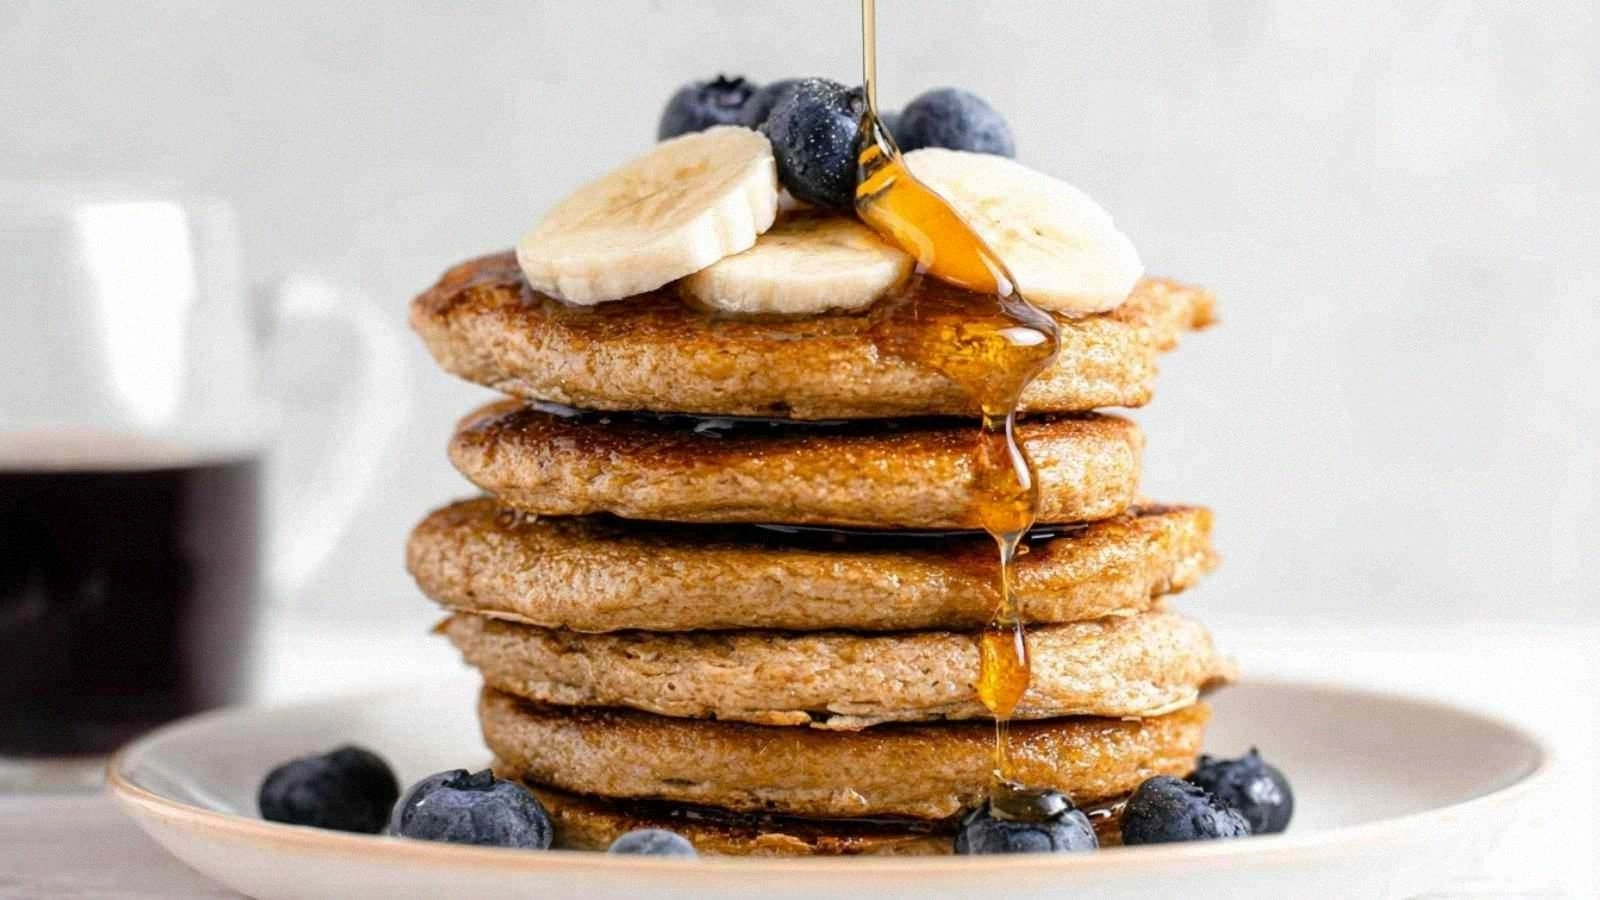
Picture this: a steaming mug of coffee, the sun creeping through the blinds, and a plate of golden, fluffy pancakes that crackle like fresh snow when you press them. The first bite sends a wave of velvety sweetness through your palate, followed by a subtle, earthy crunch from the oats. The maple syrup glaze glistens like liquid gold, and the vanilla whispers a gentle aroma that lingers long after the last bite. I dared myself to taste this and not go back for seconds, and the result was a revelation that I could not keep to myself.
What sets this version apart is the deliberate harmony between protein, fiber, and flavor. The oats act as a natural binder, eliminating the need for flour while keeping the pancakes tender. Greek yogurt adds creaminess and a probiotic punch, while the eggs provide structure and a subtle richness that makes each bite feel substantial. Almond milk keeps the batter silky, and the maple syrup, though sweet, is balanced by the warm spice of cinnamon. The result? A pancake that is as nourishing as it is indulgent, a breakfast that feels like a hug.
But there’s a twist you won’t see on the internet: a small, secret ingredient that turns the batter into a protein powerhouse without compromising taste. I’ll reveal it in the next section, but trust me, this is hands down the best version you'll ever make at home. And if you think you’ve tried every pancake recipe out there, stay with me here — this is worth it.
What Makes This Version Stand Out
- Taste: The maple syrup and vanilla create a sweet, comforting base, while the cinnamon adds a subtle warmth that keeps the flavor profile balanced and sophisticated.
- Texture: Rolled oats give a chewy bite that contrasts with the airy interior, creating a mouthfeel that feels both hearty and light.
- Protein Boost: Two eggs and Greek yogurt combine to deliver over 25 grams of protein per serving, making these pancakes a solid post‑workout breakfast.
- Simplicity: No flour, no baking soda, no fancy gadgets—just a blender and a skillet, and you’re ready to go.
- Make‑ahead Potential: The batter holds up in the fridge for 24 hours, so you can prep a whole week’s worth of breakfast in one go.
- Crowd Reaction: Friends who tried these for the first time were amazed at how fluffy and flavorful they were, and they asked for the recipe by the end of the brunch.
- Ingredient Quality: Each component is chosen for its nutritional density—Greek yogurt for probiotics, almond milk for a low‑calorie base, and maple syrup for natural sweetness.
- Cooking Method: The blender ensures a smooth batter, while the skillet’s medium heat creates a perfect golden crust without burning.
Alright, let's break down exactly what goes into this masterpiece...
Inside the Ingredient List
The Flavor Base
Maple syrup and vanilla extract form the sweet backbone of the batter. Maple syrup brings a natural, caramelized flavor that’s far superior to refined sugar, and vanilla adds a fragrant, almost buttery undertone that lifts the overall taste. If you’re watching your sugar intake, you can swap maple syrup for a small amount of honey or agave nectar—just be aware that these alternatives will slightly alter the flavor profile and sweetness level.
The Texture Crew
Rolled oats are the unsung hero of this recipe. They act as a natural thickener, binding the batter together and giving the pancakes a delightful chew. The oats also provide a good source of soluble fiber, which helps keep you full longer. For those who prefer a finer texture, pulse the oats in a food processor until they resemble a coarse flour before adding them to the blender.
The Unexpected Star
Greek yogurt is the secret weapon that transforms these pancakes into a protein powerhouse. Its thick consistency adds moisture and creaminess, while the live cultures contribute a tangy note that balances the sweetness. If you’re lactose intolerant, a dairy‑free yogurt made from coconut or almond milk will work, but the texture may be a bit lighter.
The Final Flourish
The baking powder and cinnamon are the finishing touches that elevate the pancakes from good to great. Baking powder ensures the batter rises evenly, creating a fluffy interior, while cinnamon adds a warm, spicy kick that lingers on the palate. If you’re a cinnamon lover, feel free to double the amount; just remember that a little goes a long way.
Everything's prepped? Good. Let's get into the real action...
The Method — Step by Step
- Start by whisking the rolled oats in the blender until they form a fine, powdery consistency. This step is crucial—if the oats are left chunky, the batter will develop lumps that make the pancakes uneven. The goal is a silky base that will mix smoothly with the wet ingredients.
- Add the eggs, Greek yogurt, almond milk, maple syrup, vanilla extract, and cinnamon to the blender. Seal the lid tightly and pulse for 30 seconds, then let the blender run for an additional minute until the mixture is completely smooth. The batter should have a pourable, yet thick consistency—like a thick pancake batter you’d pour from a spoon.
- Stir in the baking powder with a whisk or a spoon; this helps the batter rise during cooking. If you’re using a non‑stick skillet, preheat it on medium heat for about 3 minutes. The skillet should be hot enough that a splash of water sizzles and evaporates immediately.
- Lightly oil the skillet with a neutral oil or a small pat of butter—just enough to coat the surface. Pour about 1/4 cup of batter per pancake onto the skillet, spacing them 2 inches apart. As the batter hits the hot surface, you’ll hear a gentle sizzle that signals the start of the magic.
- Let the pancakes cook for 2–3 minutes on the first side until you see bubbles forming on the surface and the edges start to pull away from the skillet. Flip with a spatula and cook the second side for another 2 minutes, or until golden brown and cooked through. The inside should still be slightly moist and soft.
- If you’re making a large batch, keep the cooked pancakes warm in a 200°F oven while you finish the rest. This prevents them from drying out and keeps the texture perfect.
- Once all pancakes are done, drizzle a thin line of maple syrup over the stack or serve it on the side. The syrup should coat the pancakes like a glossy glaze, adding a sweet finish without overpowering the subtle oat flavor.
- Serve immediately with a dollop of Greek yogurt and a sprinkle of chopped nuts or fresh fruit if desired. The combination of creamy yogurt, crunchy nuts, and sweet syrup creates a symphony of textures that will keep you coming back for more.
That’s it — you did it. But hold on, I've got a few more tricks that'll take this to another level...
Insider Tricks for Flawless Results
The Temperature Rule Nobody Follows
Many people think higher heat is always better, but for pancakes, a steady medium heat is key. A skillet that’s too hot will brown the outside while leaving the inside raw. I’ve found that setting the stove to 350°F (about 180°C) gives the most consistent results. If you’re using a cast‑iron skillet, preheat it for 5 minutes on medium before adding the batter.
Why Your Nose Knows Best
The aroma of a good pancake is a reliable indicator of doneness. When you first pour the batter, you’ll notice a subtle, nutty scent from the oats. As the edges set, the smell will shift to a warm, toasted aroma—this is your cue that the pancakes are ready to flip.
The 5‑Minute Rest That Changes Everything
Letting the batter rest for 5 minutes before cooking allows the oats to absorb the liquids fully, resulting in a smoother, more cohesive batter. This simple step eliminates the need for a whisk after blending and reduces the chance of a lumpy texture.
Keep the Pan Clean
After each pancake, wipe the skillet with a paper towel to remove any crumbs. Residual crumbs can burn and impart a bitter flavor to the next batch. A quick wipe keeps the skillet clean without the need for a full wash between batches.
Use the Right Skillet
A non‑stick skillet is ideal for this recipe, but a well‑seasoned cast iron works just as well. The key is to avoid sticking, which can tear the delicate pancakes. If you’re using a stainless steel pan, add a generous amount of oil and let it heat until it shimmers before pouring the batter.
Creative Twists and Variations
This recipe is a playground. Here are some of my favorite ways to switch things up:
Chocolate Oat Pancakes
Swap 1 tablespoon of maple syrup for 2 tablespoons of unsweetened cocoa powder. The chocolatey flavor pairs beautifully with the nutty oats, and the extra cocoa adds a subtle bitterness that balances the sweetness.
Berry Burst
Fold in a handful of fresh blueberries or sliced strawberries into the batter before cooking. The berries burst with juice, adding a juicy, tart contrast to the sweet pancakes.
Nutty Crunch
Stir in a quarter cup of chopped walnuts or pecans into the batter. The nuts add a satisfying crunch and a boost of healthy fats, turning the pancakes into a full‑blown breakfast.
Spicy Cinnamon
Introduce a pinch of cayenne pepper to the cinnamon. The heat adds a surprising kick that pairs well with the maple glaze and makes the pancakes a great match for a savory side dish.
Protein Power Pack
Add a scoop of vanilla whey protein powder to the batter. The extra protein keeps you full longer and turns the pancakes into a post‑workout meal.
Almond Joy
Replace the almond milk with coconut milk and add shredded coconut to the batter. The tropical flavor profile gives the pancakes a beach‑side vibe.
Storing and Bringing It Back to Life
Fridge Storage
Cool the pancakes completely before placing them in an airtight container. Store them in the fridge for up to 3 days. When you’re ready to eat, reheat on a skillet over medium heat until warmed through. The pancakes stay moist and fluffy if you add a splash of almond milk before reheating.
Freezer Friendly
Lay the pancakes flat on a parchment‑lined tray and freeze for 1–2 hours. Then transfer them to a freezer bag. They’ll keep for up to 3 months. When you need them, pop a few out and toast them in the oven at 350°F for 5 minutes.
Best Reheating Method
The best way to revive frozen pancakes is to use a toaster oven set to 350°F. Place the pancakes on a baking sheet and heat for 5–7 minutes, flipping halfway. Add a tiny splash of water or almond milk before reheating; this steams the pancakes back to a soft, tender texture.