Okay, picture this: it’s a rainy Saturday afternoon, the kind where the clouds look like they’re about to press a giant, soggy blanket over the whole city. I was half‑heartedly scrolling through Instagram, scrolling past a cascade of pumpkin‑spice lattes and cinnamon‑swirl muffins, when a sudden dare popped up in the comments of a friend’s post: “Make something that screams holiday but isn’t just a boring cookie.” I laughed, grabbed a bowl, and thought, “Challenge accepted.” The kitchen was already humming with the sound of rain tapping the windows, the air thick with the promise of something warm, and I could almost taste the caramel‑kissed maple in the air before I even opened the pantry.
I admit it—I was craving a scone that could double as a dessert, a breakfast treat, and a snack that would make my coworkers jealous. The usual gingerbread cookie was too crumbly, the classic scone too bland. I wanted a piece that had the spice‑laden heart of gingerbread, the buttery crumb of a perfect scone, and a glossy maple glaze that would make you want to drizzle it over everything from pancakes to pizza (don’t ask). I started mixing, tasting, and adjusting, and after a few frantic taste‑tests—yes, I ate half the batch before anyone else got a bite—I finally landed on the version that made my taste buds do a happy dance.
What makes this version stand out? It’s the marriage of two beloved comfort foods: the deep, warming spices of gingerbread meet the flaky, tender crumb of a classic scone, all crowned with a maple glaze that’s sticky, sweet, and just a touch buttery. Most recipes either over‑sweeten the glaze or under‑season the dough, leaving you with a bland bite or a cloyingly sugary mess. This one hits the sweet spot—literally and figuratively. I dare you to taste this and not go back for seconds; the flavor balance is so spot‑on that you’ll be planning your next batch before the first one even cools.
And here’s the kicker: I’ve added a secret technique that most bakers overlook—a quick chilling of the dough before shaping. This tiny step locks in the butter, giving you that glorious, airy crumb that shatters like thin ice when you bite. I’m not kidding; the texture difference is night and day. Let me walk you through every single step — by the end, you’ll wonder how you ever made it any other way.
What Makes This Version Stand Out
- Spice Symphony: A balanced blend of ginger, cinnamon, nutmeg, and a whisper of cloves creates a depth that’s richer than a holiday candle.
- Maple Magic: The glaze uses pure maple syrup, not artificial flavor, giving a caramel‑like sheen that glistens like sunrise on snow.
- Flaky Texture: Chilled butter pockets melt in the oven, producing layers that rise and separate with a buttery snap.
- Simplicity Meets Sophistication: You need only a handful of pantry staples, yet the result feels like a bakery‑level masterpiece.
- Crowd‑Pleaser: Even the pickiest eaters love the sweet‑spicy combo, making it perfect for brunches, holiday parties, or solo indulgence.
- Ingredient Quality: Using real maple syrup and fresh ground spices elevates the flavor profile beyond store‑bought mixes.
- Cooking Method: Baking at a high heat for a short time locks in moisture while giving a golden crust.
- Make‑Ahead Potential: The scones freeze beautifully; reheat with a splash of water for that just‑baked freshness.
Inside the Ingredient List
The Flavor Base
Ground ginger is the star of the show, delivering that unmistakable bite that says “holiday” without being overpowering. If you substitute with fresh ginger, you’ll get a zingy freshness, but you’ll also introduce moisture that can make the dough too sticky. I recommend using a fine grind—coarse pieces will leave pockets of spice that feel uneven. A pinch of cinnamon adds warmth, while nutmeg and cloves bring depth and a subtle smoky undertone. If you’re missing any, a splash of all‑spice works in a pinch, but the flavor won’t be as layered.
The Texture Crew
All‑purpose flour provides structure, while a bit of whole‑wheat flour adds a nutty undertone and a slight chew. The combination keeps the crumb tender yet sturdy enough to hold the glaze without cracking. Baking powder is your leavening hero, giving the scones that lift, while a dash of baking soda reacts with the maple syrup’s acidity to create extra fluffiness. Cold, cubed butter is crucial; it creates steam pockets that expand during baking, forming the flaky layers we all crave.
The Unexpected Star
Maple syrup isn’t just a sweetener; it brings mineral richness and a buttery depth that brown sugar alone can’t match. The syrup also contributes to the caramelization of the crust, giving that golden‑brown finish. If you’re allergic to maple, a blend of honey and a touch of molasses can mimic the flavor, but expect a slightly different aroma. The glaze’s powdered sugar provides the glossy finish, while an extra drizzle of maple syrup before baking intensifies the caramel notes.
The Final Flourish
A large egg acts as a binder, ensuring the dough holds together without becoming dense. Milk adds moisture and a subtle creaminess that balances the spices. Salt, though often overlooked, amplifies every other flavor, making the ginger and maple pop. Finally, a pinch of sea salt on top of the glaze right before the oven does wonders—tiny crystals melt into the glaze, creating a sweet‑salty contrast that feels like a sophisticated kiss.
Everything's prepped? Good. Let's get into the real action…
The Method — Step by Step
- First things first: whisk together the dry ingredients. In a large mixing bowl, combine 2 cups all‑purpose flour, ½ cup whole‑wheat flour, 2 tsp baking powder, ½ tsp baking soda, 1 tsp ground ginger, 1 tsp ground cinnamon, ½ tsp ground nutmeg, ¼ tsp ground cloves, and ½ tsp salt. Stir with a fork until everything is evenly distributed. The aromas will start to mingle—imagine a spice market in a snow globe. Pro tip: sift the flour mixture to aerate it, which leads to a lighter crumb.
- Next, cut in the butter. Toss ½ cup cold, cubed unsalted butter into the dry mix and use a pastry cutter or your fingertips to rub the butter into the flour until the mixture resembles coarse crumbs with pea‑sized butter pieces. This is the moment where the magic happens; those butter pockets will melt in the oven, creating layers that separate like a buttery sunrise. Kitchen Hack: Keep the butter in the freezer until the last second before mixing to ensure it stays firm.
- Now, whisk the wet ingredients separately. In a small bowl, beat 1 large egg, then stir in ½ cup milk, ¼ cup pure maple syrup, and ¼ cup brown sugar until smooth. The mixture should have a glossy, amber hue. The maple syrup will begin to caramelize the moment it hits the heat, creating that signature golden crust we’re after.
- Combine wet and dry. Make a well in the center of the flour‑butter mixture, pour in the wet blend, and gently fold with a spatula until just combined. The dough should be slightly sticky but manageable; over‑mixing will develop gluten and make the scones tough. Watch Out: If the dough feels too wet, sprinkle a tablespoon of flour at a time—don’t over‑correct or you’ll lose the tender crumb.
- Turn the dough onto a lightly floured surface and pat it into a 1‑inch thick rectangle. With a sharp knife, cut the dough into 8 even triangles or rounds, depending on your shape preference. This is where the “chill before bake” trick shines: place the cut pieces on a parchment‑lined baking sheet, cover loosely with plastic wrap, and refrigerate for 20 minutes. This rest allows the butter to firm up again, ensuring the edges stay crisp.
- While the dough chills, preheat your oven to 400°F (200°C) and line another baking sheet with parchment. Once the 20‑minute chill is up, arrange the scones on the sheet, leaving a little space between each. Brush the tops lightly with a mixture of 1 tbsp maple syrup and 1 tsp melted butter—this initial glaze will help the final glaze stick and add an early caramel note.
- Bake the scones for 12‑15 minutes, or until the tops are a deep golden‑brown and the edges start to pull away from the parchment. You’ll know they’re ready when a gentle tap on the bottom sounds hollow and the aroma fills the kitchen like a cozy blanket. Pro tip: Rotate the tray halfway through baking for an even color.
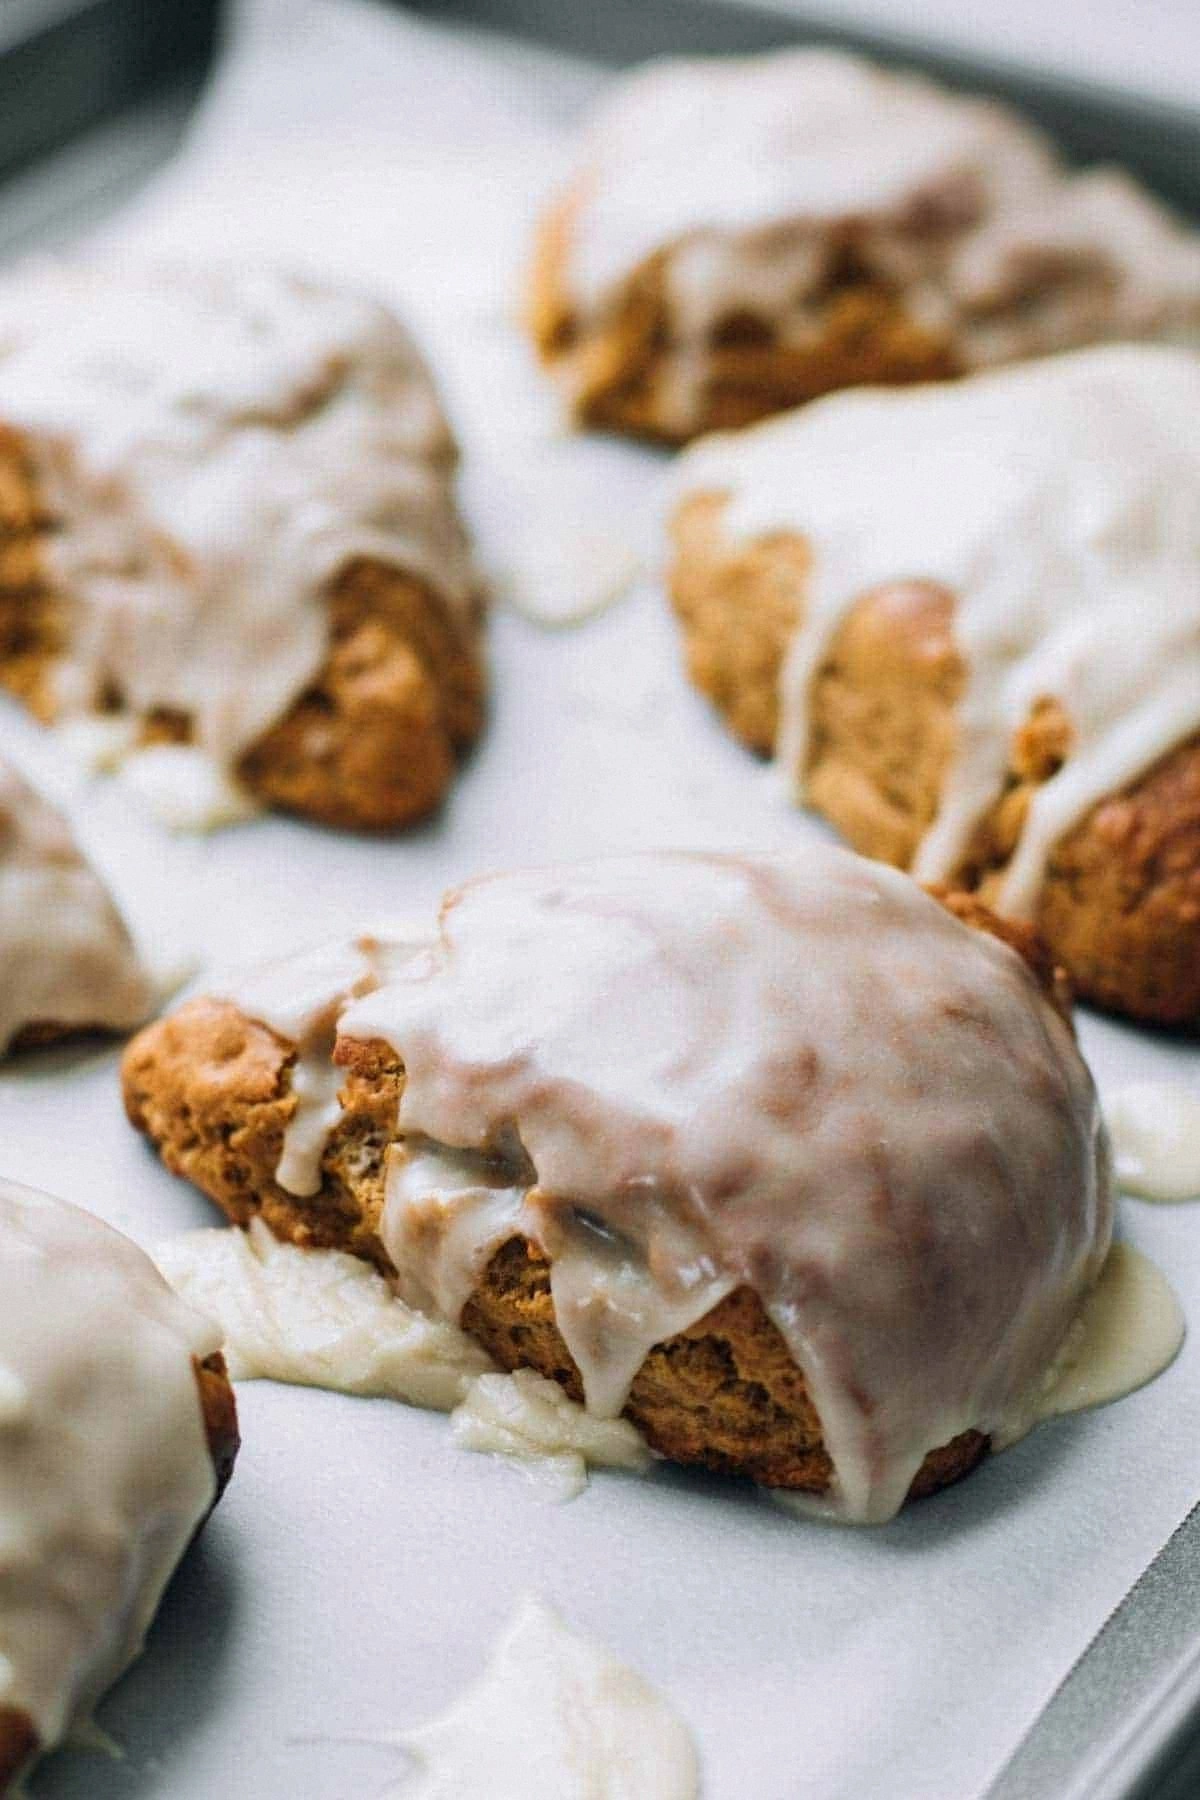
- While the scones cool on a wire rack, whip up the glaze. In a small bowl, whisk together 1 cup powdered sugar, 2 tbsp pure maple syrup, and a splash of milk (just enough to achieve a pourable consistency). The glaze should be glossy and drizzle‑ready—think of a waterfall of amber silk.
- Finally, drizzle the glaze over the warm scones. The heat will melt the glaze slightly, allowing it to seep into the crevices, creating a sweet‑salty crust that cracks beautifully as it sets. Let the glazed scones sit for five minutes before serving so the glaze can firm up. That first bite? Expect a buttery, flaky interior, a spiced, aromatic core, and a maple‑kissed top that makes your taste buds do a happy jig. That's it — you did it. But hold on, I've got a few more tricks that'll take this to another level…
Insider Tricks for Flawless Results
The Temperature Rule Nobody Follows
Never bake scones in a cold oven. Starting at a hot 400°F ensures the butter melts quickly, creating steam pockets that puff the dough. If you start low, the butter will soak into the flour, resulting in a dense, gummy texture. I’ve seen novices set the oven to 350°F and end up with soggy tops that never crisp. Trust the heat, and you’ll get that coveted golden edge that cracks like a fresh‑baked cookie.
Why Your Nose Knows Best
Your sense of smell is a far more reliable timer than any clock. When the kitchen fills with the scent of caramelizing maple and toasted spices, that’s the cue that the scones are near perfection. If the aroma fades before the timer’s up, pull them out a minute early; if it intensifies, give them a minute or two more. This sensory checkpoint prevents over‑baking and saves the delicate interior from drying out.
The 5‑Minute Rest That Changes Everything
After you pull the scones from the oven, let them rest on the rack for exactly five minutes before glazing. This short pause lets the steam escape, preventing the glaze from becoming soggy. The interior finishes its set, the crumb firms up just enough to hold the glaze without crumbling. Skipping this step leads to a glaze that slides off like water on wax—definitely not what we want.
Glaze Temperature Trick
If you whisk the glaze while it’s still warm from the stovetop, you’ll achieve a silky texture that spreads evenly. Cold glaze can clump, leaving unsightly streaks. I recommend warming the maple syrup in the microwave for 10 seconds, then mixing it with the powdered sugar; the result is a glossy river that hugs every curve of the scone.
The “Double‑Glaze” Finish
For an extra layer of decadence, drizzle a thin first glaze, let it set for two minutes, then apply a second drizzle of a slightly thinner glaze (add a splash more milk). The first layer creates a caramel crust, while the second adds a glossy sheen that catches the light—perfect for that Instagram moment. I dare you to try it and see how the texture evolves with each bite.
Creative Twists and Variations
This recipe is a playground. Here are some of my favorite ways to switch things up:
Apple‑Cinnamon Swirl
Swap half the maple syrup for unsweetened applesauce and add ½ cup finely diced dried apples to the dough. The result is a moist, fruity bite that pairs beautifully with the existing spice profile. Great for a fall‑inspired brunch.
Chocolate‑Covered Delight
After glazing, dip the bottom half of each scone in melted dark chocolate and sprinkle a pinch of sea salt. The bitter chocolate contrasts the sweet maple, creating a sophisticated flavor combo that will wow coffee‑shop connoisseurs.
Nutty Crunch Variation
Fold in ¼ cup toasted chopped pecans or walnuts into the dough before shaping. The nuts add a pleasant crunch and a buttery depth that complements the maple glaze. Toasting the nuts first intensifies their flavor.
Spicy Kick
Add a pinch of cayenne pepper or a dash of chili powder to the spice blend. This subtle heat lifts the sweet maple, creating a balanced sweet‑spicy profile that’s perfect for adventurous eaters.
Vegan Version
Replace the egg with a “flax egg” (1 tbsp ground flaxseed mixed with 3 tbsp water) and use plant‑based butter and almond milk. The flavor stays true, and the texture remains flaky. Just remember to keep the butter cold for that same lift.
Storing and Bringing It Back to Life
Fridge Storage
Store scones in an airtight container in the refrigerator for up to three days. Place a piece of parchment between layers to prevent sticking. When ready to eat, warm them in a preheated 350°F oven for 5‑7 minutes; the glaze will soften, and the interior will regain its fluff.
Freezer Friendly
Freeze unglazed scones on a baking sheet, then transfer to a zip‑top freezer bag for up to two months. To reheat, bake straight from frozen at 375°F for 12‑15 minutes, then glaze while still warm. The fresh‑out‑of‑the‑freezer taste rivals the original batch.
Best Reheating Method
For a quick revival, microwave a single scone for 15‑20 seconds, then splash a tiny drizzle of water on the top before a quick 2‑minute blast in a toaster oven. The steam generated restores the crumb’s softness, while the glaze re‑glazes itself to a glossy finish.