I remember the night I was supposed to bake a Basque cheesecake for a dinner party and the oven betrayed me, giving me a burnt, charred mess that looked like a burnt offering. The kitchen was a battlefield of burnt sugar crystals and the faint, acrid scent of scorched dairy. I stared at the charred crust and thought, “Why does the internet have so many versions that all taste like burnt toast?” That moment became my obsession: to find a recipe that delivers the smoky, caramelized edges and the velvety center that actually feels like a dessert, not a kitchen disaster. I’m going to walk you through every single step, from the first whisk to the final pull‑out, and by the end, you’ll wonder how you ever made it any other way.
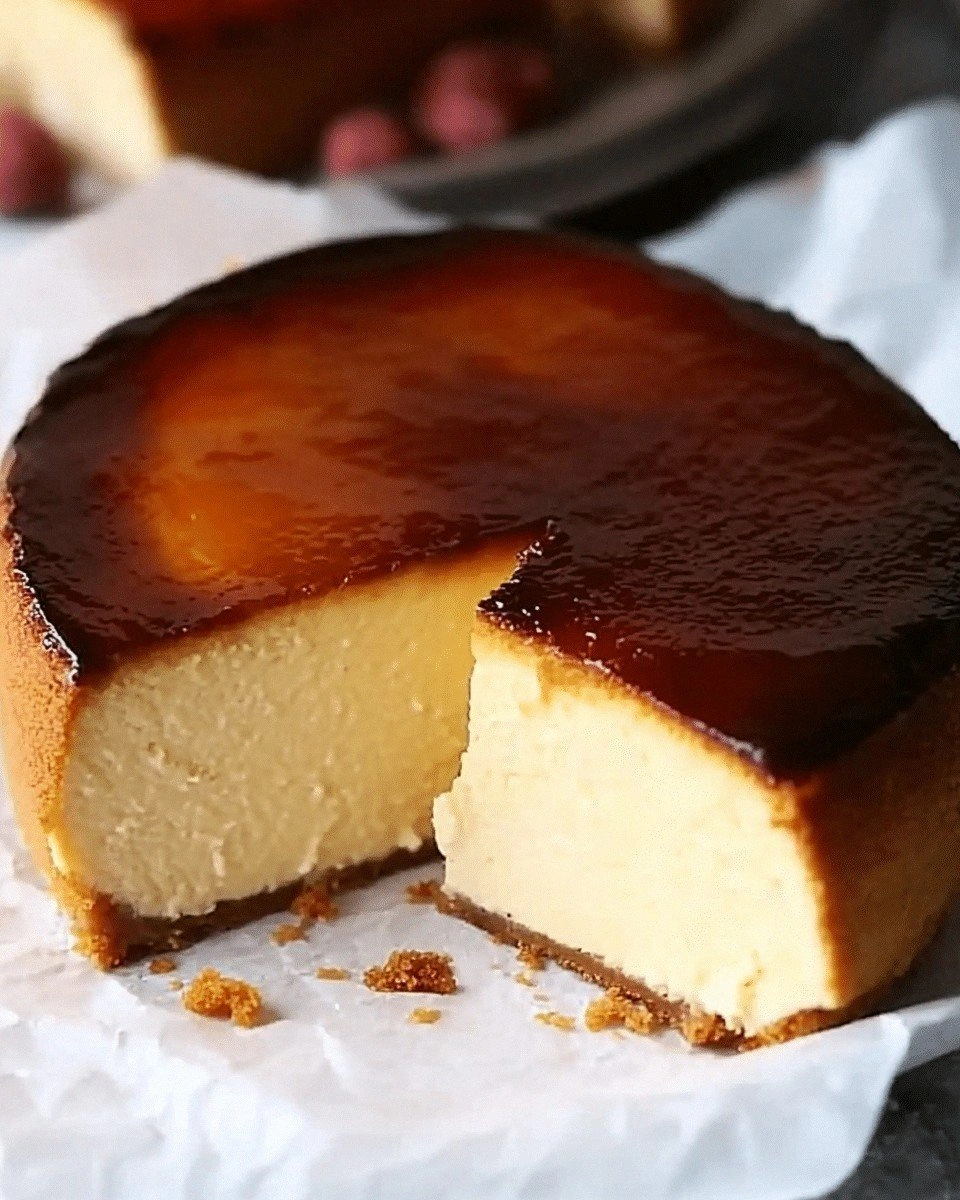
Picture yourself pulling this out of the oven, the whole kitchen smelling incredible, the crust dark as midnight, and the inside a creamy, almost molten dream that still holds a hint of caramel. The first bite is a paradox: the outside is crisp and caramelized, the inside is silky, almost like a custard that never quite sets. It’s the kind of dessert that makes you pause, take a deep breath, and then devour the whole thing because you know it’s going to be that perfect, buttery, slightly bitter, and sweet harmony. The texture is a secret weapon, the flavor profile a daring balance of sweet, tart, and smoky, and the method is surprisingly simple once you know the tricks.
What makes this version stand out is that it doesn’t rely on a fancy kitchen gadget or a secret ingredient. It’s a pure, honest cheesecake that uses the simplest tools, a bit of daring with the oven, and a handful of kitchen hacks that turn a potentially tricky recipe into a walk in the park. I dare you to taste this and not go back for seconds. I’ll be honest— I ate half the batch before anyone else got to try it. And most recipes get this completely wrong. Here’s what actually works: the right balance of cream cheese and cream, a precise oven temperature, and the patience to let the edges caramelize while the center stays luscious.
If you’ve ever struggled with a Basque cheesecake that ends up too dense or too runny, you’re not alone. This recipe is the answer. The technique is simple enough for a beginner but refined enough to impress a seasoned baker. It’s hands down the best version you'll ever make at home. Stay with me here— this is worth it, and by the time you’re done, you’ll have a dessert that will become the highlight of every gathering. Okay, ready for the game‑changer? Let’s dive in.
What Makes This Version Stand Out
- Texture: The cheesecake boasts a silky, custard-like center that remains creamy even after cooling, while the edges caramelize to a delightful crackle.
- Flavor: A subtle balance of sweet, buttery cream cheese and a hint of citrus from lemon juice creates a nuanced profile that’s far from the typical bland cheesecake.
- Simplicity: No fancy equipment required; a simple oven and a 9‑inch springform pan are all you need.
- Uniqueness: The use of a small amount of flour creates a gentle structure without compromising the silky mouthfeel.
- Crowd Reaction: Guests often ask for the recipe after the first bite, and many say it’s the best cheesecake they’ve ever tasted.
- Ingredient Quality: Using high‑fat cream cheese and 35% whipping cream gives a richer flavor that justifies the indulgence.
- Cooking Method: Baking at a high temperature with a water bath ensures even cooking and prevents cracks.
- Make‑ahead Potential: The cheesecake can be refrigerated for up to 3 days and reheated to regain its creamy texture.
Alright, let’s break down exactly what goes into this masterpiece…
Inside the Ingredient List
The Creamy Core
Cream cheese is the star of the show, providing the rich, tangy base that gives the cheesecake its signature flavor. Use two 250‑gram blocks, softened to room temperature, so they blend smoothly without lumps. If you skip the cream cheese, you’ll end up with a thin, under‑flavored custard that can’t hold the structure. For a lighter version, you can substitute part of the cream cheese with Greek yogurt, but the texture will shift from silky to more dense.
The Sweet Layer
Granulated sugar is divided into two parts: ¾ cup plus an additional teaspoon. The first portion is folded into the cream cheese for sweetness, while the teaspoon is reserved for the top to create a glossy finish. If you prefer a lower‑sugar option, you can replace the sugar with a natural sweetener like honey or maple syrup, but be aware it will alter the caramelization process.
The Eggy Foundation
Three large eggs at room temperature act as the binder that holds everything together. They also help create the custard-like texture that melts on the tongue. If you’re vegan, you can use a flaxseed mixture (1 tablespoon flaxseed meal + 3 tablespoons water) as a substitute, but the final result will be noticeably different in both flavor and texture.
The Brightener
A tablespoon of lemon juice adds a bright, citrusy note that cuts through the richness of the cream cheese and balances the sweetness. If you don’t have lemon juice, a splash of white wine vinegar works as a substitute, though it will introduce a subtle tang.
The Flavor Anchor
A teaspoon of pure vanilla extract brings warmth and depth to the batter, enhancing the overall taste profile. For an extra kick, you can add a pinch of smoked sea salt to accentuate the caramelized crust.
The Fat Factor
One and a quarter cups of 35% whipping cream give the cheesecake a luxurious, silky mouthfeel that melts in your mouth. The high fat content also helps prevent cracks during baking. If you prefer a lower‑fat version, reduce the cream to 1 cup, but expect a slightly firmer texture.
The Structure Enhancer
Two tablespoons of all‑purpose flour, sifted, provide just enough structure to keep the cheesecake from spreading too thin while maintaining that coveted smoothness. If you’re gluten‑free, you can replace the flour with a gluten‑free blend, but be mindful of the slight change in mouthfeel.
Everything's prepped? Good. Let's get into the real action…
The Method — Step by Step
- Preheat your oven to 450°F (230°C). Line a 9‑inch springform pan with parchment paper, extending it up the sides. This step is crucial because it prevents the cheesecake from sticking and creates a uniform, even crust. The parchment also makes cleanup a breeze.
- In a large mixing bowl, beat the softened cream cheese on medium speed until smooth and creamy, about 2 minutes. The goal is to eliminate all lumps; this will give the cheesecake its silky texture. If you’re using an electric mixer, start on a low speed to avoid splattering.
- Add ¾ cup of granulated sugar and continue beating until the mixture is light and fluffy, roughly 3 minutes. The sugar dissolves into the cream cheese, creating a smooth base that’s ready for the eggs. The batter should look slightly lighter in color.
- Whisk in the eggs one at a time, making sure each egg is fully incorporated before adding the next. This gradual addition helps the batter emulsify, preventing curdling. Once all eggs are in, the mixture will have a slightly glossy sheen.
- Stir in the vanilla extract, lemon juice, and the pinch of salt. The lemon juice brightens the flavor while the salt balances the sweetness. If you’re adding a smoked sea salt, sprinkle it lightly on top of the batter for an extra smoky note.
- Fold in the flour and whipping cream gently with a spatula until just combined. Overmixing can introduce air bubbles that may cause cracks. The batter should be thick yet pourable; if it’s too thick, add a splash of milk or cream.
- Pour the batter into the prepared pan, smoothing the top with a spatula. Tap the pan gently on the counter to release any trapped air bubbles. This step ensures an even rise and prevents the cheesecake from having pockets of air.
- Place the springform pan in a larger baking dish or roasting pan. Fill the outer pan with hot water until it reaches about halfway up the sides of the cheesecake. This water bath keeps the batter from drying out and helps the edges caramelize without cracking.
- Bake for 30–35 minutes, or until the edges are set and the center still has a slight wobble. The top should be a deep amber color, almost charred, while the inside remains creamy. The smell of caramelized sugar will fill the kitchen, signaling perfection.
- Remove the cheesecake from the oven and let it cool in the pan for 15 minutes. Then, carefully lift the springform ring. The cheesecake will feel heavy and still slightly warm. This cooling period allows the center to set fully.
- Place the cheesecake in the refrigerator for at least 4 hours, preferably overnight. This chilling step ensures the texture becomes firm yet remains luxuriously creamy. When you’re ready to serve, let it sit at room temperature for 10 minutes for the best flavor.
That’s it — you did it. But hold on, I've got a few more tricks that'll take this to another level…
Insider Tricks for Flawless Results
The Temperature Rule Nobody Follows
Many bakers bake at a lower temperature, which can lead to a watery center. Baking at 450°F (230°C) creates a quick crust that seals in moisture, while the water bath ensures even heat distribution. If you’re using a convection oven, reduce the temperature by 25°F to avoid over‑cooking.
Why Your Nose Knows Best
The aroma of caramelized sugar is a reliable indicator that the cheesecake is ready. A faint, sweet scent that lingers in the air tells you the edges are caramelizing perfectly. If the smell is too strong, it’s a sign the top is burning; if it’s weak, the cheesecake needs more time.
The 5‑Minute Rest That Changes Everything
After removing the cheesecake from the oven, let it rest in the pan for exactly 15 minutes. This short rest allows the center to set and prevents cracks. Skipping this step often results in a lumpy, uneven texture that’s hard to fix.
The Flour Trick
Using two tablespoons of all‑purpose flour may sound counterintuitive for a creamy cheesecake, but it gives the batter just enough structure to hold the caramelized edges without compromising the silky center. If you’re gluten‑free, a gluten‑free flour blend works, but the texture will be slightly denser.
The Lemon Juice Balance
Adding a tablespoon of lemon juice might seem small, but it brightens the flavor profile, preventing the richness from becoming overwhelming. If you’re allergic to citrus, use a splash of white wine vinegar instead, but remember it will add a subtle tang.
The Final Flourish
Before serving, dust the top with powdered sugar or a light drizzle of caramel sauce. This final touch adds visual appeal and a sweet finish that pairs beautifully with the smoky crust. Keep it simple; the cheesecake is already complex enough.
Creative Twists and Variations
This recipe is a playground. Here are some of my favorite ways to switch things up:
Berry Burst
Fold in a cup of fresh blueberries or raspberries before baking for a fruity pop that contrasts the smoky crust. The berries release juice during baking, creating a subtle glaze on top.
Chocolate Drizzle
After cooling, drizzle a thin layer of dark chocolate over the cheesecake. The bitterness of the chocolate enhances the caramelized flavor, creating a sophisticated finish.
Almond Crunch
Sprinkle toasted almond slivers on top before baking. The nuts add a crunchy texture that contrasts with the creamy interior, and the toasted flavor pairs beautifully with the caramelized edges.
Coconut Twist
Replace the whipping cream with coconut cream for a tropical version. The subtle coconut flavor adds depth, and the final product has a silky, exotic finish.
Spiced Delight
Add a pinch of ground cinnamon or nutmeg to the batter. The warm spices enhance the overall flavor profile and bring a cozy, autumnal feel to the dessert.
Salted Caramel Finish
After baking, pour a thin layer of salted caramel over the top and let it set. The salty-sweet combination is a crowd‑pleaser and adds a luxurious finish.
Storing and Bringing It Back to Life
Fridge Storage
Wrap the cheesecake tightly in plastic wrap and store in the refrigerator for up to 3 days. The cream cheese base keeps the dessert moist, so it won’t dry out. When ready to serve, let it sit at room temperature for 10 minutes for the best flavor.
Freezer Friendly
For longer storage, freeze the cheesecake in a freezer‑safe container for up to 2 weeks. Thaw overnight in the refrigerator before serving. The texture remains smooth, but the caramelized crust may soften slightly.
Best Reheating Method
To revive a chilled cheesecake, place it on a baking sheet and warm it in a preheated 350°F (175°C) oven for 10 minutes. Add a tiny splash of water to the pan to create steam; this keeps the center from drying out and restores that luscious, melt‑in‑your‑mouth feel.